Author Topic: Peanuts Master bow build  (Read 1511 times)

Offline Apex Predator

  • Trad Bowhunter
  • **
  • Posts: 3372
Re: Peanuts Master bow build
« Reply #20 on: September 15, 2009, 12:32:00 PM »
I just love Fullerplast!
I didn't claw my way to the top of the food chain to eat vegetables!

Offline metsastaja

  • TGMM Member
  • Trad Bowhunter
  • ***
  • Posts: 1165
Re: Peanuts Master bow build
« Reply #21 on: September 17, 2009, 07:21:00 PM »
wow coming along nicely pete. Can not wait to see it.
Les Heilakka
TGMM Family of the Bow  
Some times the uneventful nights are just as good if not better than the eventful ones

Offline talkingcabbage

  • Trad Bowhunter
  • **
  • Posts: 791
Re: Peanuts Master bow build
« Reply #22 on: September 20, 2009, 01:33:00 AM »
pete,

when you took the left twist out of the limb, you said you sanded the left side?  that's the part that always confuses me.  where on the limb did you sand (root, mid, or tip) and how much to take out that twist?
Joe

"If your work speaks for itself, don't interrupt."

One of two things will happen; it'll either work or it won't.

Offline Pennsyltuckey pete

  • Trad Bowhunter
  • **
  • Posts: 301
Re: Peanuts Master bow build
« Reply #23 on: September 20, 2009, 10:31:00 PM »
Joe,

I know what you mean about the confusion on which way to take the twist out of the limb.  

The process that I use to check the limbs is actually a lot more than what I went in to on the build along.

If there is any twist when I first string the bow the first thing I do is check the string nocks.  If the string nocks are not even on both sides of the limb you will end up with a twisted limb.  The next thing that I do is check how the string is resting in the string nocks.  These nocks are not smoothed and rounded so the string does not always find its natural center.  If the string is at all mis-aligned you will have twist.  Once I have determined that the limb is indeed twisted I un-string the bow and look at the twisted limb.  First I compare the right side to the left side.  Sometimes close inspection will reveal a small area where the limb is a little wider on the strong side.  In this case I sand down the wide spot to match the other side.  I also use a ruler that is marked in 1/64 of an inch and compare the width of the right and left halves of the limb to each other.  If I find a side that has a little more width I remove the extra material.  If I am unable to determine the actual cause of the twist using the above methods I will deepen the string nock on the strong side of the bow about a 1/16 of an inch. I then remove material from the strong side of the limb starting at the fade going all the way to the tip.  I then repeat the procedures listed before, and recheck the limb. I will do this at the most two times.  IF after that there is any remaining twist I take the bow strung with the tiller stick in place and place it on the ground where I can stand over it.  I eyball the twisted limb and try to determine where the twist starts.  Once I have determined that I mark it with a light pencil mark, un-string the bow, measure back from the tip to the mark and write the number down.  I then erase the mark.  Walk away from the bow for a while.  Return and do the same thing with fresh eyes.  If I find that the limb twist is starting at the same point I then un-string the bow and start sanding from about an inch back of the mark to the tip of the bow.  I take maybe a dozen strokes with 120 grit sand paper on a 12" sanding block and then re check the tiller.  It is one of those things that depending on the amount of twist I may take more but Do Move SLOWLY!  Like everyone says you cant put it back.


One thing to keep in mind when working on limb twist. Any change that you make will affect how the other limb rests.  Go slowly!

pete
Love one woman, Many Bows

Offline Pennsyltuckey pete

  • Trad Bowhunter
  • **
  • Posts: 301
Re: Peanuts Master bow build
« Reply #24 on: September 21, 2009, 05:15:00 PM »
Glen Newell of Austrilia contacted me on a PM and shared the following.  I like the Idea so I wrote Glenn back and asked if I could share his method of thinning the limbs.  I will try it on the next bow.

Glenn Wrote

     "G'day Pete, I was just looking at your buildalong on the recurve. When I shape up the limbs I use a hand held Makita planner with carbide blades. The planner goes through the fibreglass like butter and even after 10 bows the blades are still sharp, I just finish off to the line on the linisher. The other advantage of the planner as to the bandsaw is that the limbs stay cool through the whole process. I have shaped up over 200 hundred custom bows with the planner now and it only takes minutes to do. I did use the bandsaw once but I didn't it burnt the timber core and it seemed to be a painful exercise as compared to the planner. The bow you made on the buildalong looks real good...Glenn.."


I did ask Glenn if he put the bow in the vice or the plane and had he tried both.  The following was his response.

Glen Wrote

     "Pete I have mainly only ever mounted the bow in the vise and moved the palner down the limbs. I did try mounting the planer upside down once but I prefer to have the bow in the vise. I set the blades very course to get the bulk off but then set it fine to finish off.. I have never had any damage with splinters coming off the limbs but the blades must be tungsten carbide.
No worries about sharing the info in your build along...Glenn "

Thanks Glenn.

pete
Love one woman, Many Bows

Offline dutchwarbow

  • Trad Bowhunter
  • **
  • Posts: 326
Re: Peanuts Master bow build
« Reply #25 on: September 21, 2009, 06:46:00 PM »
nice!

I like to see how you use your tools, and I especially like your thickness sander. Do you have any buildalong of it? As I have plans for something similar.

your bow looks outstanding so far. Looking forward to updates!!

Nick
in the old days religion had it's use to keep nations together. Today, religion tears nations apart.

Nick

Offline Pennsyltuckey pete

  • Trad Bowhunter
  • **
  • Posts: 301
Re: Peanuts Master bow build
« Reply #26 on: September 23, 2009, 10:30:00 PM »
Has anyone got an extra camera?  I lost my camera so no pics right now.

All I can do is tell you that the nocks are being filed to shape.  TO start the process with the overlay and the lim pads in place I refile the original nock that is now filled with glue and then start shaping.

The first thing I do is to focus on perfecting the string path over the overlay and down the pad on the belly of the bow.  To do this I use a rat tail file and one of the small chain saw sharpening files.  As a guide to see how the string  paths are doing I use an old string.  The key here is to make sure that there are no sharp edges and the string can find its natural center on the loop.  Here are some pics from a previous bow that I built.


I sure hope I find that camera.

pete
Love one woman, Many Bows

Offline Pennsyltuckey pete

  • Trad Bowhunter
  • **
  • Posts: 301
Re: Peanuts Master bow build
« Reply #27 on: September 24, 2009, 09:16:00 PM »
Well, I found the camera!  Here are pics of how I carve/shape the nock.  After the groves are in the limb of the bow and the limbs are pulling straight and true I start the shaping process.  The first thing I do is use the rat tail to file the side of the nock away so I can shape the string grove nice and smooth from the back of the bow to the string pad on the belly.  This first cut is to get the excess wood out of the way.


After it is out of the way I then smooth the groove.  again I am constantly checking even and square with a string.  This photo shows the rounding process.


 This is what it looks like from the belly after one side is done.


I finish the both sides and then use a string to trace the location of the string on the string pad.  This shows the pad with the string in place and the groove traced.


Again the rat tail file is my tool of choice to groove the string pad.  I finish filing with a chain saw file.  You will also see that I have smoothed the sides of the nock "Extending" the cut of the string groove out to the tip of the bow limb.


I then make two last cuts to bring the tip to a point.


From here out it is sanding and smoothing to final shape.

Thanks for watching. As I said earlier there are lots of ways to do this.  This is just the way I do it.  If you have a different or easier way,  I would love to see it.

pete
Love one woman, Many Bows

Offline dutchwarbow

  • Trad Bowhunter
  • **
  • Posts: 326
Re: Peanuts Master bow build
« Reply #28 on: September 25, 2009, 03:58:00 PM »
Pete, this is excelent.


about the tips; Looking at the thickness of your string I'd suggest to remove 1/16" from each side of the tip, to reduce the tip-mass a little, but it might also make the tips look better. Right now they're 'semi-pinnocks', wich you may like, or not.

This is just my humble opinion  :)

Nick
in the old days religion had it's use to keep nations together. Today, religion tears nations apart.

Nick

Offline Pennsyltuckey pete

  • Trad Bowhunter
  • **
  • Posts: 301
Re: Peanuts Master bow build
« Reply #29 on: September 25, 2009, 11:44:00 PM »
Nick

Thanks for the suggestions.    The sharp edges have been curved and like you suggested the tip of the bow is going to be thinned/narrowed.  What is your favorite nock shape?  I am still trying to find one that I really like for my bows.

pete
Love one woman, Many Bows

Offline metsastaja

  • TGMM Member
  • Trad Bowhunter
  • ***
  • Posts: 1165
Re: Peanuts Master bow build
« Reply #30 on: September 29, 2009, 09:19:00 AM »
How about a picture of the finished product.
Les Heilakka
TGMM Family of the Bow  
Some times the uneventful nights are just as good if not better than the eventful ones

Offline dutchwarbow

  • Trad Bowhunter
  • **
  • Posts: 326
Re: Peanuts Master bow build
« Reply #31 on: September 29, 2009, 12:17:00 PM »
sorry pete, missed your question. But I like long, narrow overlays with nicely rounded grooves(in crossection).
 like these beauties by mike/jason westfang (dryadbows)

 http://dryadbows.com/All%20Natural%20Collection/images/BushWacker/BW12.jpg

no corners on my bows. None at all  ;)

Nick
in the old days religion had it's use to keep nations together. Today, religion tears nations apart.

Nick

Offline Pennsyltuckey pete

  • Trad Bowhunter
  • **
  • Posts: 301
Re: Peanuts Master bow build
« Reply #32 on: September 29, 2009, 10:04:00 PM »
Picture of the finished product is still a bit out there!  Lots of details to be filled in.  And Nick, thanks for the pic!  Someday I will get them that smooth!  I do like the curves!  I think I may just have to bring them in to play on the next bow.  Unfortunately this one is a little to far along to follow your lead. So to pick up where I left off...  

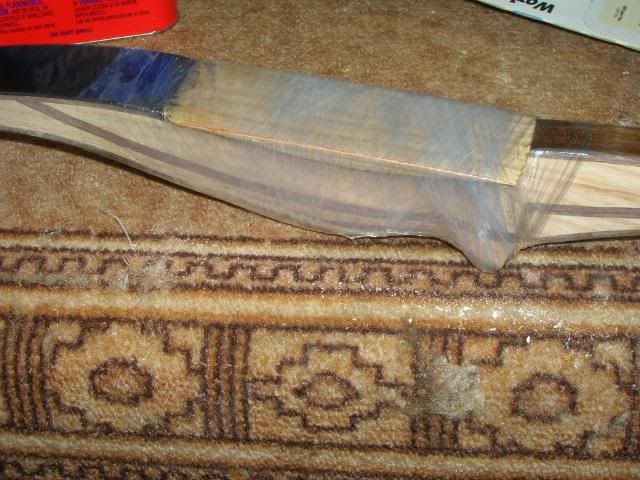
With the nocks roughed in so the tips are "close" to finished, it was time to finish the grip.  The part that was missing was a slender piece of wood that goes on the back of the bow to round out the glass.  The piece of wood that I cut out of the riser when I originally shaped it comes in to play and final fitted to the back of the bow.


Once the fit on this is light tight I tooth the wood with the 18 tpi hack saw blade, rough up the glass, smear everything with 20 minute epoxy and wrap it in clear plastic wrap to clamp it to the bow for 24 hours.


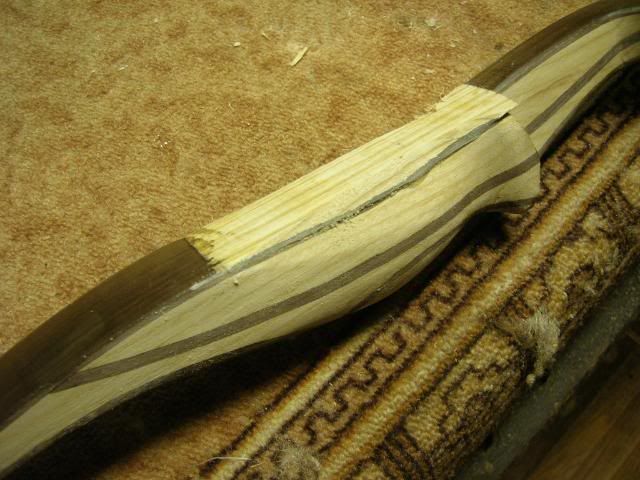
Ta Da Stripped of the plastic!


Aggressive use of files, sanding drums, sandpaper and other stock removal tools leaves me with a roughed in grip.


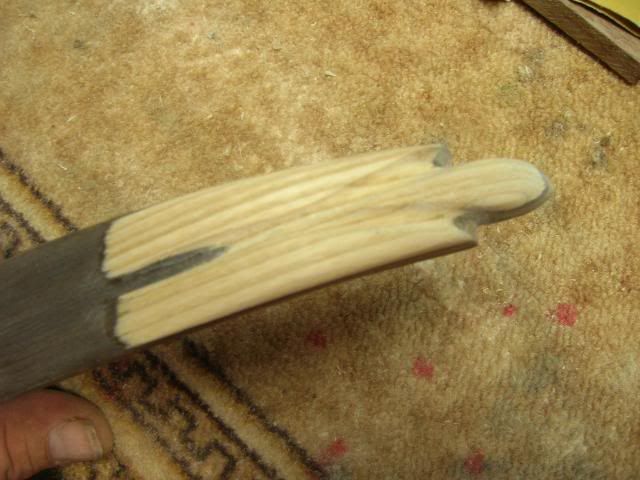
And then the finish shaping. This little piece of wood really makes a difference on the feel and fit of the bow.


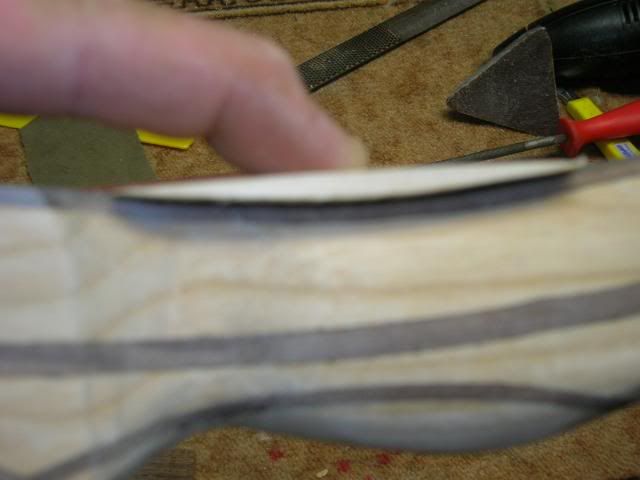
With the riser fitted it was time to go back and finish the tips. Here the limb pad has been final shaped and is ready for finish sanding.


final shaping of the phenolic tip overlay is completed and then the sanding starts.


The bow is close to done now.  Finish sanding and rounding of the limbs and then the application of the selected yet to be determined finish.

pete
Love one woman, Many Bows

Online kennym

  • TG HALL OF FAME
  • Trad Bowhunter
  • *****
  • Posts: 17318
Re: Peanuts Master bow build
« Reply #33 on: September 29, 2009, 10:09:00 PM »
Lookin good Pete,I been outta the loop here for a week!!
Stay sharp, Kenny.

   https://www.kennysarchery.com/

Offline Pennsyltuckey pete

  • Trad Bowhunter
  • **
  • Posts: 301
Re: Peanuts Master bow build
« Reply #34 on: September 30, 2009, 03:12:00 PM »
Got home today and had the requisite time to move Peanut ahead.  The work that needed to be done was the final tweaking of the tips and the riser.  This is more of a tuning thing that I do rather than something for aesthetics.  What I do is string the bow and check the tiller to make sure that the bow is pulling straight with the nocks finalized and then I shoot it.  This is where I do the "Shootability" test as my friend Greywolf calls it.  Is the bow shooting  where I am looking?  Is it kind to shoot?  Well the first time out I had arrows all over the place but mostly to the left.  What I did was remove just a touch of wood from the meaty part on the back of the riser so the bow would naturally pivot just a hair to the right in my hand. I also raised the brace height to 7" where it should have been to begin with.

I cleaned her up again and it was time to head outside.  Here are the first three shots after just the little bit of clean up.  These three shots were taken at 18 yards.


Did I mention that I want the bow to shoot with a variety of mis matched arrows? I was actually aiming just a skotch lower than I hit but that can easily be adjusted with the addition of a shelf pad, and the nock point. The bow felt smooth so it is now time for clean up and finish.  I am going to wimp out on this one and use the Minwax.

pete
Love one woman, Many Bows

Offline AkDan

  • Trad Bowhunter
  • **
  • Posts: 2119
Re: Peanuts Master bow build
« Reply #35 on: September 30, 2009, 03:34:00 PM »
very nice!  I'm sure your buddy will be pleasantly suprised!

Offline Marty

  • Trad Bowhunter
  • **
  • Posts: 833
Re: Peanuts Master bow build
« Reply #36 on: October 12, 2009, 01:55:00 PM »
It never ceases to amaze me the generosity of the folks involved in Traditional Archery. Pete came to Florida this past weekend to enjoy sonme of our record high tempeartures- it has been flat out brutal!!! I arrived at camp on Friday afternoon, and was getting ready for the afternoon baking in a tree and was handed this bow! Wow- I was shocked, especially when I see the time and effort put into a custom bow and to realize the ability it takes to make one. I have no such talent.

We played with the bow, but we all wanted to hunt so I really haven't had the time to tune the bow and practice with it before it gets in a tree with me. All I can say is that it shoots as sweet as any bow I own and I can't wait to give it a try. Pete will be here all week and when I get back this weekend maybe the temperature will drop enough to make ya wanna shoot in the yard. Last week was that brutal- even with a new toy to play with! Not only is Pete a talented bowyer, but he knows his way around a swamp buggy mechanically. As I left camp on Sunday morning, my steering box bolts were broken and he was busy taking off the old and saying- no  worries, by the time you get back- it will be all back together! Definitely a handy fella to have around!!!

A mere thanks seems a little short!!!

Offline Pennsyltuckey pete

  • Trad Bowhunter
  • **
  • Posts: 301
Re: Peanuts Master bow build
« Reply #37 on: October 22, 2009, 06:05:00 PM »
I finally got down to Florida and had a great time hunting.  One of the fun parts of the trip was turning to Marty and handing him the bow and saying "Hey this is for you."  Yes we had a blast and I even managed to kill a pig.  

Marty is the skinny one on the left.


pete
Love one woman, Many Bows

Offline tradtusker

  • TGMM Member
  • Trad Bowhunter
  • ***
  • Posts: 3820
Re: Peanuts Master bow build
« Reply #38 on: October 28, 2009, 08:52:00 AM »
very nice! congrats on the howg
There is more to the Hunt.. then the Horns

**TGMM Family of the Bow**


Andy Ivy

Offline dutchwarbow

  • Trad Bowhunter
  • **
  • Posts: 326
Re: Peanuts Master bow build
« Reply #39 on: October 28, 2009, 07:50:00 PM »
More pictures?  :)  looks like one hell of a bow!

you bet I'm jealous of the new owner!

Nick
in the old days religion had it's use to keep nations together. Today, religion tears nations apart.

Nick

Users currently browsing this topic:

0 Members and 1 Guest are viewing this topic.
 

Contact Us | Trad Gang.com © | User Agreement

Copyright 2003 thru 2024 ~ Trad Gang.com ©