Author Topic: New r/d  (Read 438 times)

Offline mzombek

  • Trad Bowhunter
  • **
  • Posts: 122
New r/d
« on: February 01, 2014, 10:04:00 AM »
I am in the process of starting a r/d build from the plans that purchased from Kenny M last year. I have my form built, but I am not sure how to create the radius on the riser to fit the lams that will be sandwiched between the form and the riser. I see that all of the pics here have really good glue lines.
Can you help me out?
Thanks,
   Z

Offline fujimo

  • Trad Bowhunter
  • **
  • Posts: 3619
Re: New r/d
« Reply #1 on: February 01, 2014, 10:10:00 AM »
kenny uses some kind of a radius jig. this is what i did. i took the glass and the lams taped them down to the form in the riser area- then i placed my riser block behind it and drew on my profile( in fact i made a pattern the same way from some 3/8" plexiglass- just what i had lying around.
 cut out and sanded to fit- removed the tape that i was holding the lams down with first obviously, and just kept pushing the riser onto the setup and checked for fit. maybe if you would like i can take a few photos for you, if you want.
just what i did- i didnt have a radius jig for my saw.
there will be lotsa other ways to do this too. the good folk on here will start dropping in...round about now!!!

Offline mzombek

  • Trad Bowhunter
  • **
  • Posts: 122
Re: New r/d
« Reply #2 on: February 01, 2014, 10:21:00 AM »
That would be great fugimo if you could put the pics up so I could take a look at them

Offline heartlandbowyer

  • Trad Bowhunter
  • **
  • Posts: 664
Re: New r/d
« Reply #3 on: February 01, 2014, 10:22:00 AM »
Your radius shouldn't change with your lams just the location of it. I typically clamp my riser block to the form so the form is my template, I then trace the back side of the riser and cut the riser close to the line and sand to fit. I then mark my belly ramps cut and sand the fade to a feather edge.

You can then do you pre glue fit up in the form and check your lines before you glue. Glue lines and fades take some practice.

Good luck, you'll get there.
Cory

Online kennym

  • TG HALL OF FAME
  • Trad Bowhunter
  • *****
  • Posts: 17318
Re: New r/d
« Reply #4 on: February 01, 2014, 10:36:00 AM »
The radius does change on this one because of the .002 taper on back under riser.

If you have the 58/60, a 29" radius will be really close to fitting. The 62/64" takes 27" R

Every form may be a little different depending on  how the template lined up.

So you can do like Wayne said and make a template, or make a swing jig for your bandsaw .

Dry run anyway, and if you only do the back of the riser first, you can clamp it with a quick clamp to check fit without breaking your nicely ground fades.  Then when you like the fit, cut and grind the fades on belly side, and never do anymore to the back.

Remember if you use a swing jig, the riser tips will be off the lams for an inch or so due to geometry of limbs and riser radius. It will squeeze right down when you glue up as long as you make the riser fades 1/16" at 1 inch from end and 1/8" + (.140" is what I shoot for) at 2"

Call me if you run into probs!!   :)
Stay sharp, Kenny.

   https://www.kennysarchery.com/

Offline heartlandbowyer

  • Trad Bowhunter
  • **
  • Posts: 664
Re: New r/d
« Reply #5 on: February 01, 2014, 11:03:00 AM »
10/4 on the Rad getting larger with the taper. Ive been thinking about making a riser jig with some steel banding on it. I could then throw a washer on my spindle sander and have e sanded edge that fits the form perfectly every time, should cut shaping time significantly.

Offline EHK

  • Contributing Member
  • Trad Bowhunter
  • ****
  • Posts: 265
Re: New r/d
« Reply #6 on: February 01, 2014, 05:38:00 PM »
I do like Wayne and Cary said...trace the riser off of the bow form and then cut and sand to shape.  It can take some back and forth but just remember to remove material slowly and you'll be fine - go too fast and you can't put material back.  (I might have done that once).

I have been thinking about making a radius jig for my band saw though.  Seems like it would simplify things for sure.

Don't be afraid to get started.  I'm far from a master craftsman and I have a couple of Kenny style bows under my belt now and both are excellent shooters.  They may have some battle scars, but they still shoot.  Just take your time.  Do that dry run until everything looks good.  Think and plan things through.  Impatience is your worst potential enemy.

Good luck and enjoy the addiction.

Eric

Offline fujimo

  • Trad Bowhunter
  • **
  • Posts: 3619
Re: New r/d
« Reply #7 on: February 01, 2014, 06:14:00 PM »
this is what i do, here are the pics i promised you- seems like the radius curve will be easier and quicker- i have a big resaw blade on my saw- and dont like changing them out- so here is what i have done for my two glass bows.
   
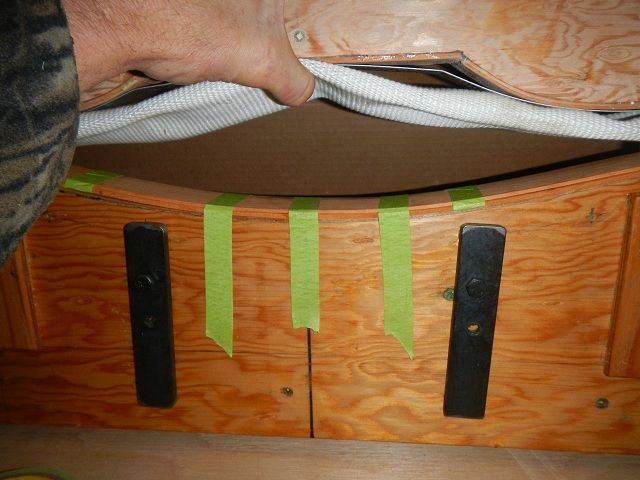
lay down your glass and lams that are going on the back of the riser, tape them down tight. draw a template pattern, with a very sharp pencil- no pen- as it will give you an off set mark.
i tape a lot more places- just did a few for the pic- make sure they are up snug!!
now when you make your template- you will have to accommodate for the tape- so maybe retape it in different places- and draw in the missing line sections!
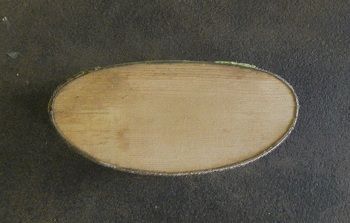
i then combined that with the belly side profile from kennys plans, and you can see i just made the  back a complete radius- guess i could have followed the profile out towards the fades- -just like kenny mentioned in his post above.
   

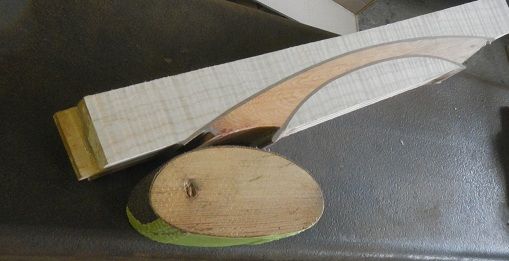
then i made a good sanding block- so i have  3 different radii to suit different needs
   
\\could have made it with 4 different radii- well...next time!!
i used some 36 grit paper off cuts from my lam grinder- or any good fabric backed sandpaper off your belt sander etc, and i taped it inside and outside with some tape,so its now like a mini belt. so now i can take the sand paper "belt"off and the block, rotate its position, so that the paper is in the correct place, and the tape is against my hand

VERY IMPORTANT.make sure the sides of your block are 90 degrees.
   
now after i have cut my shape on the band saw, and rough ground on the spindle sander- i can finish sand by hand.
putting the riser flat down on a surface, and the sanding block too- and then while sanding - everything stays 90 degrees.
then keep taking it back, and  checking on the form- except now you have taken the tape off the lams, and are checking for good fit against the lams.

then...as kenny says cut out your ramps and sand and feather them, what i do here is take the block of wood that i cut off the back radius- and tape it to the riser in the middle-so now my feathering has some support- so i dont bust it.

all make sense?? i am confused reading my own ramblings!!     :confused:        :knothead:

Offline mzombek

  • Trad Bowhunter
  • **
  • Posts: 122
Re: New r/d
« Reply #8 on: February 01, 2014, 07:47:00 PM »
Thanks everyone for this info, very helpfully. Thanks for the pics fujimo.

Users currently browsing this topic:

0 Members and 1 Guest are viewing this topic.
 

Contact Us | Trad Gang.com © | User Agreement

Copyright 2003 thru 2024 ~ Trad Gang.com ©