3Rivers Archery


The Trad Gang Digital Market


Contribute to Trad Gang and Access the Classifieds!

Become a Trad Gang Sponsor!

Traditional Archery for Bowhunters


LEFT HAND BOWS CLASSIFIEDS TRAD GANG CLASSIFIEDS ACCESS RIGHT HAND BOWS CLASSIFIEDS


Author Topic: Making a carousel fletching table with PICS  (Read 775 times)

Offline dino

  • Trad Bowhunter
  • **
  • Posts: 1081
Making a carousel fletching table with PICS
« on: August 10, 2008, 08:51:00 AM »
I just made a new carousel fletching table and decided to post a little how to/build along out of it.  
 

The basic material list is:
4x4 3/4" birch plywood
2x2 3/4" birch plywood
2x2 3/16 hardboard
3 heavy duty casters
1/2x6 black pipe nipple
1/2 black pipe floor flange


The 3/8" carbide spiral cutter is for cutting the tables out.


The table will be 36 diameter table 4x4 sheet is cut to 37" square and the center is marked for the circle cutting jig.  My circle cutting jig has a 3/4" dowel for the pivot point, so I drill a 3/4 hole in the center of the to be table top for the jig.


Once the top table is cut, I reset the circle cutting jig to 12" center for the 24 base and hardboard circle.  Again mark the center of each, drill a 3/4 hole drop in the circle cutting jig and cut them out.  So when finished you have a 36" top, 24" base and a 24" hardboard circle that will be the glidding surface for the casters. From here the top and the base got finished.  Sand the edges really good.  The base got about 4 coats of poly and the top about 6 or 8.  I spray thin coats, sand with steel wool in between to give a pretty hard finish.  More to come...
"The most demanding thing you can ask of a piece of wood is for it to become an arrow shaft. You reduce it to the smallest of dimension yet ask it to remain it's strongest, straightest and most durable." Bill Sweetland

Offline dino

  • Trad Bowhunter
  • **
  • Posts: 1081
Re: Making a carousel fletching table with PICS
« Reply #1 on: August 10, 2008, 09:04:00 AM »

After the top and the base are finished drying, laminate the hardboard to the bottom of the table top. The hardboard just provides a smooth surface for the casters to run against when the table is turning.  I coat both surfaces with titebond II and use some 3/4" crown staples to hold it in place.


The bottom of the 24" base gets four feet mounted to the bottom.  I just dug thru the scrap bin and found a piece of poplar and cut four 3x4x3/4 block.  Nothing fancy, just functional.


Once the feet are on, flip the base over and mount the casters and the floor flange.  The floor flange is mounted right over the center hole that the circle cutting jig used and the 1/2 black pipe is not the center rotation point for the table.  Casters are mount at 3 equal intervals on the base.


With the base completed the table top is set on the base.  Now time for the fletching jigs....
"The most demanding thing you can ask of a piece of wood is for it to become an arrow shaft. You reduce it to the smallest of dimension yet ask it to remain it's strongest, straightest and most durable." Bill Sweetland

Offline dino

  • Trad Bowhunter
  • **
  • Posts: 1081
Re: Making a carousel fletching table with PICS
« Reply #2 on: August 10, 2008, 09:40:00 AM »


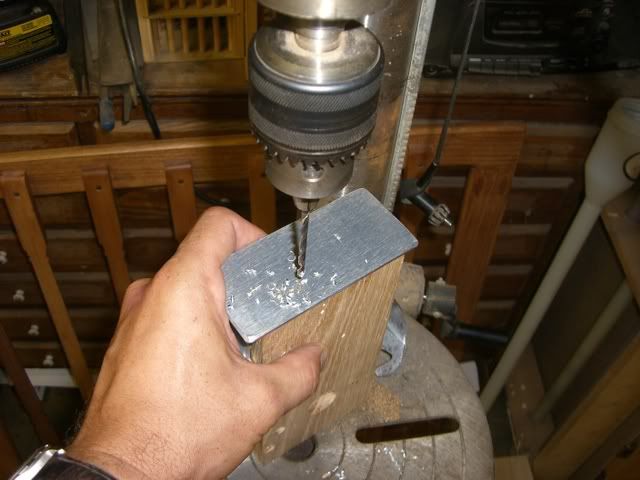
This is a 24 jig table of Bitzenburg jigs.  Each base has to be drilled for the mounting screw to secure it to the table.  The all of the jig bases are set on the table to work on the arrangement.
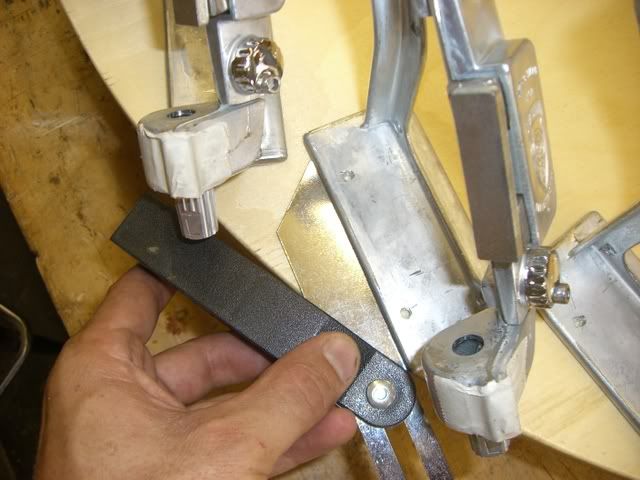
 

I found that 43 degrees from the tangent is a good working position.  This part is some measurement and alot of "eyeball work".  Each base is set around the table and a 36" accommodates 24 jigs TIGHT.  They are set a the 43 degrees and spaced till there is a equal space between each jig.  The angle gauge sets the angle of the base and the spacing between the bases also.
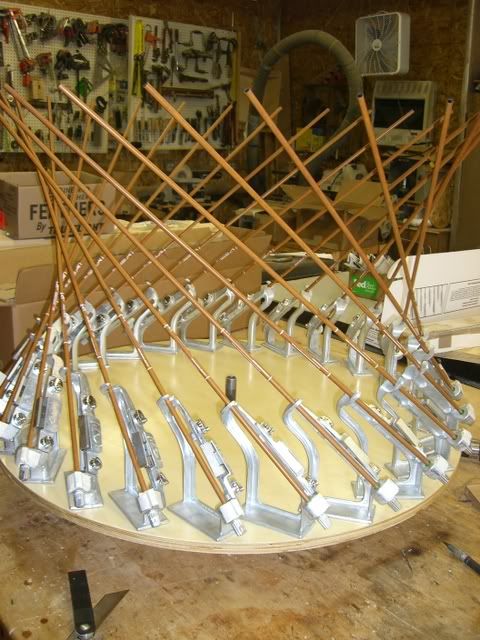
 

Once the spacing is down, I put a shaft in each jig and tweak each one till you have perfect spacing between the shafts in the circle and then drill in the mounting screws in the jig bases to hold them in place.  This is the real "eyeball work".  This proper spacing allows for adjustment screws on each jig to be acessed easily and freely along with each arrow being able to be inserted and removed from the jig without interferance from the next.  Everything is close and tight but remains accessable.
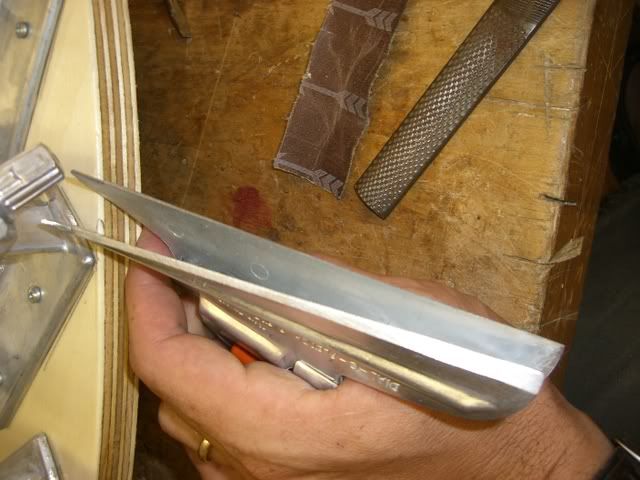
 

Each clamp need to be deburred.  I open the clamp up and run a file of 50 grit paper down the inside  of the clamp edge.  There is a very sharp burr on the inside of each clamp when they are new.  After the burr is taken off and the edge is smooth I apply teflon jig release tape to each jig.  That stuff is amazing.  Doesn't allow any glue to stick to your clamp.  Lastly each clamp is paired with a base at this point.  I tighten the magnet, adjust the top and bottom sets on the jig and number each clamp to jig base.  As much as you think everyone is the same they each have their own tweak so I number all of them so the same clamp is always on the same base.
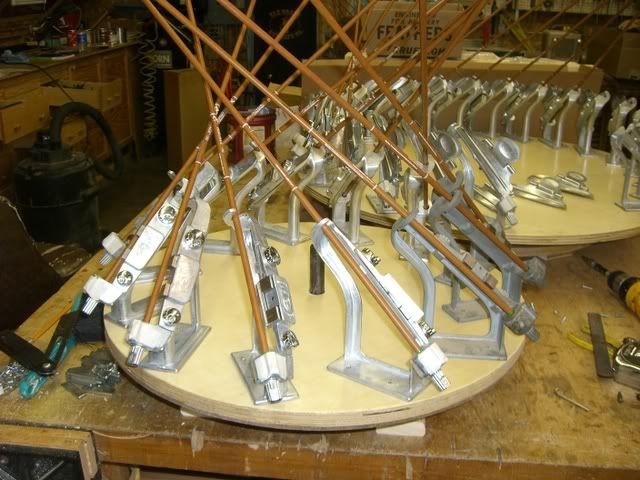
 

This is a 12 fletcher carousel that I made at the same time for my right wing jigs.  Made the same just scaled down slightly.  24" table top made a little more room between the jigs but everything else is the same.  The angle was modified to bring the arrows in toward the center a little.  A few more pics to come when I get them uploaded....
"The most demanding thing you can ask of a piece of wood is for it to become an arrow shaft. You reduce it to the smallest of dimension yet ask it to remain it's strongest, straightest and most durable." Bill Sweetland

Offline Jerry Jeffer

  • Trad Bowhunter
  • **
  • Posts: 3676
Re: Making a carousel fletching table with PICS
« Reply #3 on: August 10, 2008, 09:49:00 AM »
Dino, looks awesome! Nice looking shop too.
I will give thanks to the LORD because of his righteousness and will sing praise to the name of the LORD Most High.

Offline **DONOTDELETE**

  • Trad Bowhunter
  • **
  • Posts: 10441
Re: Making a carousel fletching table with PICS
« Reply #4 on: August 10, 2008, 10:11:00 AM »
Great looking, Thanx for sharing

Offline yellow bow

  • Trad Bowhunter
  • **
  • Posts: 2097
Re: Making a carousel fletching table with PICS
« Reply #5 on: August 10, 2008, 10:57:00 AM »
looks great,better than some of the ones i've seen in local pro shops.

Offline b.glass

  • TGMM Member
  • Trad Bowhunter
  • ***
  • Posts: 3098
Re: Making a carousel fletching table with PICS
« Reply #6 on: August 10, 2008, 11:07:00 AM »
WOW!!!!!!
B.Glass, aka Mom, aka Longbowwoman
Gregory R. Glass Feb. 14th, 1989-April 1st, 2007; Forever 18.
TGMM Family of The Bow
Mark 5:36 "Don't be afraid, just believe".

Users currently browsing this topic:

0 Members and 1 Guest are viewing this topic.
 

Contact Us | Trad Gang.com © | User Agreement

Copyright 2003 thru 2024 ~ Trad Gang.com ©