INFO: Trad Archery for Bowhunters


Author Topic: Making a simple pouch type sheath.  (Read 1430 times)

Offline D.Ellis

  • Trad Bowhunter
  • **
  • Posts: 956
Making a simple pouch type sheath.
« on: January 03, 2015, 09:56:00 PM »
Finally got around to doing this.......my apologies for the long delay. Also trying to figure out my new camera, so some of the pics are not great. Hopefully they will do the trick though.

This is the way I build a simple welt style pouch sheath.......I build this type for anything without a cross guard.
As always, I am not an expert at this, so if anyone has any tips or tricks at any stage that is an improvement over my methods, feel free to pipe up and share the knowledge.   :campfire:

Let's begin.
First I make a tracing on thin cardboard(cereal box works great for this) of the blade. Then I add a border all the way around for the welt. In this case I am making the welt 5/16" wide. Make sure the widest part of the blade will pass the narrowest point between the welts.


Then I cut around the outside of the "welt" line to get a template of the sheath to be.


Preview of the sheath. I went with a nice deep sheath for this one.

 
60# GN Lil'Creep Jackknife
67# osage selfbow
62# "Zang Hill" string follow

Offline D.Ellis

  • Trad Bowhunter
  • **
  • Posts: 956
Re: Making a simple pouch type sheath.
« Reply #1 on: January 03, 2015, 10:13:00 PM »
Cutting out the top and bottom of the sheath......using the template as a pattern. Remember to flip the template over or you'll end up with 2 identical pieces........


After cutting the top and bottom out, I use scissors to cut the welt portion of the template away.


And then trace around the template on the flesh side of the top and bottom to mark out where the welt will be glued on.


And slice a bunch of strips for the welt.
Here're the components.


Now I determine if the sheath is to be right or left handed and prepare the top side for tooling. I wet the leather with a warm, damp cloth.......I don't soak it down heavy, but I want the leather to take the tooling well, so it needs the moisture to go fairly deep. Just keep dampening it with the cloth. I am not going to go into detail on carving or tooling, as there are so many different methods for that. I used a chunk of knarly elk antler and rolled/pressed it into the leather surface, and then took a modeling tool and made some sweeping grooves over that.


60# GN Lil'Creep Jackknife
67# osage selfbow
62# "Zang Hill" string follow

Offline D.Ellis

  • Trad Bowhunter
  • **
  • Posts: 956
Re: Making a simple pouch type sheath.
« Reply #2 on: January 03, 2015, 10:23:00 PM »
Grooving the top side where the stitching will go.
I want it grooved deep enough that the stitching will be protected from abrasion.


And marking for the holes.


At this point I want to dye the leather. Any part of the leather where the glue will go gets pre dyed otherwise the contact cement will prevent the dye from taking and leave ugly light blotches.

 
Inside of the sheath.........pre dye those edges before glue up.


Pre dye the welt pieces and glue them on.....I am gluing them to the back half of the sheath, but you could glue them to the front. You can see that I have dyed the cut end of the welt where it will butt up against the welt that is already glued on.

 
60# GN Lil'Creep Jackknife
67# osage selfbow
62# "Zang Hill" string follow

Offline tomsm44

  • Trad Bowhunter
  • **
  • Posts: 1340
Re: Making a simple pouch type sheath.
« Reply #3 on: January 03, 2015, 10:23:00 PM »
Quote
Originally posted by D.Ellis:
Remember to flip the template over or you'll end up with 2 identical pieces........
True story.
Matt Toms

Flatwoods Custom R/D:  64", 47@28
'66 Kodiak: 60", 55@28
Redwing Hunter:  58", 53@28
Ben Pearson 709 Hunter:  58", 47@28
Ben Pearson 709 Hunter:  58", 42@28
Hoots Recurve:  56", 42@28

Offline D.Ellis

  • Trad Bowhunter
  • **
  • Posts: 956
Re: Making a simple pouch type sheath.
« Reply #4 on: January 03, 2015, 10:36:00 PM »
Now I lay the knife in there and mark with my fingernail where I want to glue the next layer of welt on.


Continued up till I think it is thick enough. This is something that comes with experience. If you make it too thick, the knife will be loose in the sheath. Too thin and it will be too tight. I prefer a bit too snug since there are ways to loosen it, but no way to tighten it up. More on this later.


Tapering the built up welt. I use a razor knife, but it's also possible to use a contact wheel on the belt grinder to taper the welt down.


Dye the welt where it has been tapered down, and glue on the top of the sheath.


Making the belt loop piece. Pretty simple. 2 connected with a slot on each side.


Bevel the slots on the outside. where the belt will enter.


And inside where the belt will pass thru.

 
60# GN Lil'Creep Jackknife
67# osage selfbow
62# "Zang Hill" string follow

Offline D.Ellis

  • Trad Bowhunter
  • **
  • Posts: 956
Re: Making a simple pouch type sheath.
« Reply #5 on: January 03, 2015, 10:52:00 PM »
Pre dyed and marked where the glue will go.


After the belt loop is glued on I try the knife in the sheath. If it is very tight, it may be wise to pull it apart and add a bit more thickness to the welt. The stitching will tighten it up a fair bit.......again, this is something that you get a feel for after a while.

Time to drill for the stitching.
I am using my drill press with a block of wood under the sheath. The drill bit is 5/64" which makes a good fit for the Tandy Tejas thread I will be using.
A few tips for this. Try not to keep flipping the sheath over to check progress, as consistency of hold and angle will affect where the drill comes out on the backside of the sheath.
Try to let the sheath sit flat on the wood in the position it wants to sit most stable........ it will be more consistent and that's key to straight stitching on the back of the sheath.
Use the highest speed your drill press is capable of, and don't force the drill through, let it cut. If you push it too hard you risk the drill wandering off course.

Here in this pic you can see the drill bit exiting at the edge of the belt loop piece.......red arrow.


This is important so the thread will hold that edge down nicely and stay low in the grooves. Here again you see that. Still need to groove the stitch holes in this pic.

 
60# GN Lil'Creep Jackknife
67# osage selfbow
62# "Zang Hill" string follow

Offline ymountainman

  • Trad Bowhunter
  • **
  • Posts: 299
Re: Making a simple pouch type sheath.
« Reply #6 on: January 03, 2015, 11:13:00 PM »
Thanks for posting Darcy this is a big help.

Offline D.Ellis

  • Trad Bowhunter
  • **
  • Posts: 956
Re: Making a simple pouch type sheath.
« Reply #7 on: January 03, 2015, 11:17:00 PM »
Connect the dots on the back of the sheath with the grooving tool and groove front and back a bit extra deep where you plan for the stitching to end........I forgot to take a pic of this.

Time to do the stitching. I use between 7 and 8 times the length of the total stitch length of thread......so if the row of stitching is 5 inches long, I will use 35 to 40 inches of thread.........maybe a bit less if the sheath is thin. It's not cool to get almost to the end of the stitching and find out your thread is too short.

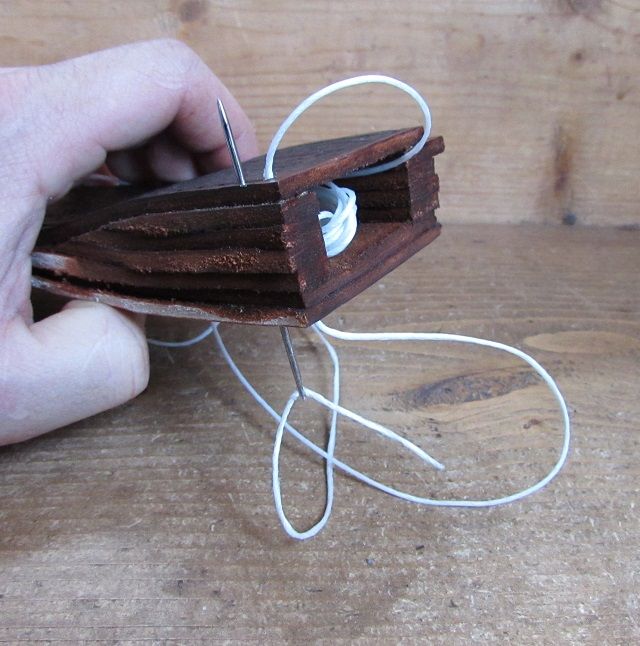
Find the center of the thread, pull the first half through to the mid point and roll the other half up and tuck it inside the sheath to keep it out of the way.


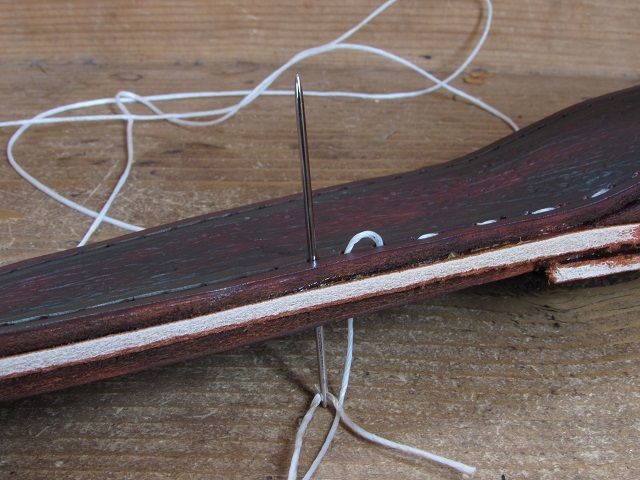
Pics are better than words here I think. Pull the thread as snug as you can.


I thread the first half all the way to the far end and then take the second half and thread it up where the first one went down and down where the first came up.


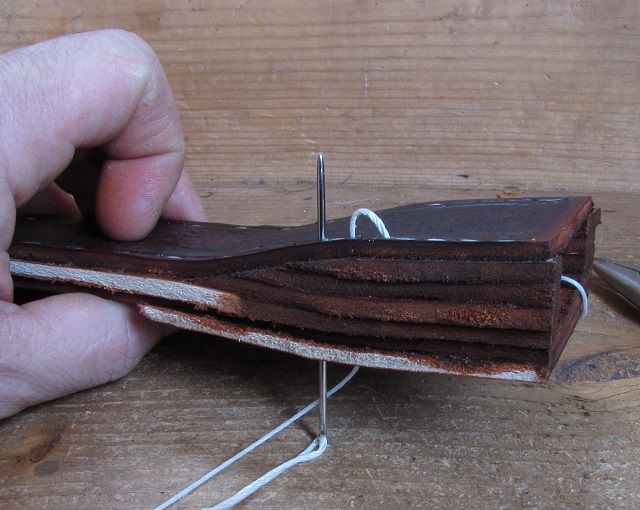
At the end where the 2 threads meet. I tie an overhand knot and run the tag ends back down and head back towards the starting point. The stitching will be doubled up in the grooves......fortunately we made the grooves slightly deeper here to make room for the extra.


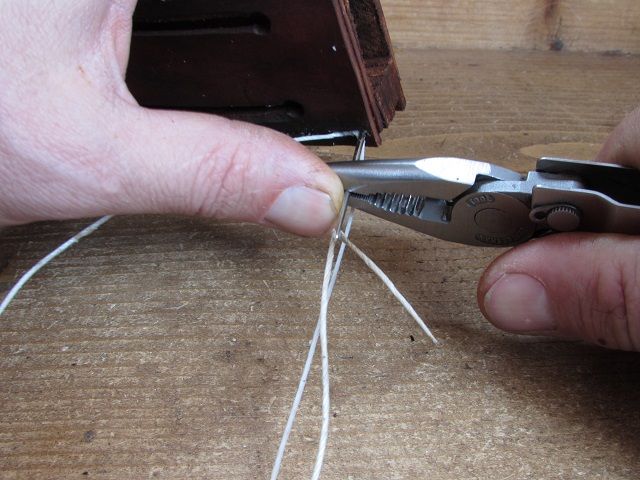
I find this to be a good way to get the needle through the holes when they are snug, and during the last few stitches it should be quite snug. Grip the needle with a pair of pliers, and use your thumb to push the pliers so the needle passes through the hole.


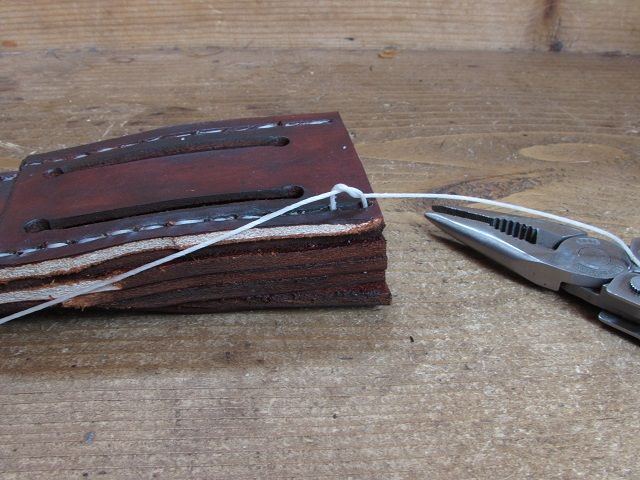
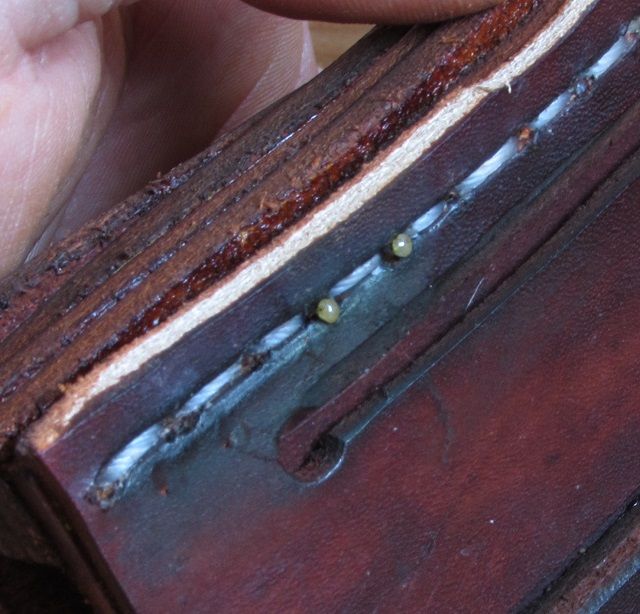
After going over the stitching for 3 or 4 holes, pull the tag ends as tight as possible, cut the remainder off about 3/16" long and melt the ends back using the side of the lighter flame.


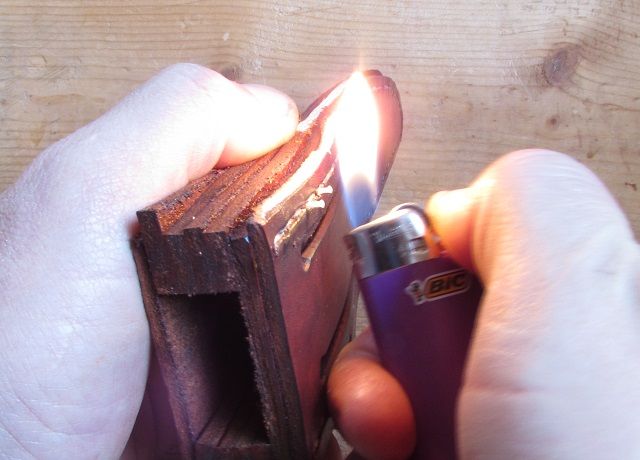
The thread will melt into little beads that will not be easily pulled back through the holes.

 
60# GN Lil'Creep Jackknife
67# osage selfbow
62# "Zang Hill" string follow

Offline tomsm44

  • Trad Bowhunter
  • **
  • Posts: 1340
Re: Making a simple pouch type sheath.
« Reply #8 on: January 03, 2015, 11:28:00 PM »
This is great information.  After I burn the tag ends on mine, I also add a small drop of water thin super glue to each one.  You want it thin so it will soak into the thread in the hole and you don't get a big chunk of dried glue on the back of your sheath.  Probably not necessary, but it makes me feel a little better.
Matt Toms

Flatwoods Custom R/D:  64", 47@28
'66 Kodiak: 60", 55@28
Redwing Hunter:  58", 53@28
Ben Pearson 709 Hunter:  58", 47@28
Ben Pearson 709 Hunter:  58", 42@28
Hoots Recurve:  56", 42@28

Offline D.Ellis

  • Trad Bowhunter
  • **
  • Posts: 956
Re: Making a simple pouch type sheath.
« Reply #9 on: January 03, 2015, 11:33:00 PM »
At this point the remainder of the welt needs trimmed off. I use the beld grinder.......running lengthwise, but it is also possible to just trim with a sharp knife and hand sand.
I do a bit of hand sanding with 220 grit paper after the belt grinder to smooth the edges up better. I also round the sharp corners off by hand sanding.


After it is all smoothed up, I dye the edges and let the coloring dry.
The next step goes a long way towards making the sheath look finished. This goop is called "Gum Tragacanth" which, as I understand, come from some kind of plant.......even though the name does sound like some sort of prehistoric fish!

Sorry, I didn't realize I'd photographed the French side of the bottle........darn bilingual labeling laws.   :rolleyes:    :D    


Anyway, rub a bit of this goop into the edges of the sheath, and then burnish the edges with a smooth hard object. They make burnishers for this, but anything hard and smooth will work. Here I'm using an adult beverage bottle.


Tried to capture the sheen on the edge.......
The time you spend sanding smooth and burnishing the edges will be well spent when you see how much of an improvement it makes to the appearance.

 
60# GN Lil'Creep Jackknife
67# osage selfbow
62# "Zang Hill" string follow

Offline D.Ellis

  • Trad Bowhunter
  • **
  • Posts: 956
Re: Making a simple pouch type sheath.
« Reply #10 on: January 03, 2015, 11:52:00 PM »
At this point the sheath is done but for using some sort of water repelling finish. I prefer Schnee's Montana pitch blend boot wax.


So, you're all done and the sheath is a bit too snug..........Just take some of the carboard cereal box you used for the template(in this case the template itself), and place it in the sheath. Fold the top over so the knife doesn't shove it in too far, and place the knife in the sheath for a while. I have sometimes added 2 or 3 layers of cardboard and left the knife in overnight for a serious case of toosnugitis.......worked great.

I used to wet form the sheath to the knife, but it's risky as the damp sheath can cause untold numbers of issues to your finely finished knife. This method of overstretching, done dry, works better, without the fear of corrosion or leaching stains into your handle material.   :knothead:
60# GN Lil'Creep Jackknife
67# osage selfbow
62# "Zang Hill" string follow

Offline D.Ellis

  • Trad Bowhunter
  • **
  • Posts: 956
Re: Making a simple pouch type sheath.
« Reply #11 on: January 04, 2015, 12:01:00 AM »
Quote
Originally posted by tomsm44:
This is great information.  After I burn the tag ends on mine, I also add a small drop of water thin super glue to each one.  You want it thin so it will soak into the thread in the hole and you don't get a big chunk of dried glue on the back of your sheath.  Probably not necessary, but it makes me feel a little better.
I used to do that as well Matt, but this thread is so waxy I doubt if it will make any difference. That, and I have had some ugly looking marks on the sheath from the super glue, so now I elect to skip that step.
I have had to remove stitching before to rebuild a sheath(I was changing the carry method) and it was hard to take apart deliberately......so I am pretty confident it's gonna be tough enough in use.

Thanks,
Darcy   :campfire:
60# GN Lil'Creep Jackknife
67# osage selfbow
62# "Zang Hill" string follow

Offline Sockrsblur

  • TGMM Member
  • Trad Bowhunter
  • ***
  • Posts: 2242
  • Lake Placid Ironman Triathlete 2011, 2012, 2018
Re: Making a simple pouch type sheath.
« Reply #12 on: January 04, 2015, 09:11:00 AM »
Great build Darcy! Thanks for all the pictures, shows the process well. Beautiful knife too!
TGMM Family of the Bow
"Hunt Hard!" Uncle Bud
PBS Member

Offline bjansen

  • Trad Bowhunter
  • **
  • Posts: 2263
Re: Making a simple pouch type sheath.
« Reply #13 on: January 04, 2015, 03:43:00 PM »
Great tutorial. Thanks for sharing this Darcy

Offline Lin Rhea

  • Trad Bowhunter
  • **
  • Posts: 4541
Re: Making a simple pouch type sheath.
« Reply #14 on: January 04, 2015, 09:12:00 PM »
Very well done! Great work Darcy!
"We dont rent pigs." Augustus McCrae
ABS Master Bladesmith
TGMM Family of the Bow
Dwyer Dauntless longbow 50 @ 28
Ben Pearson recurve 50 @ 28
Tall Tines Recurve 47@28
McCullough Griffin longbow 43@28

Offline KeithG

  • Trad Bowhunter
  • **
  • Posts: 77
Re: Making a simple pouch type sheath.
« Reply #15 on: January 04, 2015, 10:08:00 PM »
thanks for the post. I am trying to figure out to make a sheath for a knife I just finished.

Offline Shinken

  • Trad Bowhunter
  • **
  • Posts: 2752
Re: Making a simple pouch type sheath.
« Reply #16 on: January 05, 2015, 10:27:00 PM »
This was a *great* pictorial/how to on building a pouch sheath!

Thanks for takin' the time to share the pics of the progress!

Keep the wind in your face!

Shoot straight, Shinken

   :archer2:
"The measure of your life will be the measure of your courage."

TRUTH is TRUTH
even if no one believes it

A LIE is a LIE
even if everyone believes it

Offline D.Ellis

  • Trad Bowhunter
  • **
  • Posts: 956
Re: Making a simple pouch type sheath.
« Reply #17 on: January 06, 2015, 01:59:00 AM »
Thanks guys. Hope someone finds something helpful in there.
Darcy   :campfire:
60# GN Lil'Creep Jackknife
67# osage selfbow
62# "Zang Hill" string follow

Offline Tique

  • Trad Bowhunter
  • **
  • Posts: 581
Re: Making a simple pouch type sheath.
« Reply #18 on: January 12, 2015, 10:11:00 AM »
Great tutorial. Really like the pictures showing the details and the tips on finishing. I'd like to know some details on the leather you used: how thick, how was it tanned, smooth on both sides, etc. Just getting started on sheathes for my knives and this tutorial has really helped.
Untested ideas are not facts.

Offline D.Ellis

  • Trad Bowhunter
  • **
  • Posts: 956
Re: Making a simple pouch type sheath.
« Reply #19 on: January 13, 2015, 02:29:00 PM »
This was made with 9 oz tooling leather. They are not all created equal. The better quality of materials you use the better the finished product.......this is mid grade, but hand picked to be the best of the lot from that grade of leather.
I try and buy top grain leather with as smooth and clean of flesh side as possible. If the flesh side is a bit rough, but the leather otherwise of good quality, you can still make a nice sheath by lining it with a thin deerskin, suede or garment leather. I can't stand it when the flesh side is flakey and rough inside a sheath. Every time you take the knife out there're small bits of leather "dust" clinging to the blade.   :knothead:  

Darcy   :campfire:
60# GN Lil'Creep Jackknife
67# osage selfbow
62# "Zang Hill" string follow

Users currently browsing this topic:

0 Members and 1 Guest are viewing this topic.
 

Contact Us | Trad Gang.com © | User Agreement

Copyright 2003 thru 2024 ~ Trad Gang.com ©