Author Topic: Making a Riser Coin Medallion  (Read 420 times)

Offline LC

  • Trad Bowhunter
  • **
  • Posts: 1302
Making a Riser Coin Medallion
« on: January 13, 2013, 08:09:00 PM »
After a little layoff of making my own bows I've recently began making a copy of a early model Bear one piece recurve. I've been pondering the coin medallion and always liked it. I first thought I'd use a buffalo nickel. But the other day I was tinkering in the garage and ran onto this 3/4" brass drift punch. The ideas starting flowing! lol Now I used power tools from my "other" hobby of building knifes but you could do all this with hand tools and a little sweat equity.
   

So I cut off the mushroomed end and belt sanded with 120grit.
   
Next buffed with 500 grit
     
Finally buffed for a high luster finish. I didn't want my end result to be high luster but it makes the next steps easier. Think scrimshaw using colored epoxing glue.
     
Next step is to draw on my design using a sharpie. Center line is for reference only. If you don't like your design simply wipe off at this stage.
     
Most people get rich by making more money than they have needs, me, I just reduced my needs!

Offline LC

  • Trad Bowhunter
  • **
  • Posts: 1302
Re: Making a Riser Coin Medallion
« Reply #1 on: January 13, 2013, 08:15:00 PM »
Next step is to engrave using a dremel or better yet my Roto Zip with flex shaft.Got tired of dremels giving up the ghost way too early. Use a hammer holder belt clip and let the motor hang at my waist side.
     

Engraving done. I first thought the diamond coated bits would be great. Turns out the minature carbon cutting spheres kicked butt! Used  one little carbon sphere and one VERY little tiny carbon sphere and they cut great!
     

Next mix up some 5 minute epoxy and add some black testors paint for color. Note the custom made mixing tool. Stainless spring steel! I get new ones every time I change out my wind shield wipers! lol
     
Next fill in the engraving
     
Most people get rich by making more money than they have needs, me, I just reduced my needs!

Offline D

  • Trad Bowhunter
  • **
  • Posts: 1509
Re: Making a Riser Coin Medallion
« Reply #2 on: January 13, 2013, 08:19:00 PM »
Thats pretty dang cool idea.

Offline LC

  • Trad Bowhunter
  • **
  • Posts: 1302
Re: Making a Riser Coin Medallion
« Reply #3 on: January 13, 2013, 08:25:00 PM »
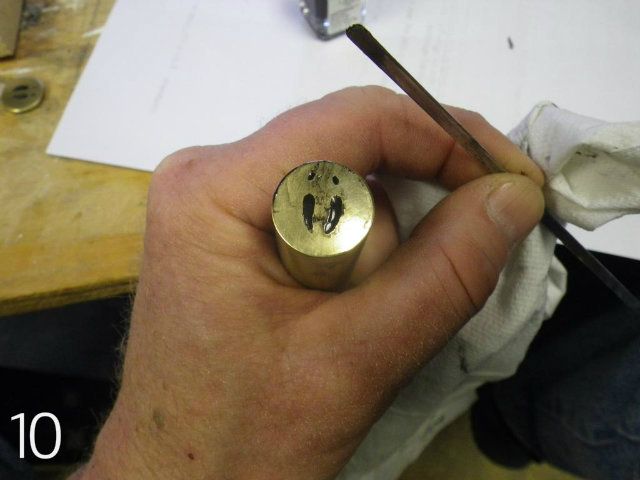
Using my custom made glue mixer I scraped off the excess to save sanding time.
     
Final sanding with wood block wrapped in 600 grit to take off excess glue and give it that brushed look!
     
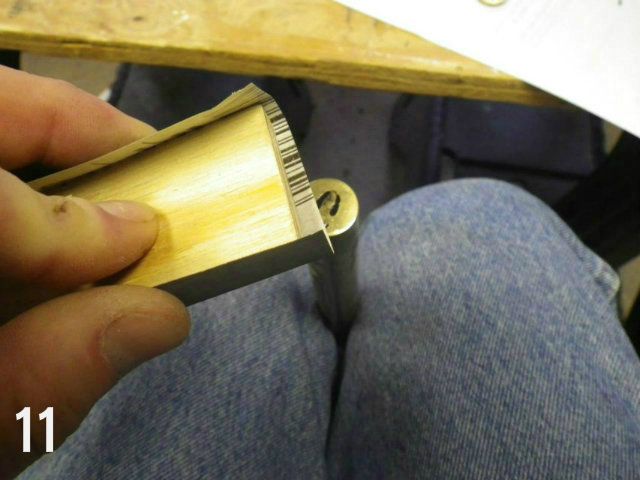
Final step is to slice off thin section of coin. I used my portable band saw set up as a stationary band saw but a hack saw would work fine.
     
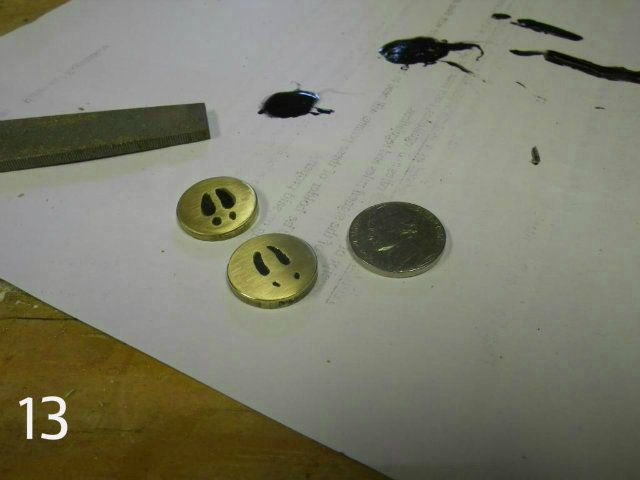
Finally slide it over a flat file to take off burrs and any high side you may have.
     

Keeping with the tradition of Bear changing their coin every year the board of directors of Coop Bows LLC will meet in the spring to decide the 2014 coin design. They just may change the color, use a turkey foot track, bear track or a european skull mount. Or they may go all in and decide to use a Nickel Silver coin! Who knows but all production bows in 2014, probably 2 (two)yes both bows I'll build next year, will have a newly designed coin!     :goldtooth:    

In all seriousness coming from the the knife making hobby a better option may be electro etching. I have all the equip but never had any stencils made. May have to look into that! But for the hobbiest bow maker I think this will work. If your interested google electro etch, it's how most knife makers "mark" their knifes! I think electro etching would be a awesome way for small time makers to make a incredible  custom detailed "coin" at a incredible cheap price! You can buy solid brass and nickel silver bars from most knife making suppliers.
Most people get rich by making more money than they have needs, me, I just reduced my needs!

Offline Citycop

  • Trad Bowhunter
  • **
  • Posts: 145
Re: Making a Riser Coin Medallion
« Reply #4 on: January 13, 2013, 08:50:00 PM »
Great idea

Offline Sharp Shooter

  • Trad Bowhunter
  • **
  • Posts: 361
Re: Making a Riser Coin Medallion
« Reply #5 on: January 13, 2013, 08:54:00 PM »
LC, I'm going to try that with my LOGO, Great idea. Tony

Offline Dmaxshawn

  • Trad Bowhunter
  • **
  • Posts: 1708
Re: Making a Riser Coin Medallion
« Reply #6 on: January 13, 2013, 09:00:00 PM »
Thats pretty slick Bud   Nice work.

Offline mwosborn

  • Trad Bowhunter
  • **
  • Posts: 1678
Re: Making a Riser Coin Medallion
« Reply #7 on: January 14, 2013, 12:22:00 AM »
Very cool!
Enjoy the hunt!  - Mitch

Offline Buemaker

  • Trad Bowhunter
  • **
  • Posts: 3108
Re: Making a Riser Coin Medallion
« Reply #8 on: January 14, 2013, 06:32:00 AM »
He-He. Board of directors of Coop Bows LLC.   :)   Good idea with the coin. Bue--.

Online Roy from Pa

  • Administrator
  • Trad Bowhunter
  • ****
  • Posts: 20649
Re: Making a Riser Coin Medallion
« Reply #9 on: January 14, 2013, 07:07:00 AM »
Nice work.

Online wood carver 2

  • Trad Bowhunter
  • **
  • Posts: 2722
Re: Making a Riser Coin Medallion
« Reply #10 on: January 14, 2013, 04:58:00 PM »
Thanks for that great build along. I've been thinking of trying something like that for some time now.
Dave.
" Vegetarian" another word for bad hunter.

Offline scottm

  • Trad Bowhunter
  • **
  • Posts: 775
Re: Making a Riser Coin Medallion
« Reply #11 on: January 14, 2013, 07:51:00 PM »
Thats Cool!!

Offline JJB

  • Trad Bowhunter
  • **
  • Posts: 1719
Re: Making a Riser Coin Medallion
« Reply #12 on: January 14, 2013, 07:54:00 PM »
That's a neat idea!
-Jay

Offline LC

  • Trad Bowhunter
  • **
  • Posts: 1302
Re: Making a Riser Coin Medallion
« Reply #13 on: January 14, 2013, 07:55:00 PM »
Update. After getting a couple of these under my belt now I much prefer to engrave and then finish sand with 600 grit for the brushed effect. I then using a small nail or drill bit with one end ground to a needle point and just dap drop in the colored epoxy in the engraved areas. The problem I was having was the sanding dust ending up in the color epoxy and hard to remove. This method works really well and doing it while it's still molten it just flows out and fills in the egraved area perfectly. Then theres no chance of sanding dust corrupting the colored epoxy. FYI

Also it appears to me the pics are loading too large. I purposely set my camera to 640 range then loaded to Photo bucket. It somehow saved them larger. I've went and manually edited them to 640/480 saved them to replace existing but they still seem to large.  Does it take awhile for photo bucket changes to take effect?
Most people get rich by making more money than they have needs, me, I just reduced my needs!

Offline goobersan

  • Trad Bowhunter
  • **
  • Posts: 1386
Re: Making a Riser Coin Medallion
« Reply #14 on: January 14, 2013, 09:20:00 PM »
Quote
Originally posted by Sharp Shooter:
LC, I'm going to try that with my LOGO, Great idea. Tony
Me too       Thanks Tony!!  that's awesome!

Offline jsweka

  • TG HALL OF FAME
  • Trad Bowhunter
  • *****
  • Posts: 3571
Re: Making a Riser Coin Medallion
« Reply #15 on: January 16, 2013, 05:12:00 PM »
That's really neat!  Thanks for sharing.
>>>---->TGMM<----<<<<

Offline So-Mo Archer

  • Trad Bowhunter
  • **
  • Posts: 209
Re: Making a Riser Coin Medallion
« Reply #16 on: January 17, 2013, 02:04:00 AM »
LC, that is too cool! Thanks for the build along, and for the glue mixer idea, I've got a set of wipers that need a change anyhow  ;)  .

I love Bear bows, and have always loved the coin on the riser. May try this for my logo as a tribute to a Papa Bear!
Matt

Ben Pearson Rogue, 55 @ 28
SoMo Red Warrior, 47 @ 28
Compton's
NCBA
NCWRC Hunters Ed Instructor
"The shortest answer is to do the thing!" - Ernest Hemingway

Offline Knawbone

  • Trad Bowhunter
  • **
  • Posts: 2483
Re: Making a Riser Coin Medallion
« Reply #17 on: January 20, 2013, 02:34:00 PM »
LC, Iv' made similar engraved buttons out of Deer antler. Nice job with the brass. Thanks for sharing your Idea.
HHA 5 lam Cheetah 65" 48@26
HHA W Special 66" 52@26
HHA W Special 68" 56@28
GN Bushbow 64" 56@29
21st Street Chinook 64" 58@28
Kota Prarie Nomad 60" 47@24
You can do a lot of things when you have too W S Butler My Grandfather

Offline LC

  • Trad Bowhunter
  • **
  • Posts: 1302
Re: Making a Riser Coin Medallion
« Reply #18 on: January 20, 2013, 02:44:00 PM »
I never thought of antler, that would be cool. The neat thing about using 3/4 round stock is with a 3/4 fostner bit you can inlet it with basically a snap fit. I did think about using a 3/4 wooden dowel of a different color than my riser and engraving or wood burning in it  though. I knew others had to be doing something similiar.
Most people get rich by making more money than they have needs, me, I just reduced my needs!

Offline Knawbone

  • Trad Bowhunter
  • **
  • Posts: 2483
Re: Making a Riser Coin Medallion
« Reply #19 on: January 21, 2013, 08:28:00 PM »
Antler works well for a lot of applications. Buttons,closures,ornamentals ect. Antler carves well also.  I made a nice powder measure for my flintlock which hangs off my possibles bag.The brass button was the right choose for the Bear bow however. Show us some pictures when you get er done.   :thumbsup:
HHA 5 lam Cheetah 65" 48@26
HHA W Special 66" 52@26
HHA W Special 68" 56@28
GN Bushbow 64" 56@29
21st Street Chinook 64" 58@28
Kota Prarie Nomad 60" 47@24
You can do a lot of things when you have too W S Butler My Grandfather

Users currently browsing this topic:

0 Members and 1 Guest are viewing this topic.
 

Contact Us | Trad Gang.com © | User Agreement

Copyright 2003 thru 2024 ~ Trad Gang.com ©