INFO: Trad Archery for Bowhunters


Author Topic: Decorative Arrow Rack Build-a- Long......Finished  (Read 9902 times)

Online Wile E. Coyote

  • Trad Bowhunter
  • **
  • Posts: 538
Decorative Arrow Rack Build-a- Long......Finished
« on: January 27, 2009, 10:12:00 AM »
Over the years the Trad Gang Community has continually enriched my life and my archery endeavors. As a show of thanks I would like to offer a simple build along of an arrow rack that will serve as both a functional and decorative piece of furniture. I hope you all enjoy.

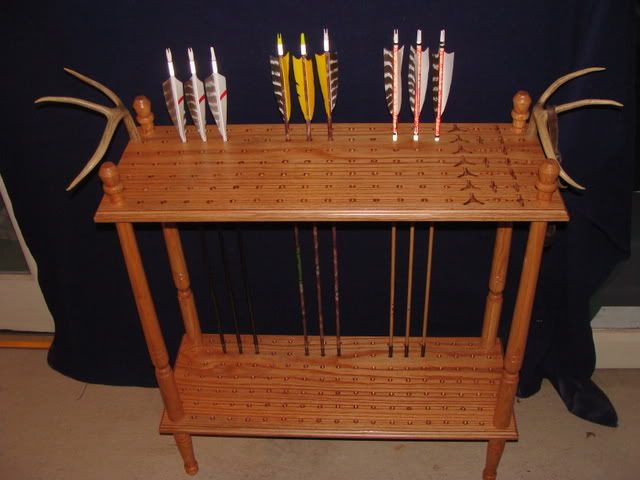
For those of you who need a teaser to insure you follow along, here is a photo of the finished product.
 

   SUPPLIES  
In this turorial I chose to use Red Oak. My choice was directed by the availability of product at my local Home Improvement store and the fact that the item was to be made as a gift, so I opted for top shelf materials. As I have learned from the Master of Frugality Van TX, there is always a less expensive method of achieving the desired result, so feel free to substitute where you see fit. If you use the products I did the total cost will be just under $100.

(4) 6" or 8" Oak Table Legs
(4) 25" Oak Table Legs
(2) 1" x 11 1/4" x 30" Oak Boards
(1) Baluster Fastener Kit (Contains 4 fasteners and a driver)
3/8" Drill Bit
3/8" Countersink Bit
1/4" Drill Bit
15/64" Drill Bit
Wood Stain
Rub on Poly Finish

OPTIONAL
7/16" Drill Bit
Dremel Bit #9931
Router
1 set deer antlers
Wayne LaBauve

"Learn to wish that everything should come to pass exactly as it does."

Online Wile E. Coyote

  • Trad Bowhunter
  • **
  • Posts: 538
Re: Decorative Arrow Rack Build-a- Long......Finished
« Reply #1 on: January 27, 2009, 10:40:00 AM »
The prefab table legs I used as well as the Baluster fastener kit were available at both Home Depot and Lowes. The shorter table legs will go on the bottom and either size works fine. Be aware however that the longer legs come in 25" and 28". If you get the longer legs they will work but you will have to trim them accordingly as noted in the instructions.
 

I purchased a 5ft. section of 1" X 11 1/4" Oak board and cut it into 2 equal sections. Since I was attempting to make a decorative and not just funtional piece I chose to route the edges of each board.
 
Choose the board with the nicest grain for the top board. This is the one upon which you will draw the pattern for your drill holes.

I chose to space the holes for the shafts at 1 1/2" apart as I felt this was a good compromise between maximal arrow capacity and adequate feather clearance. With the size board I was using this meant that the setback from the front and back edge to the center of the first hole was 1 1/4" and the set back from the left and right edges was 1 1/2" to the center of the first hole. You will need to measure and center accordingly based upon the size of your board and the amount of space you would like between each arrow.

With these measurements proceed to mark out the grid on the top board.
 
Wayne LaBauve

"Learn to wish that everything should come to pass exactly as it does."

Offline Dave Bowers

  • Trad Bowhunter
  • **
  • Posts: 1391
Re: Decorative Arrow Rack Build-a- Long......Finished
« Reply #2 on: January 27, 2009, 10:45:00 AM »
Very nice   :thumbsup:

Offline unclewhit

  • Trad Bowhunter
  • **
  • Posts: 357
Re: Decorative Arrow Rack Build-a- Long......Finished
« Reply #3 on: January 27, 2009, 10:45:00 AM »
Very nice Coyote.  :thumbsup:
unclewhit
Bob lee signature series
Schafer Silvertip
Howard Hill "Tembo"

Online Wile E. Coyote

  • Trad Bowhunter
  • **
  • Posts: 538
Re: Decorative Arrow Rack Build-a- Long......Finished
« Reply #4 on: January 27, 2009, 12:00:00 PM »
Mark corner holes to be skipped during the drilling process.
 
If you want to include locations for broadheads as well as field points you need to designate those locations at this time, as the hole size you drill will differ.

Now drill all holes designated for field points or bare shafts with a 3/8" drill bit. This size hole will accomidate shafts up to 11/32. If you want to be able to fit 23/64 shafts use a 7/16" bit.  All spots designated for broadheads should be drilled with a 7/16" drill bit. ( A drill press comes in mighty handy here )
 
Many of the holes you drill will have irregular edges.
 
Smooth the edges of all holes with 120 grit sandpaper wrapped around a paint brush handle, pencil or dowel. Alternate sanding on top and into the hole until edges are smooth.
 
Wayne LaBauve

"Learn to wish that everything should come to pass exactly as it does."

Offline snag

  • TG HALL OF FAME
  • Trad Bowhunter
  • *****
  • Posts: 6337
Re: Decorative Arrow Rack Build-a- Long......Finished
« Reply #5 on: January 27, 2009, 12:19:00 PM »
I'm liking this Wayne. I have been considering what to do with all these arrows in the closet! Thanks. Another reason to go shopping at the hardware store!  :clapper:
Isaiah 49:2...he made me a polished arrow and concealed me in his quiver.

Offline Kip

  • Trad Bowhunter
  • **
  • Posts: 1720
Re: Decorative Arrow Rack Build-a- Long......Finished
« Reply #6 on: January 27, 2009, 12:32:00 PM »
Wayne looks like I see some 3-blade 4-blade and two blade holes in there.Good job You have talent my friend in everything I have seen you make.Kip

Offline Mike Byrge

  • Trad Bowhunter
  • **
  • Posts: 105
Re: Decorative Arrow Rack Build-a- Long......Finished
« Reply #7 on: January 27, 2009, 01:34:00 PM »
That is going to be nice!!!  Good job Wayne

Offline Jason Jelinek

  • Trad Bowhunter
  • **
  • Posts: 485
Re: Decorative Arrow Rack Build-a- Long......Finished
« Reply #8 on: January 27, 2009, 01:36:00 PM »
Beautiful!  I have made similar ones with pine, but always have problems getting them sturdy.  The table legs are a great idea!

Jason

Online Wile E. Coyote

  • Trad Bowhunter
  • **
  • Posts: 538
Re: Decorative Arrow Rack Build-a- Long......Finished
« Reply #9 on: January 27, 2009, 02:44:00 PM »
Label the bottom of each of your boards. In this demo my boards are labeled (FT) for the front of the top board and (FB) for the front of the bottom board. (Believe me its important later when you want everything to match up correctly)
 
Next the top and bottom boards are aligned and clamped together.
 
Set a 3/8" countersink bit in your drill to a depth that will allow you to just make out a 3/8" depression in the bottom board.
 
Using the top board as a template, drill all holes in the bottom board. Do not be concerned at this point whether all the holes are of equal depth. You are just wanting to insure that you have a recognizable countersink hole in each slot as it corresponds to the upper board. Once you are done remove the clamps and observe the bottom board.
 
Some of the countersink holes will be deeper than others. Go back over each hole (without top board now) with the countersink bit until you have a uniform depth to all holes on the bottom board.
 
Wayne LaBauve

"Learn to wish that everything should come to pass exactly as it does."

Online Wile E. Coyote

  • Trad Bowhunter
  • **
  • Posts: 538
Re: Decorative Arrow Rack Build-a- Long......Finished
« Reply #10 on: January 27, 2009, 07:59:00 PM »
BROADHEAD OPTION

If you have slots designated for broadheads, trace the broadhead outline centered over holes for each slot.
 
In this build along I created one row for 3 blade heads, one for 2 blade heads and one for 2 blade with bleeders. I chose to alternate the orientiation of the blades to minimize crowding of the blades.
 
I believe that the most effective and efficient tool for cutting out the broadhead outlines would be a hand held router. However, not having the skill to use just such a tool I chose to initially make rough cuts centered within the outlines using a jig saw.
 
Then groove out the design with a Dremel tool and tungsten carbide bit # 9931.
 
WARNING: This method is long and teidious and will lead to frustration and disaster if you try and speed through it. Here is a pic after the broadhead slots were completed.
 
Wayne LaBauve

"Learn to wish that everything should come to pass exactly as it does."

Offline gregg dudley

  • TG HALL OF FAME
  • Trad Bowhunter
  • *****
  • Posts: 4879
Re: Decorative Arrow Rack Build-a- Long......Finished
« Reply #11 on: January 27, 2009, 08:18:00 PM »
N-I-C-E!  :thumbsup:
MOLON LABE

Traditional Bowhunters Of Florida
Come shoot with us!

Offline Autumnarcher

  • Trad Bowhunter
  • **
  • Posts: 1169
Re: Decorative Arrow Rack Build-a- Long......Finished
« Reply #12 on: January 27, 2009, 08:22:00 PM »
A brad point drill bit will cut much cleaner holes when drilling, available at the usual big box handyman stores in the toy dept.
...stood alone on a montaintop, starin out at a great divide, I could go east, I could go West, it was all up to me to decide, just then I saw a young hawk flyin and my soul began to rise......

Offline Danny J

  • Trad Bowhunter
  • **
  • Posts: 287
Re: Decorative Arrow Rack Build-a- Long......Finished
« Reply #13 on: January 27, 2009, 09:21:00 PM »
Very nice Wayne. Thanks for the great tutorial. My wife might even let me keep that one in the house.   :)
IF YOU DON'T STAND BEHIND OUR TROOPS, PLEASE FEEL FREE TO STAND IN FRONT OF THEM.

Peace is that brief glorious moment in history when everyone stands around reloading.

"IN GOD WE TRUST"

Online cacciatore

  • TG HALL OF FAME
  • Trad Bowhunter
  • *****
  • Posts: 8320
Re: Decorative Arrow Rack Build-a- Long......Finished
« Reply #14 on: January 28, 2009, 03:00:00 AM »
Very interesting Wayne,thanks for sharing
1993 PBS Regular
Compton
CBA
CSTAS

Offline Oliverstacy

  • Trad Bowhunter
  • **
  • Posts: 1915
Re: Decorative Arrow Rack Build-a- Long......Finished
« Reply #15 on: January 28, 2009, 03:43:00 AM »
That arrow rack is one of the nicest if not the best I have ever seen.  I love the broadhead slots.

Well done...

Josh
Custom Flemish Strings by Oliverstacy!  
Kanati 60" 57@29"
AP Cumberland 66" 58@29"
WhisperStik KajikaStik 56" Recurve with Canebrakes...57@28"
WhisperStik KajikaStik aka "Wormy" RC & LB,both 55@29"
Martin Savannah 50@28"
Kota Kill-um 55@28"

Offline Chris Surtees

  • Trad Bowhunter
  • **
  • Posts: 5697
Re: Decorative Arrow Rack Build-a- Long......Finished
« Reply #16 on: January 28, 2009, 04:28:00 AM »
:clapper:     :clapper:    :clapper:

Offline gsdmikko

  • Trad Bowhunter
  • **
  • Posts: 184
Re: Decorative Arrow Rack Build-a- Long......Finished
« Reply #17 on: January 28, 2009, 07:27:00 AM »
great job   :thumbsup:    :thumbsup:
Follow Your Dreams
" It's better to die Livin'
  Than live Dyin "

Online Wile E. Coyote

  • Trad Bowhunter
  • **
  • Posts: 538
Re: Decorative Arrow Rack Build-a- Long......Finished
« Reply #18 on: January 28, 2009, 11:10:00 AM »
Realign the top board over the bottom board and clamp.(check where you marked under boards to insure front is to front) and drill out corners of the top board with a 15/16" drill bit. Drill just deep enough to mark the lower board.
 
If you got too busy while drilling and ended up accidently drilling through one of the corners when making your shafts holes on the top board, don't fret. (Hey I did it too!) A 23/64" shaft fits nice and tight and with a little glue you have a plug that can be cut, smoothed, and drilled.

Remove top board and drill bottom board through at the corners.

Complete final sanding of both top and bottom boards.

With a small amount of glue on the surface of the short table legs, screw them firmly onto the underside of the bottom board.


Wayne LaBauve

"Learn to wish that everything should come to pass exactly as it does."

Offline Jerry Wald

  • Trad Bowhunter
  • **
  • Posts: 1551
Re: Decorative Arrow Rack Build-a- Long......Finished
« Reply #19 on: January 28, 2009, 11:19:00 AM »
WOW niccccccccccccccccce

Can I just get the arrows...tee hee

you should make it a kit like Ikea and you would have your cottage industry.

Jer Bear

Users currently browsing this topic:

0 Members and 1 Guest are viewing this topic.
 

Contact Us | Trad Gang.com © | User Agreement

Copyright 2003 thru 2024 ~ Trad Gang.com ©