INFO: Trad Archery for Bowhunters


Author Topic: crafting excellent woodies  (Read 38940 times)

Offline Rob DiStefano

  • Administrator
  • Trad Bowhunter
  • ****
  • Posts: 12246
  • Contributing Member
    • Cavalier Pickups
Re: crafting excellent woodies
« Reply #60 on: February 03, 2011, 06:56:00 PM »
i use 'magic markers' for cresting - chisel point sharpie pens are my faves, along with a pentel silver pen.  this is fast, easy and good looking crest.  the downside (you knew that was coming!) is that i have yet to find a clear coat that won't bleed the marker colors.  so, i leave the cresting as is, and it will wear a fine line where it contacts the shelf almost immediately.  no big deal for me.    

if you want cresting that will take some punishment and last, the answer is to use a resin based paint (lacquer, acrylic, enamel, etc) and then spray clear coats over to seal.  this requires a few small pots of opaque paint colors and appropriate thinner and compatible spray clear, and a few good sable cresting brushes.  been there, done that, don't need the added expense and time.  i'll stick with sharpie cresting and live with the 'wear line'.  :cool:
IAM ~ The only government I trust is my .45-70 ... and my 1911.

Offline madness522

  • TGMM Member
  • Trad Bowhunter
  • ***
  • Posts: 1743
Re: crafting excellent woodies
« Reply #61 on: February 03, 2011, 07:56:00 PM »
I had the same issue with Testors paints smearing so a couple quick sprays with a spray-on poly work very well without smearing if you spray quick, thin layers.
Barry Clodfelter
TGMM Family of the Bow.

Offline Rob DiStefano

  • Administrator
  • Trad Bowhunter
  • ****
  • Posts: 12246
  • Contributing Member
    • Cavalier Pickups
Re: crafting excellent woodies
« Reply #62 on: February 04, 2011, 05:33:00 AM »
i did the testing - so be aware that clear coat light spraying of lacquer or polyu or acrylic on marking pen cresting will NOT work - the ink will run and bleed.
IAM ~ The only government I trust is my .45-70 ... and my 1911.

Offline macksdad

  • Trad Bowhunter
  • **
  • Posts: 619
Re: crafting excellent woodies
« Reply #63 on: February 04, 2011, 06:21:00 AM »
Rob, Thank you for taking the time to post this tutorial . This is a great help. Can't wait to see the rest.
Hoyt Buffalo   #45@28,#50@28, #55 @28, #60@28
Hill Country Wildcat 52#@28
Hill Country Wildcat Static #57@31
Rick Welch Accuracy Factory

Offline lpcjon2

  • Trad Bowhunter
  • **
  • Posts: 7673
Re: crafting excellent woodies
« Reply #64 on: February 04, 2011, 07:22:00 AM »
Rob If you did a light primer like Binz first would that help them soak in and dry.Maybe that craft stuff thats white (day capoge I think) for craft work.Any wax based items available for this.Or maybe thinned out clear nail polish top coat? Now you have me in search
Some people live an entire lifetime and wonder if they have ever made a
difference in the world, but the Marines don’t have that problem.
—President Ronald Reagan

Offline Rob DiStefano

  • Administrator
  • Trad Bowhunter
  • ****
  • Posts: 12246
  • Contributing Member
    • Cavalier Pickups
Re: crafting excellent woodies
« Reply #65 on: February 04, 2011, 07:44:00 AM »
Quote
Originally posted by lpcjon2:
Rob If you did a light primer like Binz first would that help them soak in and dry.Maybe that craft stuff thats white (day capoge I think) for craft work.Any wax based items available for this.Or maybe thinned out clear nail polish top coat? Now you have me in search
i have not found any clear coats that won't dissolve marking pen ink, no matter what pen ink is used or how the surface of the shaft is prepped.  if you want to clear coat it, cresting must be resin based.
IAM ~ The only government I trust is my .45-70 ... and my 1911.

Offline stiknstringer

  • Trad Bowhunter
  • **
  • Posts: 247
Re: crafting excellent woodies
« Reply #66 on: February 04, 2011, 07:54:00 AM »
I like using the touch up paints from Pep Boys.It comes in some great looking colors and will hold under any clear coat. It comes in small bottles so you don't have to buy it in pints,quarts etc. :thumbsup:

Offline Stumpkiller

  • TG HALL OF FAME
  • Trad Bowhunter
  • *****
  • Posts: 3874
Re: crafting excellent woodies
« Reply #67 on: February 04, 2011, 09:04:00 AM »
I put my crest on after the sealing (Sharpie & Pilot permanent markers over MinWax Poly).

I found wiping on the polyurethane removed the Pilot metallic ink.

Holds up so far.


Just received my first batch of 24 Douglas fir shafts (Surewoods).  They look beautiful, clear and straight, and all spined within two pounds of each other!  Don't smell as nice as cedar but I'm impressed so far.    :thumbsup:   I was surprised the 11/32" fir weighs (exactly) the same as my 23/64" cedar raw shafts.  420 grains.  They're lighter than I thought they would be - but that's OK as they'll make up at around 580 to 590 grains.  Nice moderate weight.
Charlie P. }}===]> A.B.C.C.

Bear Kodiak & K. Hunter, D. Palmer Hunter, Ben Pearson Hunter, Wing Presentation II & 4 Red Wing Hunters (LH & 3 RH), Browning Explorer, Cobra II & Wasp, Martin/Howatt Dream Catcher, Root Warrior, Shakespeare Necedah.

Offline 3arrows

  • Trad Bowhunter
  • **
  • Posts: 399
Re: crafting excellent woodies
« Reply #68 on: February 04, 2011, 11:14:00 AM »
One layer of scotch tape will protect the sharpie crest.
Believe in nothing,fall for anything

Offline Rob DiStefano

  • Administrator
  • Trad Bowhunter
  • ****
  • Posts: 12246
  • Contributing Member
    • Cavalier Pickups
Re: crafting excellent woodies
« Reply #69 on: February 04, 2011, 12:03:00 PM »
Quote
Originally posted by 3arrows:
One layer of scotch tape will protect the sharpie crest.
been there, done that, didn't like it.  also tried a piece of clear arrow wrap. prefer to just leave 'em be.
IAM ~ The only government I trust is my .45-70 ... and my 1911.

Offline South MS Bowhunter

  • Trad Bowhunter
  • **
  • Posts: 4392
Re: crafting excellent woodies
« Reply #70 on: February 04, 2011, 01:08:00 PM »
Rob,

What are you using to spin the aras for cresting?  Also what in your est. would a dz aras cost to make up your way, using the supplies you used for yours?  Thanks
Everything I have and have become is due to the Lord and his great mercy.

Offline Rob DiStefano

  • Administrator
  • Trad Bowhunter
  • ****
  • Posts: 12246
  • Contributing Member
    • Cavalier Pickups
Re: crafting excellent woodies
« Reply #71 on: February 04, 2011, 02:30:00 PM »
Quote
Originally posted by South MS Bowhunter:
Rob,

What are you using to spin the aras for cresting?  

low-tech and works just fine - electric screwdriver with a surge tubing coupler  :cool:

Also what in your est. would a dz aras cost to make up your way, using the supplies you used for yours?  Thanks

how much it costs to make up woodies, or any arrow type, is totally dependent on the scale economies and your aspirations for making your own arrows.  the real value comes with volume.  

making up one dozen of any kinda arrows means an investment in some tooling, at the least a fletching jig and some glue.

woodies will require the addition of a simple nock/point tapering tool, and some wipe-on finish at the least.

now add in the shafts, points, nocks and pre-cut feathers.

price out the above components for an idea of what it costs to build a dozen woodies.  it's easy to understand that the real value comes in building more than a dozen arrows, that and the satisfaction of doing it yourself.

IAM ~ The only government I trust is my .45-70 ... and my 1911.

Offline lpcjon2

  • Trad Bowhunter
  • **
  • Posts: 7673
Re: crafting excellent woodies
« Reply #72 on: February 04, 2011, 02:36:00 PM »
Rob, does the watered down cya make the sharpie run to?
Some people live an entire lifetime and wonder if they have ever made a
difference in the world, but the Marines don’t have that problem.
—President Ronald Reagan

Offline Rob DiStefano

  • Administrator
  • Trad Bowhunter
  • ****
  • Posts: 12246
  • Contributing Member
    • Cavalier Pickups
Re: crafting excellent woodies
« Reply #73 on: February 04, 2011, 02:38:00 PM »
Quote
Originally posted by lpcjon2:
Rob, does the watered down cya make the sharpie run to?
yes.

not 'watered down cya', it's water thin viscosity cya.
IAM ~ The only government I trust is my .45-70 ... and my 1911.

Offline South MS Bowhunter

  • Trad Bowhunter
  • **
  • Posts: 4392
Re: crafting excellent woodies
« Reply #74 on: February 04, 2011, 05:14:00 PM »
Rob will you be showing your "low tech" tools when you get to cresting and the fletching?
Everything I have and have become is due to the Lord and his great mercy.

Offline Rob DiStefano

  • Administrator
  • Trad Bowhunter
  • ****
  • Posts: 12246
  • Contributing Member
    • Cavalier Pickups
Re: crafting excellent woodies
« Reply #75 on: February 04, 2011, 05:33:00 PM »
Quote
Originally posted by South MS Bowhunter:
Rob will you be showing your "low tech" tools when you get to cresting and the fletching?
absolutely!  why not?  coming up real soon to a computer in your neighborhood!
IAM ~ The only government I trust is my .45-70 ... and my 1911.

Offline Rob DiStefano

  • Administrator
  • Trad Bowhunter
  • ****
  • Posts: 12246
  • Contributing Member
    • Cavalier Pickups
Re: crafting excellent woodies
« Reply #76 on: February 04, 2011, 08:34:00 PM »
ok, time for cresting and fletching - or is it the other way around?  which to do first?  imo, doesn't matter, but as you work on woodies, one or the other might take preference.  i'm gonna do the fletching first, cresting last.  

all fletches will be adhered with bohning fletch tape, followed by a dot of duco cement on each end of the feather, not so much to hold down the fletch at those critical points, but to smoothly transition the quill base to the shaft.  

there's also the nocking and pointing to consider as well.  one could pressure fit a nock for fletching and then glue on the nock afterwards to get a precise alignment with the feathers.  

typically, a fletching jig's nock receiver is set and locked in position for the type of offset or helical for a particular length of feather.  change one of those two parameters and the nock might not align with the fletching as you'd like after the fletching is adhered to the shaft.  now, this isn't an issue at all with carbons since [a] carbons are 360 degree uniformly spined, and a twist of the carbon's nock makes for instant realignment.  not so with woodies as they are not 360 degree uniformly spined!  if you glue on the nock, better make sure the taped or glued feathers will align properly.  and if the nock needs to be rotated, don't rotate it so much as to miss the sweet stiff spine spot.

i'm gonna use two relatively 'cheap' polycarb fletching jigs - an old martin j8 and a rather new bohning bpe.  the j8 will be used to do a four fletch, li'l chopper chopped 4.6" banana left wing processed trueflights, 75x105 configuration with slight 1 degree offset.  the bpe will do up a three fletch, young burnt 5.25" gray barred trueflights in a custom shield configuration with lots of left wing helical.  both of these jigs have been used quite a lot and each is set up to fletch the arrangements just described.  to change those settings, to use the j8 for helical 3 fletch and bpe for offset 4 fletch would mean taking the time to set up each for their new fletch configuration use.  which is one reason to have a fletch jig set up for a style and type of fletch and shaft, and changed.      

here's a gaggle of just chopped 4.6" yellow banana fletches, and 5.2" sections of full length gray barred fletches that are prepared for fletching and young feather burning.


more tomorrow morning, as i fletch up the first arrow ...
IAM ~ The only government I trust is my .45-70 ... and my 1911.

Offline Rob DiStefano

  • Administrator
  • Trad Bowhunter
  • ****
  • Posts: 12246
  • Contributing Member
    • Cavalier Pickups
Re: crafting excellent woodies
« Reply #77 on: February 05, 2011, 08:43:00 AM »
banana 4 fletch  

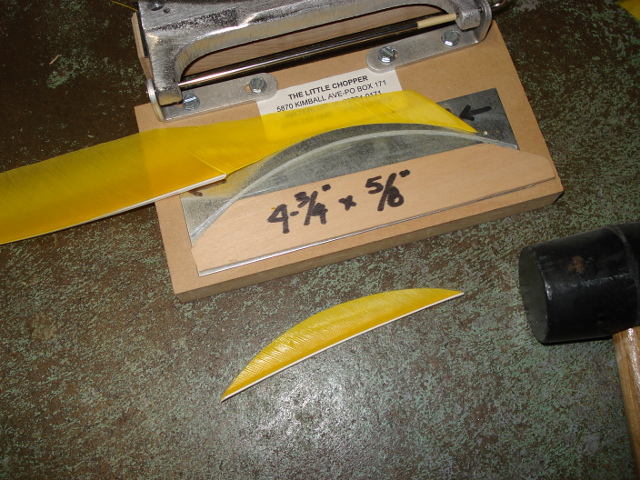
using a modified lil chopper banana high profile feather chopper (a new base plate was made from 1/8" plywood, in order to shorten the fletch length, and reduce the height), place the feather into the jig and hold it with a few fingers.  notice that i prefer to chop feathers with the 'concave' side of the feather up ...
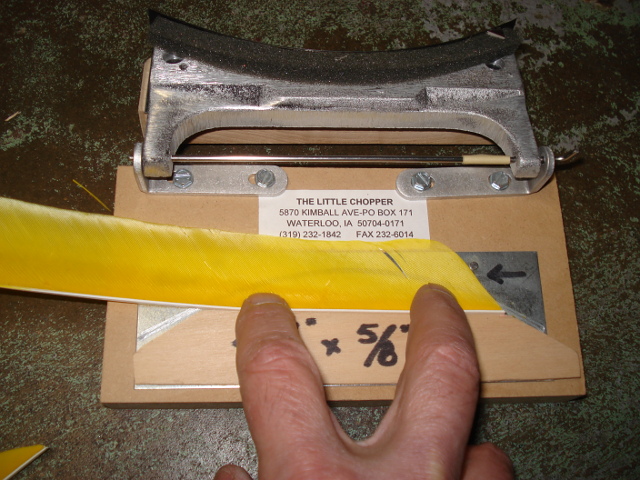
 

holding onto the feather, use yer other hand to lower the chopping blade and hold firmly enough so the feather won't move ...
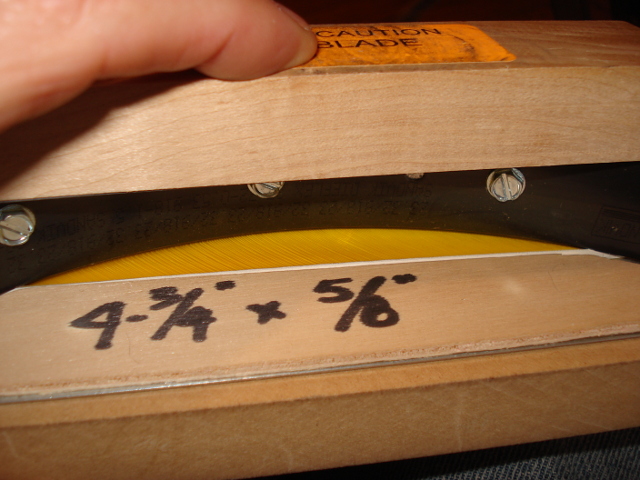
 

give the blade block a good, sharp whack with a mallet or hammer ...
 

as mentioned b4, the nock can be pushed on for a friction fit during fletching and then aligned and glued later, or glued on first - i choose to glue on first because my jig's nock receiver is well set up for an offset 4 fletch.  

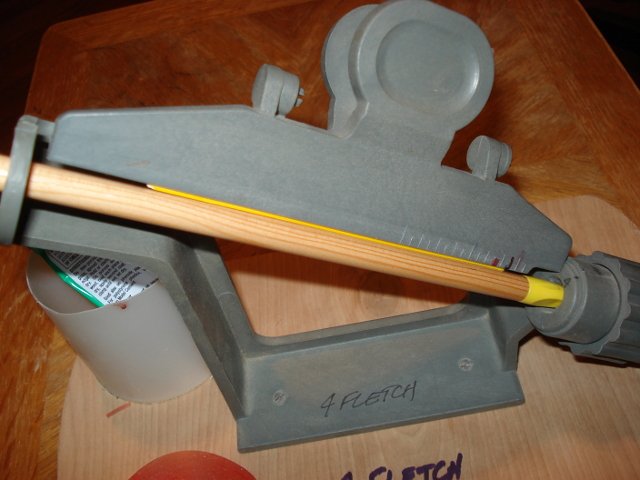
after wiping down the cap area of the shaft (where the fletches go) with naphtha (lighter fluid) on a paper towel to remove any finger oil, i've placed a fletch into the fletch jig's clamp, and i'm doing a 'test run' to make sure the fletch quill will position itself properly on the shaft and that it's the proper distance from the nock.  

you will need to spend a bit of time and effort to tweak the clamp so that the fletch lies well on the shaft.  with a straight fletch clamp, it is either set dead straight (not recommended), slightly offset in the direction of the fletch (i.e. - left wing feathers are offset to the left side).  if a helical clamp is used, take extra care in making *sure* that the entire base quill of the fletch makes contact with the shaft.  if you don't get the fletch quill to lie dead against the shaft, you will have problems.  this matters for using either fletch tape or glue - so make this an important priority!  

when it all looks good, mark the clamp with sharpie pen where the back end of the feather goes, for consistency (i used a black pen mark for this fletch type) ...
 

when all looks right, remove the clamp (with feather attached) and at this point i typically will wipe down the quill base with naphtha on a piece of paper towel to remove any lingering finger oil, line up the fletching tape with the quill base and lay it down ...
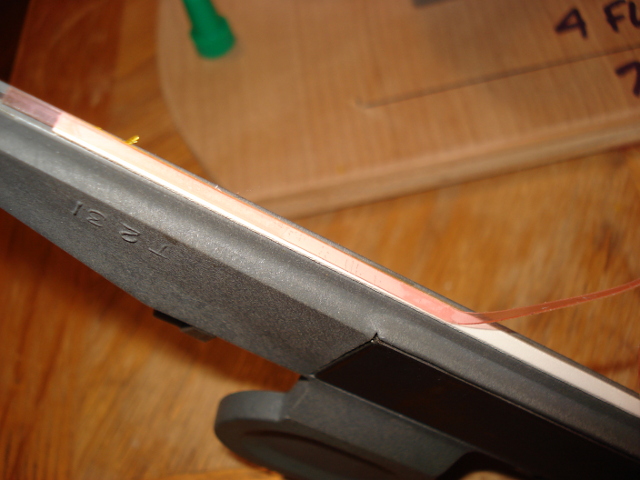
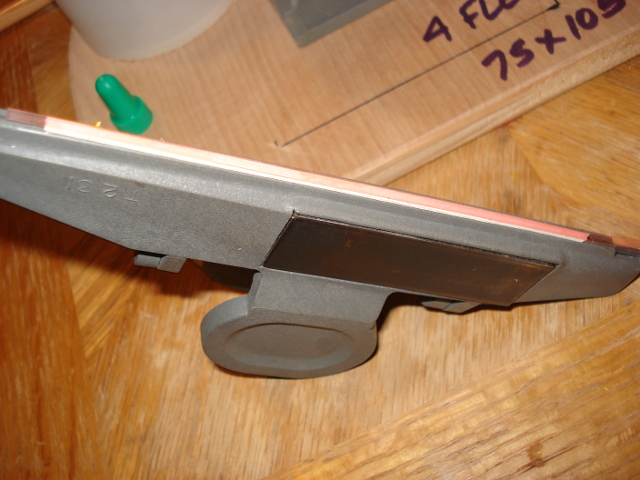


with sharp scissors, snip off the tape at both ends of the fletch, close to the quill ...
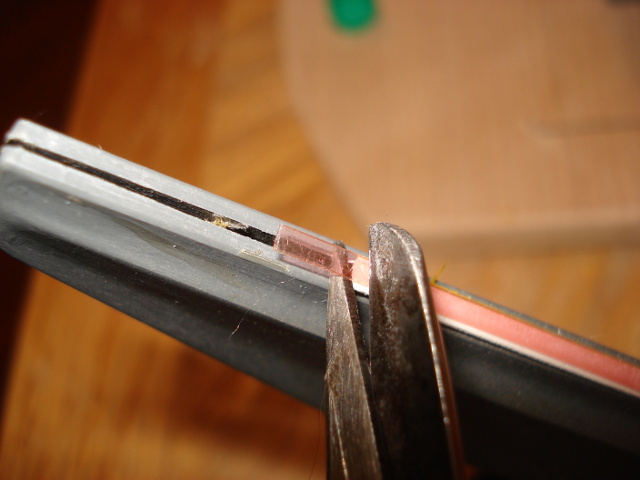
 

run a finger down the length of the fletch tape, pressing fairly hard - do it again to be sure ...
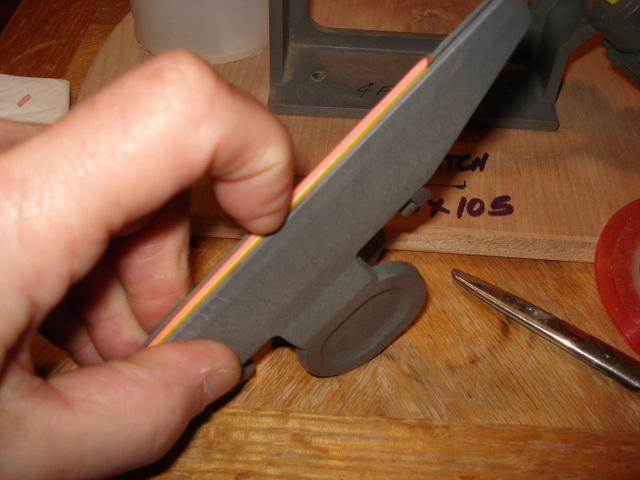
 
IAM ~ The only government I trust is my .45-70 ... and my 1911.

Offline Rob DiStefano

  • Administrator
  • Trad Bowhunter
  • ****
  • Posts: 12246
  • Contributing Member
    • Cavalier Pickups
Re: crafting excellent woodies
« Reply #78 on: February 05, 2011, 08:56:00 AM »
use an xacto or knife blade to lift up the fletch tape protective film, then pull off ...


place the clamp onto the jig's magnet, get the jig lined up in the proper position, and keep it away from the shaft ...


push down the clamp onto the shaft, press *firmly* ... press *firmly* again, to make sure ...


squeeze the clamp and remove from the feather ...


turn the jig's nock receiver, rotating the shaft towards you, and attach the next feather in the same fashion ...


when all the feathers are attached, remove the arrow (hey, NOW it's an ARROW and not a shaft!) and *firmly* press down the full length of the feather from front to back - i do it right on the feather barbs, press them right down to the quill, won't hurt them at all, but if it bothers you to press down on the barbs then just press down on the quill side edge with yer finger nail ...


and finally, a dot of glue at each end of the fletches ..

   
IAM ~ The only government I trust is my .45-70 ... and my 1911.

Offline Rob DiStefano

  • Administrator
  • Trad Bowhunter
  • ****
  • Posts: 12246
  • Contributing Member
    • Cavalier Pickups
Re: crafting excellent woodies
« Reply #79 on: February 05, 2011, 08:57:00 AM »
first woodie banana 4-fletch done ...


... fletch up the next 5 shafts with 'naners!
IAM ~ The only government I trust is my .45-70 ... and my 1911.

Users currently browsing this topic:

0 Members and 1 Guest are viewing this topic.
 

Contact Us | Trad Gang.com © | User Agreement

Copyright 2003 thru 2024 ~ Trad Gang.com ©