3Rivers Archery


The Trad Gang Digital Market


Contribute to Trad Gang and Access the Classifieds!

Become a Trad Gang Sponsor!

Traditional Archery for Bowhunters


LEFT HAND BOWS CLASSIFIEDS TRAD GANG CLASSIFIEDS ACCESS RIGHT HAND BOWS CLASSIFIEDS


Author Topic: String groove blues  (Read 627 times)

Offline polhemus

  • Trad Bowhunter
  • **
  • Posts: 7
String groove blues
« on: November 26, 2007, 08:31:00 PM »
I'm having some problems with making my string grooves look nice and even and the same from one another. They always seem to be a little off from each other. Sometimes they're angle will be slightly different or they just dont look quite right. Does anyone out there have any tips or tricks, maybe a homemade jig, that could help me make them better?

Online Pat B

  • TG HALL OF FAME
  • Trad Bowhunter
  • *****
  • Posts: 15009
Re: String groove blues
« Reply #1 on: November 26, 2007, 10:43:00 PM »
I usually measure about 3/4" on the back and 1" on the belly with a pencil. I mark all around the tip then use a chain saw file to cut the grooves in the sides and bring them together on the belly. Everything above the string groove is excess weight so I remove as much material from the sides and belly, above the groove, as I shape the tip.    Pat
Make the most of all that comes and the least of all that goes!
TGMM Family of the Bow

Offline Eric Krewson

  • Trad Bowhunter
  • **
  • Posts: 3126
Re: String groove blues
« Reply #2 on: November 26, 2007, 11:07:00 PM »
Cut the groove across the back, string the bow at normal brace height, mark both sides of the string, file between the lines.


Offline Whip

  • Moderator
  • Trad Bowhunter
  • ***
  • Posts: 8189
Re: String groove blues
« Reply #3 on: November 26, 2007, 11:21:00 PM »
That looks easy Eric.  :thumbsup: , and great timing for me.  I'm about ready to cut my first set on a stave I've been working on.  Any more "tip tips" you can share?  It looks like you laminate the tip?
PBS Regular Member
WTA Life Member
In the end, it is not the years in your life that count. It's the life in your years. Abraham Lincoln.

Offline Crooked Stic

  • TG HALL OF FAME
  • Trad Bowhunter
  • *****
  • Posts: 6065
Re: String groove blues
« Reply #4 on: November 27, 2007, 01:09:00 AM »
Eric thats a idea that never crossed my mind. Thanks.  :thumbsup:
High on Archery.

Offline Eric Krewson

  • Trad Bowhunter
  • **
  • Posts: 3126
Re: String groove blues
« Reply #5 on: November 27, 2007, 07:52:00 AM »
I like to glue on overlays on my bows. I had a couple bows split out at the string nocks early on so I add overlays on all my bows now. Here is a similar overlay after finish shaping.


Online Walt Francis

  • Administrator
  • Trad Bowhunter
  • ****
  • Posts: 3091
Re: String groove blues
« Reply #6 on: November 27, 2007, 08:08:00 AM »
Eric,
That appears to be an excellent method; I will have to give it a try.  

Nice looking tips are one of the first things I check when looking at a bow, it is one of the signs that the bowyer takes pride in his craftsmanship.  I have taught numerous people how to make bows over the last several years and none of them have managed to get nice looking tips on their first few bows.  It might be that I am not a good teacher, none of them were skilled woodworkers, or getting them right has a learning curve (a longer curve for some) and takes a little practice.  I suggest that before anyone starts cutting the string groves on their first bow that you practice on a couple of scrap pieces of wood mocked up to look like your tips.  It doesn’t take much time to mockup some practice tips with a saw and a belt sander and if you make any mistakes they can be thrown away instead of becoming a permanent part of the new bow.
The broadhead used, regardless of how sharp, is nowhere as important as being able to place it in the correct spot.

Walt Francis

Regular Member of the Professional Bowhunters Society

Offline Buemaker

  • Trad Bowhunter
  • **
  • Posts: 3106
Re: String groove blues
« Reply #7 on: November 27, 2007, 08:39:00 AM »
Well, one learns as long as one lives, the saying goes. Eric, that is a wonderful simple idea, thanks.  Bue--.

Offline madness522

  • TGMM Member
  • Trad Bowhunter
  • ***
  • Posts: 1743
Re: String groove blues
« Reply #8 on: November 27, 2007, 11:15:00 AM »
After you get it marked you can start with a triangle file to start the groove before switching to a round file.
Barry Clodfelter
TGMM Family of the Bow.

Offline ChristopherO

  • Trad Bowhunter
  • **
  • Posts: 930
Re: String groove blues
« Reply #9 on: November 27, 2007, 11:50:00 AM »
Eric,
Would you suggest that trick only on laminated backs?  An unbacked self or board bow may be at risk if the back is cut, isn't it?

Offline Eric Krewson

  • Trad Bowhunter
  • **
  • Posts: 3126
Re: String groove blues
« Reply #10 on: November 27, 2007, 12:13:00 PM »
Yep, you don't want to cut across the back of an unbacked bow. I add tip overlays to self and board bows and use my marking methood.

For board or selfbows without overlays cut just enough side grooves to hold the string than mark for the final cutting.

Offline Shaun

  • TG HALL OF FAME
  • Trad Bowhunter
  • *****
  • Posts: 3619
Re: String groove blues
« Reply #11 on: November 27, 2007, 12:55:00 PM »
I like it Eric.

When I file grooves I use a trick from Wingnut; after cutting the first angled groove, flip the bow over and hold the small file in the first groove. You can then easily eyeball the path of the second and mark with a pencil. Check often as you cut the second groove. Works on selfbows where you don't have an overlay and don't want to cut into the backing.

Offline Whip

  • Moderator
  • Trad Bowhunter
  • ***
  • Posts: 8189
Re: String groove blues
« Reply #12 on: November 27, 2007, 08:00:00 PM »
I'm sure this will sound like a dumb question, but since the stick I am working on is the first bow I have tried building I'm entitled to ask dumb questions.

Do you put overlays on an unbacked bow?  If so, how do you mate the surface of the back of the bow and the overlay?
PBS Regular Member
WTA Life Member
In the end, it is not the years in your life that count. It's the life in your years. Abraham Lincoln.

Offline AkDan

  • Trad Bowhunter
  • **
  • Posts: 2119
Re: String groove blues
« Reply #13 on: November 28, 2007, 12:54:00 AM »
so simple, yet sooo effective!!!  Thanks for showing that Eric...almost done with the boat, and then onto bow building time...

Offline Eric Krewson

  • Trad Bowhunter
  • **
  • Posts: 3126
Re: String groove blues
« Reply #14 on: November 28, 2007, 08:30:00 AM »
I did 4 overlays yesterday, here is how I did it.

I like my overlays long and flowing. I have my string nocks 1" from the tip of the bow and start the overlay 2 1/4" from the tip. I measure down from the tip 2 1/4" and make a mark across the back of the limb. I flatten this area with the disc part of my combination belt-disc sander.

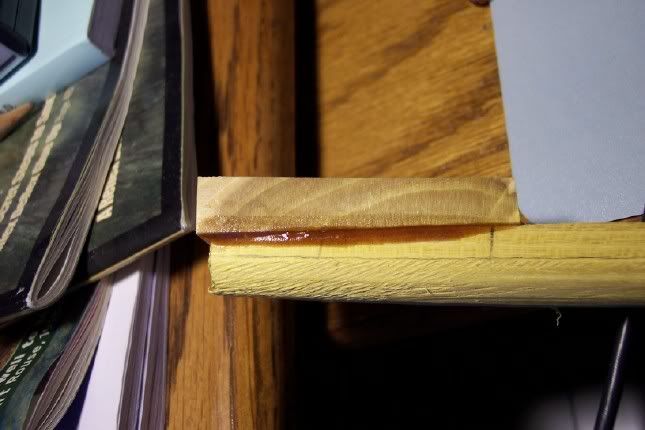
I am careful not to make a step at my line and also cut the flattened place not parallel with the back  but at an angle to the belly, about 20 degrees. This way you don't have a huge hump on the back of the bow in the form of an overlay. The pic shows the angle of the cut.


Next I take my stave to the vice and work on my flattened area with a file and finally a sanding block to straighten out the cut from the sander. The sander removes a lot of wood but does not give a good mating surface.

While I am filing and block sanding I hold my overlay piece in place on the limb, hold both up to the ceiling light and check the fit. Any gap  in the mating surface will let light through when viewed from the side. I glue the overlay on when I am satisfied with a good fit between the overlay and limb.

The 2/14" overlay sounds awful long but looks pretty good after it is shaped to a nice flowing shape. This one is osage burl.


Online Walt Francis

  • Administrator
  • Trad Bowhunter
  • ****
  • Posts: 3091
Re: String groove blues
« Reply #15 on: November 28, 2007, 09:11:00 AM »
Joe,
Overlays are optional unless you are using a soft wood like yew.  This is the method I use: Flatten the back of the tip area being careful not to violate the growth ring below the tip overage area.  It is alright to violate the ring where it will be covered by the overlay, but I try to avoid doing so if possible.  Next flatten the matting surface of the overlay and test fit until there are no gaps around the entire tip area.  The overlay is easier to flatten if you leave it large enough to hold during the flattening process.  Now trace the outline of the overlay then cut outside the line at least 1/8” leaving it oversized.  Clean both surfaces (I use Acetone or Isopropyl alcohol).  Cover both surfaces with CA glue, 2 ton epoxy, or Smooth On, and clamp in to place.  After the glue has cured shape the tip as desired with files or belt sander.  Also, I bevel the bottom edge of the overlay on the belt sander before gluing to make the transition from limb to overlay easier to shape.  Run a search on limb tips or overlays and you should find goods advice and more coherent instructions on how others install them.
The broadhead used, regardless of how sharp, is nowhere as important as being able to place it in the correct spot.

Walt Francis

Regular Member of the Professional Bowhunters Society

Offline c ott

  • Trad Bowhunter
  • **
  • Posts: 59
Re: String groove blues
« Reply #16 on: November 28, 2007, 09:16:00 AM »
Eric that is the best way I have seen to lay out string grooves. Don't know if I ever would have thought of that. Thanks.

Offline Whip

  • Moderator
  • Trad Bowhunter
  • ***
  • Posts: 8189
Re: String groove blues
« Reply #17 on: November 28, 2007, 03:19:00 PM »
That's what I was wondering about Walt.  I knew violating the growth ring is a big no no generally and pretty much guarantees a ruined bow.  But your saying it's ok as long as the overlay covers any part of the ring that got violated, right?  That back of the bow is of course somewhat rounded, and would need to be sanded flat to mate with the overlay.
Being my first one and all, is this something you recommend I try?  Or would you recommend straight tips and keep it simple?
PBS Regular Member
WTA Life Member
In the end, it is not the years in your life that count. It's the life in your years. Abraham Lincoln.

Online Walt Francis

  • Administrator
  • Trad Bowhunter
  • ****
  • Posts: 3091
Re: String groove blues
« Reply #18 on: November 28, 2007, 10:13:00 PM »
Joe,
I like to run the overlay at least ¼” - to 3/8” past any ring violation, depending on the type of overlay used.  It is easier to leave the overlays off but adding them is a fairly simple task and doesn’t take much time.  I usually base my decision on rather it will add to the looks of the bow.
The broadhead used, regardless of how sharp, is nowhere as important as being able to place it in the correct spot.

Walt Francis

Regular Member of the Professional Bowhunters Society

Users currently browsing this topic:

0 Members and 1 Guest are viewing this topic.
 

Contact Us | Trad Gang.com © | User Agreement

Copyright 2003 thru 2024 ~ Trad Gang.com ©