INFO: Trad Archery for Bowhunters


Author Topic: Restoration 101 - (Holy Smokes!)  (Read 7382 times)

Offline TonyW

  • Moderator
  • Trad Bowhunter
  • ***
  • Posts: 1033
Re: Restoration 101 - (Holy Smokes!)
« Reply #60 on: March 08, 2014, 11:27:00 AM »
R101 continues ..

A good coating of the barge will also help soften the leather.
   

Holy crap that barge is not as thick as the pic makes it look. It is a good even layer but that pic makes it look like I poured it over the leather.

Offline TonyW

  • Moderator
  • Trad Bowhunter
  • ***
  • Posts: 1033
Re: Restoration 101 - (Holy Smokes!)
« Reply #61 on: March 08, 2014, 11:30:00 AM »
After your glues dries toss the grip back into some warm water again and repeat the same steps as in the earlier lesson. Line up your straight back edge and then flip the bow over and work from the throat of the grip toward the back of the bow. Keep working until all the wrinkles are out and then overlap the long flap on the back or underlap I should say. Keep working the wet leather smooth. Booya it should come out looking something like this. If you have a few small edge gaps where the glue did not stick along the top or bottom and even in your overlap joint you can put a little barge under it with a tooth pick and let it set for 3-5 minutes. That will soften the leather again. Then smooth that spot over with your thumb. You may see a dark line along your overlap but that’s normally from the wet glue. It should clear up when the glue is completely cured. I should have added that front edge of the grip that's not glued down. I do that so I can pull the leather tight from that edge. Then I apply glue there last and finish it off.


Offline TonyW

  • Moderator
  • Trad Bowhunter
  • ***
  • Posts: 1033
Re: Restoration 101 - (Holy Smokes!)
« Reply #62 on: March 08, 2014, 11:31:00 AM »

Offline TonyW

  • Moderator
  • Trad Bowhunter
  • ***
  • Posts: 1033
Re: Restoration 101 - (Holy Smokes!)
« Reply #63 on: March 08, 2014, 11:32:00 AM »


OK your leather dried overnight. That allowed the glue to cure 100% also. The glue is rock solid and the leather is tight. No finish has been applied as yet only the leather dye. If done correctly the leather finish will tighten it again making a really good fit. I was going to trim those two place in need of trimming before I posted the pics but that would have been kind of cheesy of me to try and hide something I needed to fix wanting to make you guy's think I did the perfect grip every time NOT going to happen. We'll trim our grip this morning and the really tricky part now I forgot the hole for the quiver bushing and you can see the leather tightened up and left and impression. Or did I hummmmm I don't think so. You will want to stick around for this one.

Offline TonyW

  • Moderator
  • Trad Bowhunter
  • ***
  • Posts: 1033
Re: Restoration 101 - (Holy Smokes!)
« Reply #64 on: March 08, 2014, 11:33:00 AM »

Offline TonyW

  • Moderator
  • Trad Bowhunter
  • ***
  • Posts: 1033
Re: Restoration 101 - (Holy Smokes!)
« Reply #65 on: March 08, 2014, 11:36:00 AM »
Darn it.


That pic shows the place I need to trim and the impression of the bushing hole.

Offline TonyW

  • Moderator
  • Trad Bowhunter
  • ***
  • Posts: 1033
Re: Restoration 101 - (Holy Smokes!)
« Reply #66 on: March 08, 2014, 11:37:00 AM »
You better be damn careful with that snap knife too. One bad slip and you've sold the farm. Trust me on this one just take your time and be really, really careful. A nice cut into that new finish will spell disaster for sure at this point.


Offline TonyW

  • Moderator
  • Trad Bowhunter
  • ***
  • Posts: 1033
Re: Restoration 101 - (Holy Smokes!)
« Reply #67 on: March 08, 2014, 11:38:00 AM »

Offline TonyW

  • Moderator
  • Trad Bowhunter
  • ***
  • Posts: 1033
Re: Restoration 101 - (Holy Smokes!)
« Reply #68 on: March 08, 2014, 11:39:00 AM »
And then


Offline TonyW

  • Moderator
  • Trad Bowhunter
  • ***
  • Posts: 1033
Re: Restoration 101 - (Holy Smokes!)
« Reply #69 on: March 08, 2014, 11:40:00 AM »
And that little tiny piece on the back of the bow that did not quite line up, I got rid of that as well.


Offline TonyW

  • Moderator
  • Trad Bowhunter
  • ***
  • Posts: 1033
Re: Restoration 101 - (Holy Smokes!)
« Reply #70 on: March 08, 2014, 11:42:00 AM »
Now for that pesky little quiver bushing I forgot to punch the hole for or did I. here’s 2 pics because I'm not sure which one looks clearest on you pc.


Offline TonyW

  • Moderator
  • Trad Bowhunter
  • ***
  • Posts: 1033
Re: Restoration 101 - (Holy Smokes!)
« Reply #71 on: March 08, 2014, 11:44:00 AM »
Don Ward continues ...

Yeah I know you’re all saying, “What’s that field tip for?” I would need to point out first to you guys. Yes I do have a leather punch, fact is I have several and a couple are the best one's made. But ya know how it is; sometimes the best can be made better. So I scraped the leather punch idea year ago. I found an 11/32" field tip works better than anything for me anyhow. You can see I put the field tips point on the tool rest of my belt sander. Then I slowly feed the field tip against the sanding belt until I just kind of break into the inside cavity creating a super sharp cutting edge from the inside of the tip. This will also make the perfect bevel to taper the leather for the bushing. Once more this is where you do not want to screw up. This is nearly the final operation on the bow and if you screw up now it can get ugly real fast.


Offline TonyW

  • Moderator
  • Trad Bowhunter
  • ***
  • Posts: 1033
Re: Restoration 101 - (Holy Smokes!)
« Reply #72 on: March 08, 2014, 11:46:00 AM »
You'll need a few tools something along these lines.


Offline TonyW

  • Moderator
  • Trad Bowhunter
  • ***
  • Posts: 1033
Re: Restoration 101 - (Holy Smokes!)
« Reply #73 on: March 08, 2014, 11:47:00 AM »
By pressing around the hole with your thumb you should be able to find it pretty easy. If you are having trouble locating the bushing hole you can dampen the leather. You will need to wet the entire leather grip, all the way around or your colors may not match if you just dampen right where the hole is. The bow is all sealed under the leather. So wetting the leather should be fine. Once you located your bushing hole, place your field tip right over the hole and twist the bushing completely around and then completely around again in the other direction. That will help keep the cutter kind of centered. Once you’re done it should look something like this.


Offline TonyW

  • Moderator
  • Trad Bowhunter
  • ***
  • Posts: 1033
Re: Restoration 101 - (Holy Smokes!)
« Reply #74 on: March 08, 2014, 11:50:00 AM »
Please note the bit of barge cement showing in the hole. The glue is so thin is shouldn’t hurt anything. However there is some of the leather remaining in the hole you will have to use your snap knife and cut the extra leather out. If the leather gets between the bushing and wood making the hole too tight it will splint your riser for sure.


Offline TonyW

  • Moderator
  • Trad Bowhunter
  • ***
  • Posts: 1033
Re: Restoration 101 - (Holy Smokes!)
« Reply #75 on: March 08, 2014, 11:52:00 AM »
Don Ward continues his lesson ....


The inside and outside pieces both cut somewhat clean.


Offline TonyW

  • Moderator
  • Trad Bowhunter
  • ***
  • Posts: 1033
Re: Restoration 101 - (Holy Smokes!)
« Reply #76 on: March 08, 2014, 11:54:00 AM »
 

Remember we will be adding finish to the leather and that will give you a chance to get all the wrinkles out when the leather is dampened from the leather finish.

No lubricant needed it should screw right into the wood no problem it’s the same bushing that came out of that bow originally and the threads match real good.
 
You can also tighten the bushing up by using the screw. Screw the screw into the bushing and then just tighten the screw and bushing both at the same time.

You will want to be super careful using the screw to tighten up the bushing as the screwdriver can slip out of the slot real easy.

I'm pretty certain if you can find a small Craftsman flat blade screwdriver it has a 1/4" shank. Just grind the flat blade off and you got yourself a quiver bushing installing tool.

 I do use the adjustable wrench on the shank to make one 1/4-1/2 turn to seat the bushing. Be careful there because the last 1/4-1/2 turn tightening will wrinkle the leather.

Bear did tap the hole prior to installing the bushing. The reason being if you force the bushing into said hole hoping to cut threads it will normally split the riser. If you do not have the correct tap you can drill the hole almost the size of the bushing so it does not split the wood.

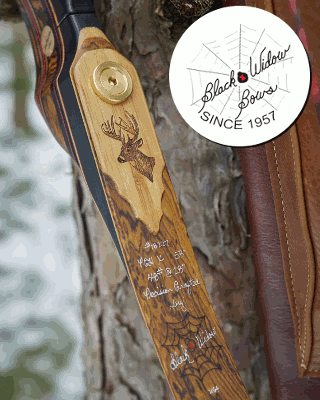
Add a little epoxy to the threads and it should be fine once the epoxy is cured. As for the counter sunk type hole in my B riser. The bushing serves to hold the leather down around the edges. So if you counter sink it the leather may come unglued around the edge of the bushing hole.

Offline TonyW

  • Moderator
  • Trad Bowhunter
  • ***
  • Posts: 1033
Re: Restoration 101 - (Holy Smokes!)
« Reply #77 on: March 08, 2014, 12:04:00 PM »


I think it will be needing a strike plate to match.

Offline TonyW

  • Moderator
  • Trad Bowhunter
  • ***
  • Posts: 1033
Re: Restoration 101 - (Holy Smokes!)
« Reply #78 on: March 08, 2014, 12:06:00 PM »
Strike Plate 101 begins...

For today strike plates 101. A few strike plate-making tools.


Offline TonyW

  • Moderator
  • Trad Bowhunter
  • ***
  • Posts: 1033
Re: Restoration 101 - (Holy Smokes!)
« Reply #79 on: March 08, 2014, 12:07:00 PM »
That square is 2 inches wide.


Users currently browsing this topic:

0 Members and 1 Guest are viewing this topic.
 

Contact Us | Trad Gang.com © | User Agreement

Copyright 2003 thru 2024 ~ Trad Gang.com ©