INFO: Trad Archery for Bowhunters


Author Topic: Longbow build along (it's done)  (Read 31468 times)

Offline madness522

  • TGMM Member
  • Trad Bowhunter
  • ***
  • Posts: 1743
Re: Longbow build along (it's done)
« Reply #40 on: April 10, 2008, 06:54:00 AM »
What an awesome thread.  I am in the planning stages of build one too and this is really inspiring me and hopefully will answer a few quesions along the way.
Barry Clodfelter
TGMM Family of the Bow.

Offline ChristopherO

  • Trad Bowhunter
  • **
  • Posts: 933
Re: Longbow build along (it's done)
« Reply #41 on: April 11, 2008, 02:04:00 PM »
RGK,
Just to help with the terminology:  The side of the bow limbs that face the archer is the belly.  The side that faces the target is the back of the bow.  The beveled cuts you glued together to create one long piece of wood lam is a skive cut.  They are real handy, too.  I just used that same technique with a Hickory lam this week on a boo backed bow.  
It is looking real good.  Can't wait to see the final product,
Christopher

Offline RGK

  • Trad Bowhunter
  • **
  • Posts: 845
Re: Longbow build along (it's done)
« Reply #42 on: April 11, 2008, 02:55:00 PM »
Thanks, I am a rookie and learning as I go.
Member: WI Bowhunters Association
Member: WI Traditional Archers
Member: American Broadhead Collectors Club
Member: Sherwood Forest Bowmen

Offline ONE SHOT

  • Trad Bowhunter
  • **
  • Posts: 157
Re: Longbow build along (it's done)
« Reply #43 on: April 11, 2008, 03:09:00 PM »
Instead of the skive cut , you will have a much stronger back one piece wood lamination if you use a "Z" splice instead. Or a single fish tail splice is another good option, a long shallow angle lets say about four or five inches will also do. with these cuts you will git more surface area for the epoxy or glue to grab onto.

Less chance of the limb pulling apart on the Bow....ONE SHOT...

Offline Aram

  • Trad Bowhunter
  • **
  • Posts: 480
Re: Longbow build along (it's done)
« Reply #44 on: April 11, 2008, 06:55:00 PM »
Looking real good. You make it look so easy I might try a glass bow soon.
If I got this far I think I'd stay up all night and call in sick. I would be sick until I'd finish it.
 :)
Looking forward to it.

Offline chrisg

  • Trad Bowhunter
  • **
  • Posts: 296
Re: Longbow build along (it's done)
« Reply #45 on: April 12, 2008, 02:27:00 AM »
On glass backed bows that don't bend through the handle and have handle overlays there is very little chance of a skive cut giving way, if it has sufficient angle and the joint is even all the way through. JMHO
chrisg

Offline TradOnly

  • Trad Bowhunter
  • **
  • Posts: 123
    • Life Insurance Agent
Re: Longbow build along (it's done)
« Reply #46 on: April 12, 2008, 02:08:00 PM »
Where can I get the pattern for the form?  I bought one from 3R but it only has the reflex in the extreme ends of the bow.  I would rather have the almost recurve shape.
Martin Savannah Longbow 50# @ 29"
Martin Savannah Stealth 55# @ 28"
Griffin Takedown 52# @ 28"
Easton Bloodline 330

Offline RGK

  • Trad Bowhunter
  • **
  • Posts: 845
Re: Longbow build along (it's done)
« Reply #47 on: April 15, 2008, 10:10:00 PM »
The pattern is untested at this time.

While health events in my life right now limit my time required to do the glue up and monitor the heat box, I do get a moment here and there to mess around with the bow project. I did a dry run and found something I never thought through (Which is the point of a dry run)


While the riser fits great on the empty form, adding the strip of fiberglass backing, four tapered laminations and the fiberglass face caused the fade-outs to lit poorly. I did not factor in the tapering of the laminations as they work away from the center of the riser. I discovered a gap at the fade-out area. I felt this gap was larger than it should be and do not want a large amount of epoxy at this hinge point. I might just be over cautious but I want a better fit and a consistent glue line. The dark black area near the thinest part of the riser is what I am worried about.


I sanded down the riser until it fit better.


I also made some tillering attachments that I saw in a post by Hera I was impressed with the ingenuity's. They are made from 4large washers that I epoxied together and cut notches in


I should be able to glue the bow together in a few days.
Member: WI Bowhunters Association
Member: WI Traditional Archers
Member: American Broadhead Collectors Club
Member: Sherwood Forest Bowmen

Offline Darel

  • Trad Bowhunter
  • **
  • Posts: 1
Re: Longbow build along (it's done)
« Reply #48 on: April 18, 2008, 06:09:00 AM »
To: RGK
"I sanded down the riser until it fit better." by means of something ? Can you show photo of this tool or tools ?

Offline RGK

  • Trad Bowhunter
  • **
  • Posts: 845
Re: Longbow build along (it's done)
« Reply #49 on: April 18, 2008, 09:03:00 PM »
I used a block of wood and 80 grit sandpaper. Sand and test. And repeat.
Member: WI Bowhunters Association
Member: WI Traditional Archers
Member: American Broadhead Collectors Club
Member: Sherwood Forest Bowmen

Offline RGK

  • Trad Bowhunter
  • **
  • Posts: 845
Re: Longbow build along (it's done)
« Reply #50 on: April 18, 2008, 09:03:00 PM »
So, enough waiting already. Time to glue this bow up. I promised a local grade school I would give them a few hours on Friday so I took the whole day off and worked on the bow in the afternoon.

I laid out everything I needed since the dry run a few days ago. Then I put both quart containers of the epoxy in a basin of hot water to warm them up a bit.
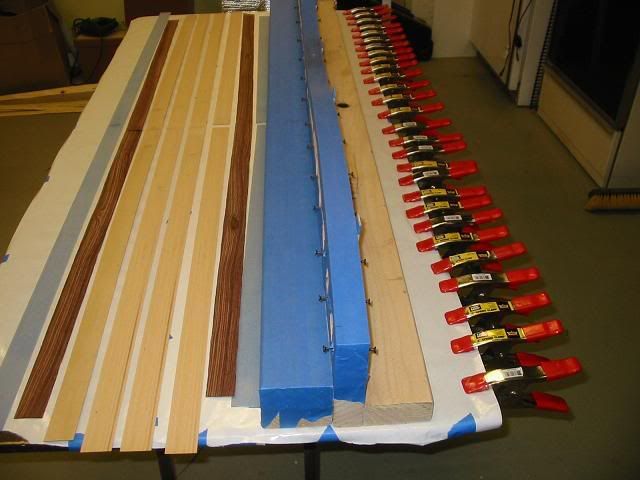


Next, I cleaned all the wood and glass surfaces and laid them in the order in which I would glue them.
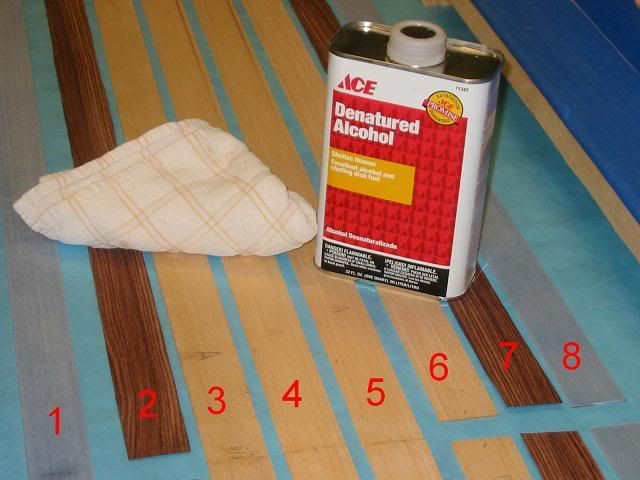
 

1. is .050 clear glass

2. is .020 kingwood vernier

3. is .090 thick hard maple taper (two pieces glued together to make one long piece)

4 and 5.  is .065 thick hard maple taper (two pieces glued together to make one long piece)

6. is a piece of hard maple .060 parallel from the piece of wood my Dad cut. (two pieces glued together to make one long piece)

7. is .020 kingwood vernier

8. is .050 clear glass

Missing from the picture is the riser.


Fast forward to a completed glue up with the warmed epoxy. Due to the mess and the fact that I was working alone, I did not slip out of my sticky rubber gloves to take pictures along the way. What a slippery mess to work with. I used a combination of spring clamps and rubber inner tube strips to compress all the layers. I had more C-clamps at the center (on the riser) but I took them off once I realized that they stuck up higher than the sides of the box and the cover would not lay flat. So much for a complete dry run. I should have tried the lid of the box also. Oh well. live and learn.
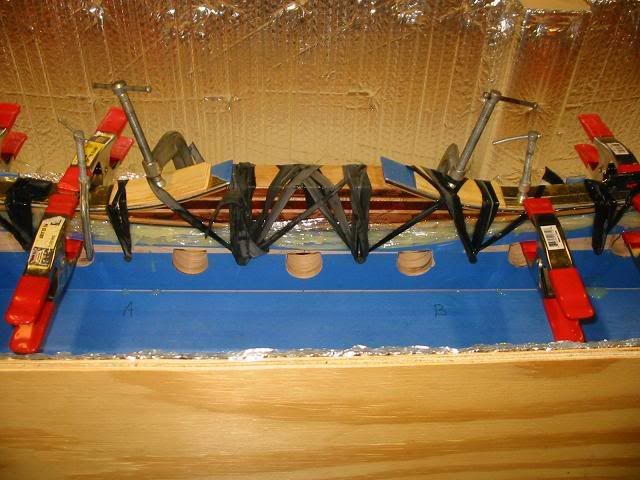
 

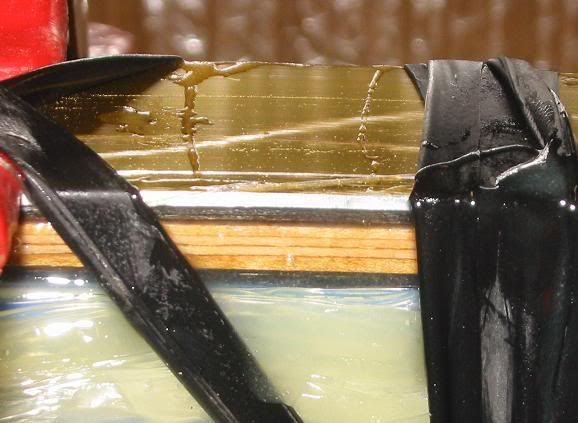
Here is a close up of all the layers and all the extra glue that oozed out. I also learned that I used too much glue. I think I could have built two bows with what came out from between the seams. Once again. Live and learn. The gold colored layer on the top is a strip of aluminum that will help spread out the load from the clamps. I was the old track from a shower door that I cut into two strips for this project.
 

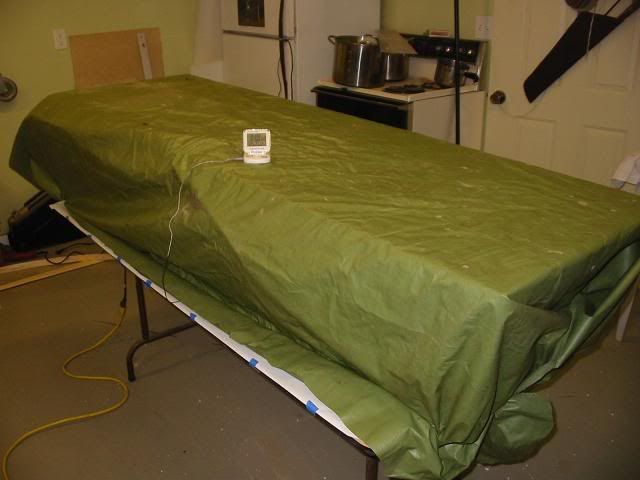
Here is the oven box doing it's job of keeping the bow at around 160F. I will unplug it before I go to bed and let it slowly cool down over night.
 
Member: WI Bowhunters Association
Member: WI Traditional Archers
Member: American Broadhead Collectors Club
Member: Sherwood Forest Bowmen

Offline suttoman

  • Trad Bowhunter
  • **
  • Posts: 493
Re: Longbow build along (it's done)
« Reply #51 on: April 19, 2008, 04:54:00 AM »
well done - this is very interesting.  I would like to try one from some of the local desert timber we have here (for the riser).  But have no idea who sells the core timbers in Australia.  I know they have to be precision ground - so unless they were made specifically for the purpose, by somebody who knew what they were doing - then they would not be viable.

Thanks for taking the time to do this RGK.  People prob don't realise how time consuming it is to take all the pictures, then upload them and write the unstructions.  You must either be retired or have more than 24 hrs in one day - LOL

Sutto
One hour of life, crowded to the full with glorious action .... is worth whole years of those mean observances of paltry decorum, in which men steal through existence, like sluggish waters through a marsh, without either honor or observation

Offline Apex Predator

  • Trad Bowhunter
  • **
  • Posts: 3372
Re: Longbow build along (it's done)
« Reply #52 on: April 19, 2008, 06:31:00 AM »
Awesome job so far.  I want to tackle one of these soon, and this will be a good reference!
I didn't claw my way to the top of the food chain to eat vegetables!

Offline tramp

  • Trad Bowhunter
  • **
  • Posts: 19
Re: Longbow build along (it's done)
« Reply #53 on: April 19, 2008, 07:12:00 AM »
i'm learning alot
thanks

Offline RGK

  • Trad Bowhunter
  • **
  • Posts: 845
Re: Longbow build along (it's done)
« Reply #54 on: April 19, 2008, 09:02:00 AM »
suttoman, I stopped watching TV 5 years ago. Not even Packer games. It created a lot of extra time in each day to make knives and arrows and bows and sausage etc, etc, etc.
Member: WI Bowhunters Association
Member: WI Traditional Archers
Member: American Broadhead Collectors Club
Member: Sherwood Forest Bowmen

Offline elk ninja

  • Trad Bowhunter
  • **
  • Posts: 1024
Re: Longbow build along (it's done)
« Reply #55 on: April 19, 2008, 10:09:00 AM »
RGK,
You are doing great!  Glue is tough to judge, but in this case, it's better to have too much than too little.  I spread my glue on both sides of the piece with a dollar store putty knife.  I look to make sure the whole piece is glistening with glue and there are no blobs and move on to the next piece or place it on the form... and I still get a lot of extra glue seeping out.  I guess it is unavoidable, but I do use a lot less glue than my first bow (I used a whole pint kit of smooth on, man was that messy!). As many bows as I have made, though, I always learn something with every one as well as learning from other's build-a-longs.  Thanks for posting it, it is going to be a looker!
Mike
>>>--Semper-Fi--->

It is better to remain silent and be thought a fool than to open one's mouth and remove all doubt.
-Abraham Lincoln

Offline Shakes.602

  • Trad Bowhunter
  • **
  • Posts: 3643
Re: Longbow build along (it's done)
« Reply #56 on: April 19, 2008, 07:22:00 PM »
Awsome Build-Along!!! I have Learned a Great Deal, and I am Anxious to See the Next Set of Pics!! Thank You for allowing ALL of Us In To Watch!!
"Carpe Cedar" Seize the Arrow!
"Life doesn't get Simpler; it gets Shorter and Turns in Smaller Circles." Dean Torges
"Faith is to Prayer what the Feather is to the Arrow" Thomas Morrow
"Ah Think They Should Outlaw Them Thar Crossbows" A Hunting Pal

Offline SOS

  • Trad Bowhunter
  • **
  • Posts: 1571
Re: Longbow build along (it's done)
« Reply #57 on: April 19, 2008, 10:39:00 PM »
More!  Bake that puppy!

Offline RGK

  • Trad Bowhunter
  • **
  • Posts: 845
Re: Longbow build along (it's done)
« Reply #58 on: April 19, 2008, 10:47:00 PM »
It was a day of ups and downs on the bow project. It took a solid hour to free the bow from the form. Removing the spring clamps was easy, The epoxy covered strips of inner tube proved to be a bit tougher. The form cleaned up easy because of all the tape I used to protect it.


The bow was a little tougher. The extra epoxy was everywhere and held bits of the inner tube captive.


To save on a mess in the shop (and because it was a nice day) I took the bow out to the back patio behind my shop. The breeze would blow all that nasty fiberglass dust away.


I learned that I need to place a layer of plastic wrap between the last layer of glass and the aluminum pressure strip. I didn't do that with this bow and needed to sand away the excess epoxy to free it from the bow. This also gave me my first look at the glue lines between the layers of wood.


after sanding both sides I could pry away the aluminum pressure strip.


Then I just had to peel away the tape to see how the Kingwood looked under the clear glass.


And the other limb.


and finally the back of the bow. Everything looked good.

 
Member: WI Bowhunters Association
Member: WI Traditional Archers
Member: American Broadhead Collectors Club
Member: Sherwood Forest Bowmen

Offline RGK

  • Trad Bowhunter
  • **
  • Posts: 845
Re: Longbow build along (it's done)
« Reply #59 on: April 19, 2008, 10:48:00 PM »
Then I worked on the riser. there was a lot of epoxy to remove.


The risers looks good and so do the skive cuts that joined the strips of maple


I then made a line on each end of the limbs that was 34 niches from the center point of the bow. (68 inches overall length) I used a fine tooth hacksaw to cut the ends off.


Both ends measured the same thickness.


Then I used the washers to string the bow before I cut the string grooves.

 
Member: WI Bowhunters Association
Member: WI Traditional Archers
Member: American Broadhead Collectors Club
Member: Sherwood Forest Bowmen

Users currently browsing this topic:

0 Members and 3 Guests are viewing this topic.
 

Contact Us | Trad Gang.com © | User Agreement

Copyright 2003 thru 2024 ~ Trad Gang.com ©