INFO: Trad Archery for Bowhunters


Author Topic: File to Knife Build-a-long (lots of pics) ****COMPLETED****  (Read 4727 times)

Offline Emmons

  • Trad Bowhunter
  • **
  • Posts: 505
Re: File to Knife Build-a-long (lots of pics) ****COMPLETED****
« Reply #20 on: July 15, 2008, 07:14:00 PM »
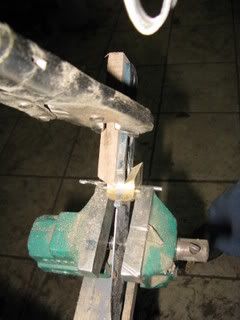
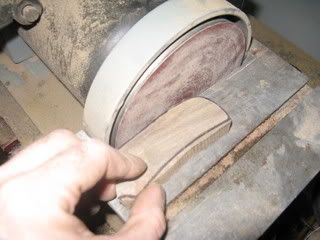
Place on the knife with the bolsters in place.  Check the fit between the handle wood and the bolster.  You want this to be very tight.  If it looks good clamp handle on one side and mark out the knife.


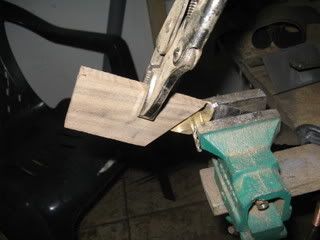
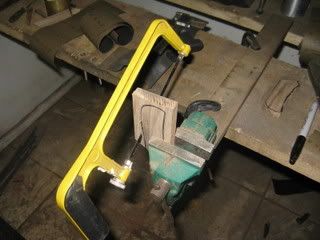
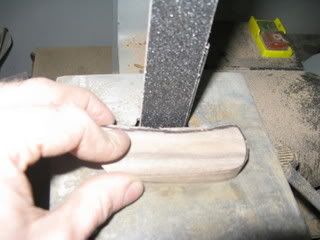
Using a small hacksaw and the belt/disc sander, I shape the handle material to the outside of the line.  I want to leave it about a 1/8” larger then the finished dimension.  This gives me a little room when I drill the pin holes and epoxy it to the knife.


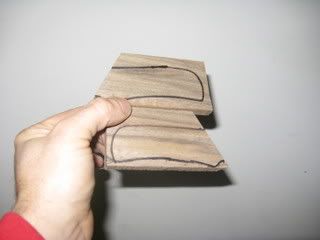
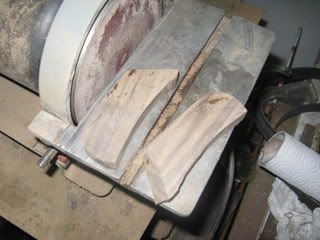
The handle wood is now roughed out.  Set it a side until final assembly.
 

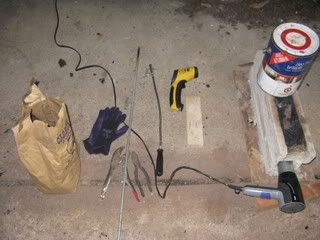
Now I move on to heat treating the blade.  I try to organize everything first.  I think this is the step that will make or break a good knife.  In the photo below I have everything ready:
Forge, blower, and charcoal
Quenching Oil (Vegetable oil)
Gloves
Magnet
Laser Temperature Gun (optional), I use thing more for checking the oil temperature.
Pliers  
 

Offline Emmons

  • Trad Bowhunter
  • **
  • Posts: 505
Re: File to Knife Build-a-long (lots of pics) ****COMPLETED****
« Reply #21 on: July 15, 2008, 07:21:00 PM »
Once the forged is fired and burning good, I normalize the blade by heating to non-magnetic and allow to air cool.  I do this three times.


Next I heat the blade to non-magnetic again and quench in 140F degree oil.  I do this with a long rod thru one of the large lightening hole in the handle.  This allows the blade to hang vertical when it is lowered into the oil.


After the blade is cooled down, I give it a quick wire brushing and clean off the oil.  I then check the hardness with a file.  The file should skate across the blade, if it cut or grabs at all I harden the blade again.  


Be very careful with the blade at this point as it can shatter if dropped.  The next step is to temper the knife.  I do this in the kitchen over set at 375F degrees (checked with the temperature gun).  I cycle the blade three times hold temperature for one hour each cycle and allowing it to air cool to below 100F degrees between each cycle.  The oven in the photo is in Celsius and show 180.
   

Blade finsh, handle assembly, and final finishing will be done in a day or two.  Thank you for being patient.  Making the build-a-long turned out to be a lot more work then I thought.

Offline Lin Rhea

  • Trad Bowhunter
  • **
  • Posts: 4541
Re: File to Knife Build-a-long (lots of pics) ****COMPLETED****
« Reply #22 on: July 15, 2008, 08:25:00 PM »
It all looks very good. Anyone could make a knife by following your instructions. Excellent job of teaching. Judging from what you have done so far, it should be a very nice knife. I certainly look forward to seeing the results. Lin
"We dont rent pigs." Augustus McCrae
ABS Master Bladesmith
TGMM Family of the Bow
Dwyer Dauntless longbow 50 @ 28
Ben Pearson recurve 50 @ 28
Tall Tines Recurve 47@28
McCullough Griffin longbow 43@28

Offline Emmons

  • Trad Bowhunter
  • **
  • Posts: 505
Re: File to Knife Build-a-long (lots of pics) ****COMPLETED****
« Reply #23 on: July 16, 2008, 12:35:00 AM »
After the knife has cooled from tempering, I start cleaning it up.  I clamp it down and block sand the whole knife with 150 grit first.


Next I clamp the knife down at the handle area and start finishing the blade.  First I block sand the ricasso and flat, and then sand the bevel.  Starting with 240 grit sanding progressing to finer and finer grits sanding in one direction (handle to point) until all mark from the previous grit are removed (about 100 strokes per grit).  I sand to 1200 grit now to get a satin finish.


At this point I like to wrap the blade with painters tape to protect it from scratches.
 

Offline Emmons

  • Trad Bowhunter
  • **
  • Posts: 505
Re: File to Knife Build-a-long (lots of pics) ****COMPLETED****
« Reply #24 on: July 16, 2008, 12:35:00 AM »
Now I measure and cut my pins.  For this knife I need two pins 1/8” for the bolster and three 1/4” mosaic pins for the handle.


Lay all the pieces out and clean with alcohol.
   

Now I start the assembly process.  The first step is to attach the bolster via peening them in place.  I also use a small amount of epoxy on them.


Clamp one of the handle scales on to the knife, making sure it is tight against the bolster.  Use the pin holes drill in the blade as a guide.  Here I clamped the knife over the center hole and drill the front and back holes.  Place the pins in these holes and more the clamp to drill the center hole.
   

Offline Emmons

  • Trad Bowhunter
  • **
  • Posts: 505
Re: File to Knife Build-a-long (lots of pics) ****COMPLETED****
« Reply #25 on: July 16, 2008, 12:39:00 AM »
With two pins thru the drilled scale, locate and clamp the other side.  Then remove the pins and drill using the scale and blade as a guide.


This is the final step of the knife assembly.  I mix two batches of epoxy, one regular and one mixed with some saw dust from the scales.  Spread the colored epoxy on the surface that mates up against the bolster and use the regular epoxy on the rest of the scales.  Attach them to the blade, then put the pins in with a coat of epoxy and clamp.


Thank you everyone complements.  I hope I can finish this up tomorrow.  It will be ready to shape the handle and finish.

Offline skullworks

  • Trad Bowhunter
  • **
  • Posts: 2012
Re: File to Knife Build-a-long (lots of pics) ****COMPLETED****
« Reply #26 on: July 16, 2008, 07:06:00 AM »
Awesome job...just AWESOME!
'cuz deer huntin' ain't catch & release!

Offline elk ninja

  • Trad Bowhunter
  • **
  • Posts: 1024
Re: File to Knife Build-a-long (lots of pics) ****COMPLETED****
« Reply #27 on: July 16, 2008, 10:35:00 AM »
Great build along!
Mike
>>>--Semper-Fi--->

It is better to remain silent and be thought a fool than to open one's mouth and remove all doubt.
-Abraham Lincoln

Offline Emmons

  • Trad Bowhunter
  • **
  • Posts: 505
Re: File to Knife Build-a-long (lots of pics) ****COMPLETED****
« Reply #28 on: July 16, 2008, 09:27:00 PM »
After the epoxy has dried remove the clamps and begin finishing the handle.
 

I start by removing the excess material and flatten the sides.  I do this with the disc sander, being careful not to heat the blade.


Now grind the wood down on the spine down to the tang, using the belt sander setup with a slack belt.


With the excess material removed, I now set the disc sander table at 45 degrees and grind a big chamfer on both sides of the handle.


Put the knife in a vise and grind the excess wood down to the tang.  Also use the Dremal to chamfer the belly side of the knife.
 

Offline Emmons

  • Trad Bowhunter
  • **
  • Posts: 505
Re: File to Knife Build-a-long (lots of pics) ****COMPLETED****
« Reply #29 on: July 16, 2008, 09:28:00 PM »
Proceed with shaping the handle, I use 80 grit emery clothe to round over all the edges.


When I have the shape I want, the next step is to block sander down to 1200 grit along the tang.
 
\\
I finish sand by hand the bolster to 1200 grit and the wood to 320 grit.


Next I apply the finish.  I like to use CA glue (super glue).  I do this by placing a bead on the wood then smooth it out with my finger.  Do not stop moving your finger or it will stick to the knife.  I apply 4 coats, sanding with 500 grit between coats.  Then on the fifth coat I wet sand with 1200 grit.
 

The final step is to remove the painters tape protecting the blade.  Clean off tape residue.  Next I polish the blade and bolster with metal polish.
 

Offline Emmons

  • Trad Bowhunter
  • **
  • Posts: 505
Re: File to Knife Build-a-long (lots of pics) ****COMPLETED****
« Reply #30 on: July 16, 2008, 09:29:00 PM »
Here is the Knife Completed.


Offline Emmons

  • Trad Bowhunter
  • **
  • Posts: 505
Re: File to Knife Build-a-long (lots of pics) ****COMPLETED****
« Reply #31 on: July 16, 2008, 09:31:00 PM »


That is it.  I hope you all like it.  Now I just have to make a sheath for it.  For that I will be following the build-a-long Robtattoo did on the cross draw sheath.

James

Offline sticshooter

  • Trad Bowhunter
  • **
  • Posts: 4210
Re: File to Knife Build-a-long (lots of pics) ****COMPLETED****
« Reply #32 on: July 16, 2008, 09:42:00 PM »
Wow that is saweeet. You need my address.LOL Great post all the way around with a awesome blade to show for it.<><
The Church of God is an anvil that has worn out many hammers.

"Walk softly..and carry a sharp   Stic."
TGMM

Offline 4runr

  • TG HALL OF FAME
  • Trad Bowhunter
  • *****
  • Posts: 6799
Re: File to Knife Build-a-long (lots of pics) ****COMPLETED****
« Reply #33 on: July 16, 2008, 10:05:00 PM »
Very nice knife, and a very nice build-a-long!
Kenny

Christ died to save me, this I read
and in my heart I find a need
of Him to be my Savior
          By Aaron Shuste

TGMM Family of the Bow

Offline skullworks

  • Trad Bowhunter
  • **
  • Posts: 2012
Re: File to Knife Build-a-long (lots of pics) ****COMPLETED****
« Reply #34 on: July 17, 2008, 07:02:00 AM »
Very nice! Thanks for an awesome build along that every knifemaker can learn something from!Fantastic job and thanks for taking all the time to show us!!!!!
'cuz deer huntin' ain't catch & release!

Offline WidowEater

  • Trad Bowhunter
  • **
  • Posts: 683
Re: File to Knife Build-a-long (lots of pics) ****COMPLETED****
« Reply #35 on: July 17, 2008, 04:04:00 PM »
freaking sweeet
Silence over speed.  Heavier arrows never hurt.

Offline cdworks

  • Trad Bowhunter
  • **
  • Posts: 98
Re: File to Knife Build-a-long (lots of pics) ****COMPLETED****
« Reply #36 on: July 17, 2008, 04:34:00 PM »
WOW great job!
C.D.Works

Offline Lin Rhea

  • Trad Bowhunter
  • **
  • Posts: 4541
Re: File to Knife Build-a-long (lots of pics) ****COMPLETED****
« Reply #37 on: July 17, 2008, 07:54:00 PM »
A knife anyone would be proud to carry! I especially appreciate your using tools that are readily available to all of us. It shows that technique and knowledge is the largest factor in being able to build a good knife.
                                    Lin
"We dont rent pigs." Augustus McCrae
ABS Master Bladesmith
TGMM Family of the Bow
Dwyer Dauntless longbow 50 @ 28
Ben Pearson recurve 50 @ 28
Tall Tines Recurve 47@28
McCullough Griffin longbow 43@28

Offline Leftieshot

  • Trad Bowhunter
  • **
  • Posts: 306
Re: File to Knife Build-a-long (lots of pics) ****COMPLETED****
« Reply #38 on: July 17, 2008, 10:41:00 PM »
VERY nice job there Chile!!

Offline Nosight

  • Trad Bowhunter
  • **
  • Posts: 684
Re: File to Knife Build-a-long (lots of pics) ****COMPLETED****
« Reply #39 on: July 18, 2008, 01:16:00 AM »
Very nice work...
 
Lin is right its not the tools that make the knife.....
 
It be the person behind them

Learned a lot on this tut. shows us beginers one does not need a huge supply of tools to do what we like doing..

Thanks for sharing.......

Later..........Buzz
Remember...aim small miss small...

Users currently browsing this topic:

0 Members and 2 Guests are viewing this topic.
 

Contact Us | Trad Gang.com © | User Agreement

Copyright 2003 thru 2024 ~ Trad Gang.com ©