INFO: Trad Archery for Bowhunters


Author Topic: Air tank forge build along  (Read 1617 times)

Offline Phoenix 1967

  • Trad Bowhunter
  • **
  • Posts: 124
Air tank forge build along
« on: February 13, 2009, 10:00:00 PM »
We are gonna builld a usefull size, fuel efficient forge, that is small enough to take along with you to where you need it. We are gonna do this with the junk I can scrounge from my stash of junk. This puppy will get the steel hot enough to forge weld.

Ok, this is the victim, an old air tank that dont hold air anymore. 'Round here, there are one or two of these in 'bout every garage, carport, and toolshed. Brand new they are like $24 from Harbor Freight.


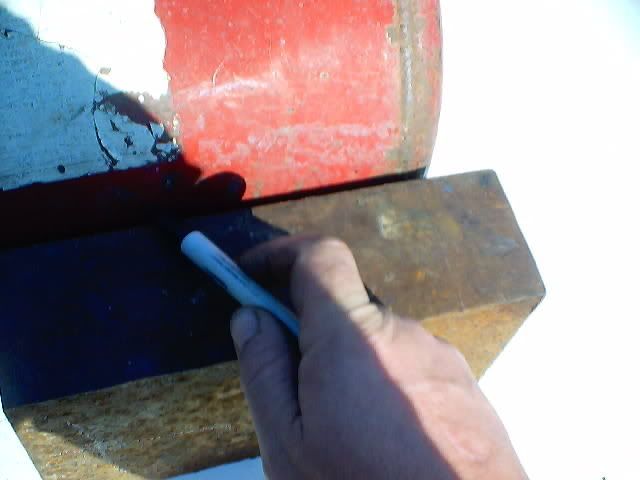
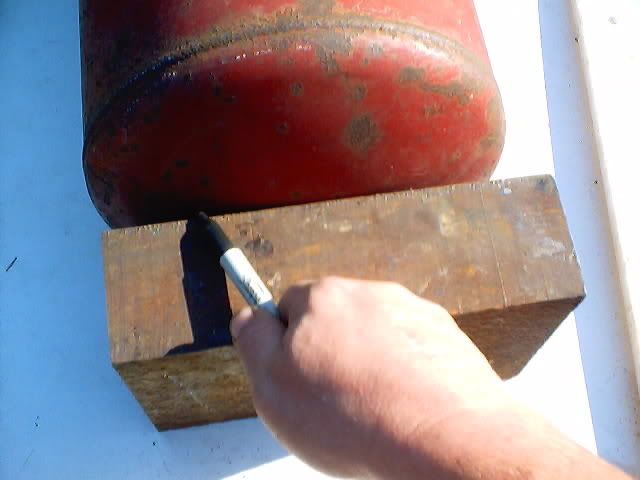
First we mark for the cut. I had a chunk of steel exactly 6 inches high, so I set it beside it and marked along the sides, and the ends...


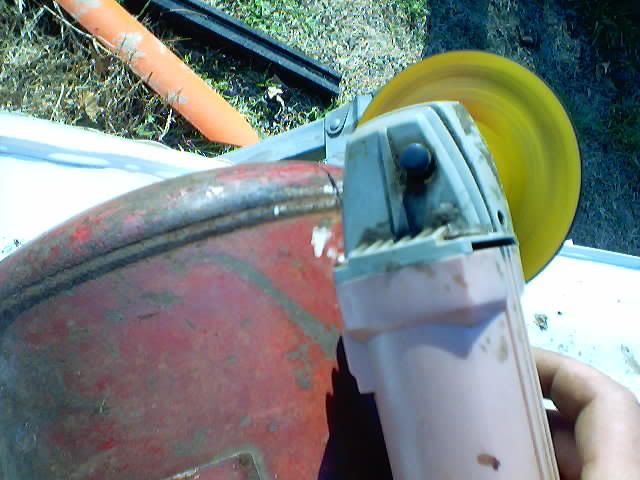
This is the dangerous part, cutting out the line. I'm using a cutoff blade on my angle grinder. you can use a jigsaw, cutting torch, anithing that will cut it will do. If you are using the tool that I am, keep in mind that you dont want to plunge too deep... just enough to cut through. if you get the thin disk bound up, BAD things happen!


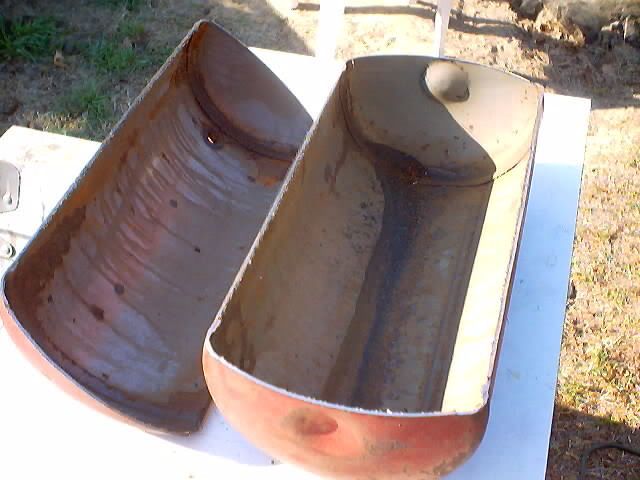
I'm gonna assume you do not have a welder. I normally, after making the cut down the first side, weld the hinges on, then continue the cut. I'm gonna do this the hard way, just for y'all, with nuts and bolts. Cut one side, mark the hinges, and continue the cut on around till you get the top off.

 
Lawren

Offline Phoenix 1967

  • Trad Bowhunter
  • **
  • Posts: 124
Re: Air tank forge build along
« Reply #1 on: February 13, 2009, 10:01:00 PM »
Use your file, sandpaper, or flap disc to dress the edges... them's YOUR fingers after all...


Almost everyone has a set of door hinges stashed somewhere in a junk drawer


Now put the top back on and trace where they go with your Sharpie


Drill the holes for the hinge bolts.


Lawren

Offline Phoenix 1967

  • Trad Bowhunter
  • **
  • Posts: 124
Re: Air tank forge build along
« Reply #2 on: February 13, 2009, 10:02:00 PM »
Now set the bottom half on end.


Make several cuts (like an asterisk) centered 2 inches up from the bottom.


Use a hammer to drive the wedges in.


Drive in Your air pipe. I chose 1 1/2 in black iron pipe.


Here's the hole


Now do the same thing for the other end.
The pipe should slide all the way through.

 
Lawren

Offline Phoenix 1967

  • Trad Bowhunter
  • **
  • Posts: 124
Re: Air tank forge build along
« Reply #3 on: February 13, 2009, 10:04:00 PM »


You want to be able to open both ends so that you can remove the ash that builds up in it. Most people use a screw on cap and a threaded pipe, I just made a slip in plug from another piece of pipe that already had an end on it.


Decide which end is gonna be the front, and make two cuts like so... using your high tech bending tool, bend the piece down to make a shelf


Lawren

Offline Phoenix 1967

  • Trad Bowhunter
  • **
  • Posts: 124
Re: Air tank forge build along
« Reply #4 on: February 13, 2009, 10:05:00 PM »
Clean up your edges..


You should now have something that resembles this


Now drill a line of holes down the center of the pipe

 
Lawren

Offline Phoenix 1967

  • Trad Bowhunter
  • **
  • Posts: 124
Re: Air tank forge build along
« Reply #5 on: February 13, 2009, 10:07:00 PM »


Now grab your shovels. Most peoples back yards have clay in them, if you dig a bit. Here, about a foot of topsoil covers that good 'ole Carolina Brickmakin' clay! If you dont have clay in your area, buy a bag of the cheapest clay kitty litter you can find, and soak it for a day in water... mix it in your backyard dirt. It works great.


Time to line the Forge!
Start packing the damp clay sand mix against the walls. Pack it as tight as you can. If your spouse thought something was wrong with you when you started this project, seeing a grown adult playing in the mud might make 'em call the "nice young men in the clean white coats" to pay you a visit!


This is something like what you should have at the end. I didn't bolt the lid on, so you could see what I'm doin better


I had this SS angle iron Base that I scavenged (Legaly!) from work, looks like great forge table material to me!

 
Lawren

Offline Phoenix 1967

  • Trad Bowhunter
  • **
  • Posts: 124
Re: Air tank forge build along
« Reply #6 on: February 13, 2009, 10:08:00 PM »
Add a metal door from an electrical cabinet and Viola! An all metal, non-flamable forge table! Now most of y'all will use one of these to provide airflow. That Hairdryer provides PLENTY of air for a forge of this design. Doh! I got Caught! Well, back to scrounging... I found this old squirrel cage blower in an exhaust fan from a bathroom I demo'd out on the base. It'll do!


Now we have the old Round Peg / Square Hole problem... Let's see... A quick raid of the pantry when the wife wasn't looking netted me a can of pumpkin (leftover from thanksgiving) that's just about the right size...


Empty the contents, and make 4 90 degree bends to make one end square...


The bottom had a circleJUST the rigt size for the pipe... Cut it out, place square end in square hole, round pipe in round hole and You're there!


Fire that thing up!


Lawren

Offline Phoenix 1967

  • Trad Bowhunter
  • **
  • Posts: 124
Re: Air tank forge build along
« Reply #7 on: February 13, 2009, 10:10:00 PM »
With the lid on


Dang that air blast is high!


Normally Iwould place a dimmer switch in the circuit But... lemme try something here


Yup! it worked! Looks kinda homegrown though... Lemme see what else I've got..


Perfect! add a screw to make it permanent, and I have an easily adjustable airflow!


Lawren

Offline Phoenix 1967

  • Trad Bowhunter
  • **
  • Posts: 124
Re: Air tank forge build along
« Reply #8 on: February 13, 2009, 10:11:00 PM »


Does it work? What do you think?


This was a bit more serious build than the chevy rim forge, and it was intended for a more serious backyard smith. The advantage is this one has a lid, is easily portable (with the hairdryer airsource) will last for years, and is big enough to handle 16 inch blades. If you are working on smaller blades, you can cover up most of the holes with mud and save charcoal. Most of this is based on Tim Lively's design (Tim's a great fellow,you really should check out his site), adapted to what I had laying around.

I purosely used basic tools, to show you that it can be done by just about anyone. Hope you enjoyed, and happy Forging!
Lawren

Offline Todd Robbins

  • Trad Bowhunter
  • **
  • Posts: 113
Re: Air tank forge build along
« Reply #9 on: February 13, 2009, 11:04:00 PM »
Great build along!  I've been looking for an easier way to heat treat longer blades than my gas forge will handle, and I think some version of this will be just the ticket.  Thanks very much!

Offline Phoenix 1967

  • Trad Bowhunter
  • **
  • Posts: 124
Re: Air tank forge build along
« Reply #10 on: February 14, 2009, 12:21:00 AM »
You are very welcome. This set up is great if you have to do a demo somewhere too.
Lawren

Offline d. ward

  • Trad Bowhunter
  • **
  • Posts: 5791
Re: Air tank forge build along
« Reply #11 on: February 14, 2009, 10:14:00 AM »
Lawsen that was super.I got a dead air compresser I was wondering what to do with.I think you just gave me the answer.Thanks bd

Offline woodsman1031

  • Trad Bowhunter
  • **
  • Posts: 132
Re: Air tank forge build along
« Reply #12 on: February 14, 2009, 10:24:00 AM »
Lawren,

  That is an awsome tutorial! Do you have a rim forge tutorial?


Tommy
Jesus Saves!

Offline Phoenix 1967

  • Trad Bowhunter
  • **
  • Posts: 124
Re: Air tank forge build along
« Reply #13 on: February 14, 2009, 11:16:00 AM »
Tommy, Idon't have one for the old chevy rim forge, but its quite simple. Find a piece of metal ductwork 14 in in diameter, and cut it however high you want the firepot. cut an 8to 10 inch hole in the side and insert a metal bladed 3 speed fan. set rim on top and line with clay.

I added a brahe rotor to the bottom of mine to raise the firepot a little.


Lawren

Offline woodsman1031

  • Trad Bowhunter
  • **
  • Posts: 132
Re: Air tank forge build along
« Reply #14 on: February 14, 2009, 11:32:00 AM »
OK, I got ya! I have a blower out of a small central AC unit. Could I put a dimmer switch on it for either forge or is it just too much air?


Tommy
Jesus Saves!

Offline Phoenix 1967

  • Trad Bowhunter
  • **
  • Posts: 124
Re: Air tank forge build along
« Reply #15 on: February 14, 2009, 11:35:00 AM »
Dimmer switch works well, and your ac blower should work fine
Lawren

Offline mwmwmb

  • Trad Bowhunter
  • **
  • Posts: 764
Re: Air tank forge build along
« Reply #16 on: February 14, 2009, 12:01:00 PM »
wow, great build along.

Offline RonnieB

  • Trad Bowhunter
  • **
  • Posts: 31
Re: Air tank forge build along
« Reply #17 on: February 15, 2009, 11:10:00 AM »
Lawren, was that ice in that bird bath??  When I as a boy up in Spartanburg it used to get that cold, but I thought you fella's in the lowlands were safe from that stuff!!

Offline Phoenix 1967

  • Trad Bowhunter
  • **
  • Posts: 124
Re: Air tank forge build along
« Reply #18 on: February 15, 2009, 12:13:00 PM »
Yeah, it's Ice. It's all that "global warming" It snowed here twice last month. Pics of it in one of the tut's
Lawren

Offline First White Falcon

  • Trad Bowhunter
  • **
  • Posts: 242
Re: Air tank forge build along
« Reply #19 on: February 15, 2009, 03:19:00 PM »
Your the MAN !!!

Users currently browsing this topic:

0 Members and 2 Guests are viewing this topic.
 

Contact Us | Trad Gang.com © | User Agreement

Copyright 2003 thru 2024 ~ Trad Gang.com ©