INFO: Trad Archery for Bowhunters


Author Topic: Sheath those hunters  (Read 1207 times)

Offline Roughcountry

  • Trad Bowhunter
  • **
  • Posts: 1112
Sheath those hunters
« on: October 15, 2010, 11:01:00 AM »
I thought I'd start a thread showing the little things leather workers do to dress up work and make it stand the test of time.
These will be just small tips that I'll post a little at a time, not a build along.

I made a couple new edgers the other day,and thought that would be a good place to start.
I see a lot of sheaths that are very well built, fit well but just lack that finished look.
Edgeing and burnishing that edge adds that little finished look that shows and also makes it more comfortable to carry.

These edgers are made from scrap O1 and 1095 left over from folders. The handles are also just scrap. They perform as good or better than the old vintage leather tools that out perform what is offered today in craft stores.

I won't spend a bunch of time on building details as most of the blade smiths here are way ahead of me in that department.
I'll start with the bissnet type edger first as it's done and I made is specialy for sheaths.

Here's the start showing a couple vintage edgers that I like and copyed ( just different sized)
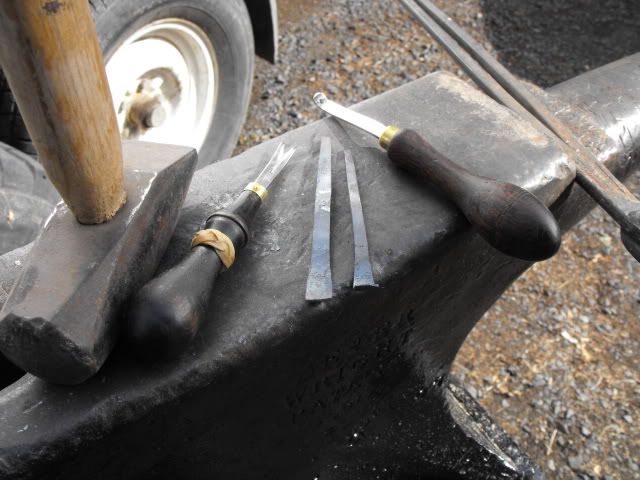
 
This edger is O1 and is dressed from the bottom side. Heat tread is left at Quench hardness and not drawn.
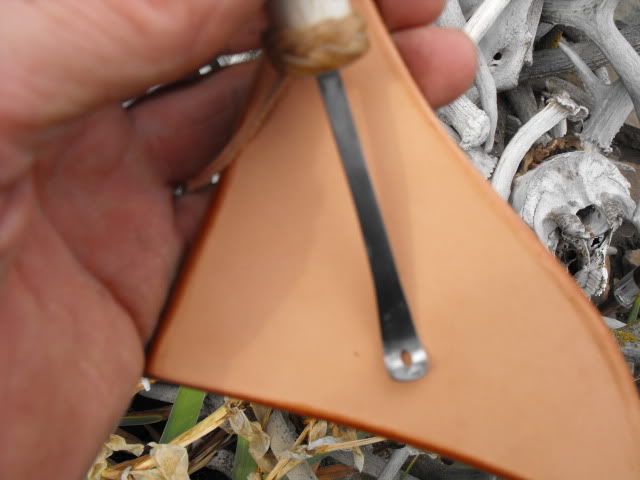
 
I don't put a handle on until it is dressed and cuts like I want it to. This type works on a push or pull that I find real handy on small curves.
The leather under the picture has been edged and burnished useing this edger and a burish cloth.
 
The finished tool
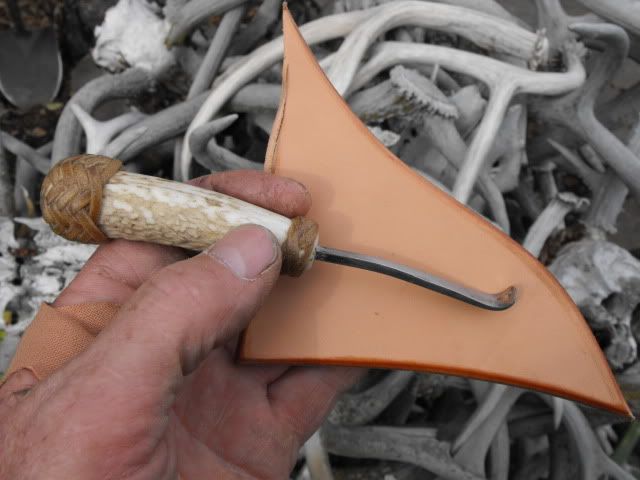
 
I'll show the other type when I get the handle done.
Fire away with any questions and I'll try to answer as I go.
After edging I'll go to stitching. Be back tonight, maybe with a couple more pics. RS

Offline Ragnarok Forge

  • Trad Bowhunter
  • **
  • Posts: 3034
Re: Sheath those hunters
« Reply #1 on: October 15, 2010, 11:12:00 AM »
How about showing how you use them in a few shots and the effects in process.  Just a pic or two would be great.  I am trying to improve my leather skills.  My sheaths just don't match up to my knives.
Clay Walker
Skill is not born into anyone.  It is earned thru hard work and perseverance.

Offline Sacred mt

  • Trad Bowhunter
  • **
  • Posts: 234
Re: Sheath those hunters
« Reply #2 on: October 15, 2010, 11:45:00 AM »
I'm watching like a HAWK...

Offline kbaknife

  • Trad Bowhunter
  • **
  • Posts: 2670
Re: Sheath those hunters
« Reply #3 on: October 15, 2010, 11:49:00 AM »
I want a better picture of the background!
When the last deer disappears into the morning mist,
When the last elk vanishes from the hills,
When the last buffalo falls on the plains,
I will hunt mice for I am a hunter and I must have my freedom.
Chief Joseph

Offline Ron LaClair

  • TG HALL OF FAME
  • Trad Bowhunter
  • *****
  • Posts: 5405
Re: Sheath those hunters
« Reply #4 on: October 15, 2010, 12:38:00 PM »
Quote
I want a better picture of the background!
 
Ya me too. What size are those tires?..   :confused: .......   :biglaugh:
We live in the present, we dream of the future, but we learn eternal truths from the past
When you were born, you cried and the world rejoiced. Live your life so that when you die, the world cries and you rejoice.
Life is like a wet sponge, you gotta squeeze it until you get every drop it has to offer

Offline Scott Roush

  • Trad Bowhunter
  • **
  • Posts: 693
Re: Sheath those hunters
« Reply #5 on: October 15, 2010, 05:29:00 PM »
I've never even seen tools like that for leather working, so I'm all.. eyes.

Offline Roughcountry

  • Trad Bowhunter
  • **
  • Posts: 1112
Re: Sheath those hunters
« Reply #6 on: October 15, 2010, 09:28:00 PM »
I'll try to figure out how to take a picture that helps show how to use a edger. If you look close at the peice of leather you can see a string of leather on the left side top, thats the edge it cuts off the leather.

I mis-spelled burnish cloth. It's a wax saturated peice of canvas cloth (10 oz. works good for sheaths) about 6 inch square would work well. Wet the edge with a sponge and rub like heck with the canvas until you see a slick brown like in the photo.
 
Ron, it's a 15" worn out horse trailer tire. Yep, the horse trailer is worn out. Still working for getting the pony to the woods though.

The horn pile is in front of my shop, home to all the weather'd horns that I find. The good ones are in the shed.

I'll be back when I get a pic on photo bucket.

Offline Roughcountry

  • Trad Bowhunter
  • **
  • Posts: 1112
Re: Sheath those hunters
« Reply #7 on: October 15, 2010, 10:02:00 PM »
Just got this picture loaded. This is how to dress the bottom of the edger. I used the corner of a bench grinder to start with on both. The 1095 you can pretty much shape with a round file before heat treating. The O1 air hardens when you shape it,if you don't have a oven (I don't)use a dremel stone bit or the like.
 
After heat treat I used a slip stone to form and sharpen the edgers so the cut the way I like. Test often on scrap leather until it cuts the size you want.

The open end edger is a push only and I dressed it to cut a special application. It still edges regular leather real well. More pics of it later.


Offline Scott Roush

  • Trad Bowhunter
  • **
  • Posts: 693
Re: Sheath those hunters
« Reply #8 on: October 16, 2010, 02:26:00 PM »
burnish cloth eh? I've been wondering how people get such nice, smooth, shiny edges.  I hate to ask this after seeing that you make such nice tools... but I've been in the habit of using an old belt sander for radiusing my edges.  Do you see a place for that? I suppose good sharp tools probably leave a much finer finish....

Offline Roughcountry

  • Trad Bowhunter
  • **
  • Posts: 1112
Re: Sheath those hunters
« Reply #9 on: October 16, 2010, 03:16:00 PM »
Scott
Lots of folks use the sander for edging leather. Nothing wrong with it but consider these points.  It's faster to use the edger
(about 3 seconds for one side) way more even and will polish smoother with the burnish cloth. Also no danger of burning the edge of the leather.

One thing I'll mention now is the kind of leather to use. Alwas use veg. tanned leather. Chrome tanned leather will rust your blades.
I use saddle skirting because I have it on hand, it's veg. tanned and I can wet form it. It also takes a stamp really well. I also like the way it ages when conditioned right and it will outlast most blades that get any kind of regular use.

I've got a couple more pictures I'll try to get on tonight. Later, RS

Offline OkKeith

  • Trad Bowhunter
  • **
  • Posts: 1237
Re: Sheath those hunters
« Reply #10 on: October 16, 2010, 03:37:00 PM »
Really good information! I would also like to see some instruction on how to apply the rawhide braiding.

Thanks for the pictures.

OkKeith
In a moment of decision the best thing you can do is the right thing. The worst thing you can do is nothing.
Theodore Roosevelt

Offline Steve Nuckels

  • Trad Bowhunter
  • **
  • Posts: 2155
Re: Sheath those hunters
« Reply #11 on: October 16, 2010, 07:53:00 PM »
Good thread!  Thanks for taking the time!  Sounds like we will get alot of good info from a saddle maker!  Thanks

The rawhide on the tool, is that a Turks head braiding?

Steve
-------
Potomac Forge

Offline Roughcountry

  • Trad Bowhunter
  • **
  • Posts: 1112
Re: Sheath those hunters
« Reply #12 on: October 16, 2010, 09:43:00 PM »
Here's a picture showing the way you'd use the edger in the push mode. My left hand would be on the leather to steady it instead of on the camera. In the pull mode the handle would be higher to bring the tip to bear on the leather.


Keith, not sure I can show how to tie those knots using the computer. The other edger is ready to have the knots tied on it, I'll get a picture of the before & after.

Steve, the little knot is a spanish ring knot and the one covering the end is a heel knot with the ground work increased once. Both knots originated with sailors like the turks head but have been adapted to rawhide and building horse gear.
My other pics are to dark, I'll retake them in better light tomorrow. RS

Offline OkKeith

  • Trad Bowhunter
  • **
  • Posts: 1237
Re: Sheath those hunters
« Reply #13 on: October 16, 2010, 10:03:00 PM »
Robin,

I bet I can find them in one of my knot books or all else fails, Google.

Sure appreciate the effort. Looking forward to more pictures.
In a moment of decision the best thing you can do is the right thing. The worst thing you can do is nothing.
Theodore Roosevelt

Offline Tom I.

  • Trad Bowhunter
  • **
  • Posts: 258
Re: Sheath those hunters
« Reply #14 on: October 17, 2010, 10:57:00 AM »
There's a great little book that graphically shows step by step the braiding of Turk's Heads, and others, available from Tandy (probably any book seller, really).  It's title is simply; Leather Braiding
by Bruce Grant.
Tom I.

Offline Roughcountry

  • Trad Bowhunter
  • **
  • Posts: 1112
Re: Sheath those hunters
« Reply #15 on: October 17, 2010, 04:10:00 PM »
Bruce Grant has three books out. The one with the most info and knots is the one with encyclopedia in the name. I'll have to look in the shop, I have all three.

My uncle trade knots back & forth with Mr Grant right after WW2, he finally stumped him with a knot he called the Gaddo knot after the sailor who showed it to him. It's one I don't know, but my brother does so I still have a litle time to learn it.

Offline Roughcountry

  • Trad Bowhunter
  • **
  • Posts: 1112
Re: Sheath those hunters
« Reply #16 on: October 17, 2010, 09:13:00 PM »

I'll try to put this all together now.
At the top there's a peice of wax sitting on a burnish cloth. Then a stitching awl, two edgers, a stitching awl with a shorter haft (handle)
Then a overstitch wheel, and a scratch compass.
Also The peice of leather to the left shows the groove a scratch compass puts in.

Last is a couple peices of leather glued together in the shape of a sheath. The groove has been put in on the stitching line and I've run the overstitch wheel down the strait side showing me where to peirce with the sewing awl.

The stright side I'll hand stitch, the other I'll machine stitch with a big hook & awl machine
Both at 5 stitches per inch.

I'll do two of these fake sheaths, edge and burnish only one. The hand stiching will be on the straight edge of the edged and burished one.
Both will have one coat of neatsfoot oil but no other finish.
Hopefully you can see the difference just these two steps will do for your sheath.


I left the bottom leather on the fake sheathes bigger for a reason. It lets me clamp that part in a stitching horse to hold it while useing the awls and sewing. It also helps steady it in the sewing machine. I trimmed it off flush with a round knife before edgeing them. ( I'll post a couple pics of a round knife later.

Offline Roughcountry

  • Trad Bowhunter
  • **
  • Posts: 1112
Re: Sheath those hunters
« Reply #17 on: October 17, 2010, 09:20:00 PM »
A  couple things I forgot to explain.
The groove you lay the stitches in help protect it from wear and make it look neater. Also you go back over the hand stitching with the overstitch wheel to set them down in the groove and round them for a more even stitch. Hard to tell the difference between the machine and hand if I do it right.
The machine has nylon thread and I hand stitch with waxed linin thread.

Hope this is all making sense. RS

Offline Ragnarok Forge

  • Trad Bowhunter
  • **
  • Posts: 3034
Re: Sheath those hunters
« Reply #18 on: October 18, 2010, 01:04:00 AM »
Things are looking great so far.  I had never heard of going back over the threads with the wheel to set them in.  Does that end up with the thread being a bit loose?  How tight do you have to pull the thread when you stitch?
Clay Walker
Skill is not born into anyone.  It is earned thru hard work and perseverance.

Offline Roughcountry

  • Trad Bowhunter
  • **
  • Posts: 1112
Re: Sheath those hunters
« Reply #19 on: October 18, 2010, 09:24:00 AM »
If you look at the overstitch wheel it has a rounded look to it. It's made specificly to go back over the stitches. It can still be used for spacing, but the wheel made for that task is called a prick wheel. Most just use the overstitch wheel and save the cost of another tool. The number stamped on the wheel is how many stitches per inch.

It won't loosen the thread, the wax helps with this. You pull the linen pretty tight and the wax helps hold it untill you get to the next stitch. The diamond shaped blade of your stitching awl also helps with this. It opens up the leather for the thread, then close's afterwards to grip it. It's better for the leather than drilling and removing leather and is way faster when you learn how to use a polished sharp awl. I use that little chunk of wax and wax my awl when pushing thru real thick skirting leather. Wax it and your good for about five holes before the glue makes it drag a bit.

Expermint on scrap leather for how tight to set your thread, go to the breaking point and then back off slightly.
 
I'll get to stitching horse's later.

Users currently browsing this topic:

0 Members and 1 Guest are viewing this topic.
 

Contact Us | Trad Gang.com © | User Agreement

Copyright 2003 thru 2024 ~ Trad Gang.com ©