Author Topic: Coming along....... Finished bow picture added  (Read 1397 times)

Offline tim roberts

  • TGMM Member
  • Trad Bowhunter
  • ***
  • Posts: 1460
Coming along....... Finished bow picture added
« on: March 29, 2009, 09:35:00 PM »
Over the weekend I got my bow laid out.  I am having trouble seeing the ring I was chasing, so I ordered a couple of staves from Mike McGuire that were already chased to a ring.  I will try to get so pictures posted tomorrow, as I have a few questions to go with the pictures.
Tim

TGMM Family of the Bow

I guess if we run into the bear that is making these tracks, we oughta just get off the trail.......He seems to like it!  
My good friend Rudy Bonser, while hunting elk up Indian Creek.

Online Pat B

  • TG HALL OF FAME
  • Trad Bowhunter
  • *****
  • Posts: 15007
Re: Coming along....... Finished bow picture added
« Reply #1 on: March 29, 2009, 11:43:00 PM »
Place the stave between you and bright sunlight and the rings will jump at you.
Make the most of all that comes and the least of all that goes!
TGMM Family of the Bow

Offline Roy Steele

  • Trad Bowhunter
  • **
  • Posts: 1087
Re: Coming along....... Finished bow picture added
« Reply #2 on: March 30, 2009, 09:12:00 AM »
Your right PAT also try wiping it with a damp rag.The ring your takeing off will come out darker.The early wood between the rings will suck up the water.I do this to see dips or valleys as some people call them.This works very well on white woods or hard woods.This will make it so clear anyone can saee the rings.
DEAD IS DEAD NO MATTER HOW FAST YOUR ARROW GETS THERE
 20 YEARS LEARNING 20 YEARS DOING  20 YEARS TEACHING
  CROOKETARROW

Online Walt Francis

  • Administrator
  • Trad Bowhunter
  • ****
  • Posts: 3089
Re: Coming along....... Finished bow picture added
« Reply #3 on: March 30, 2009, 03:59:00 PM »
Tim,
Let's see some pictures.
The broadhead used, regardless of how sharp, is nowhere as important as being able to place it in the correct spot.

Walt Francis

Regular Member of the Professional Bowhunters Society

Offline tim roberts

  • TGMM Member
  • Trad Bowhunter
  • ***
  • Posts: 1460
Re: Coming along....... Finished bow picture added
« Reply #4 on: March 30, 2009, 07:52:00 PM »


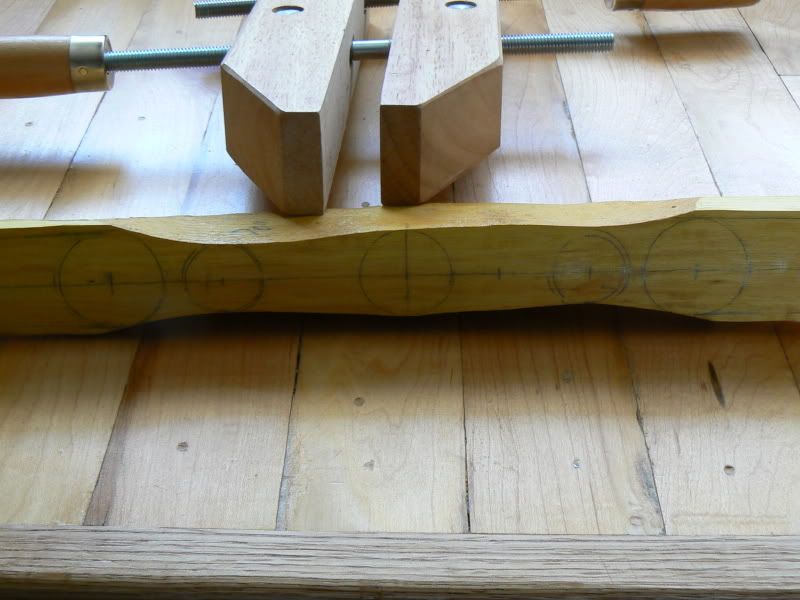
Ok, here is a couple of pictures,  The handle was roughed out when I got the stave so I did my lay out to fit that.  The stave is 70" long and because of where the handle is cut out I will be able to get a 64" bow out of it with the lower limb being 1-1/2 shorter that the upper limb. The tips are layed out to 3/4 of an inch wide, I am thinking of narrowing them to a half an inch.  It is scraped down to close to the lay out.
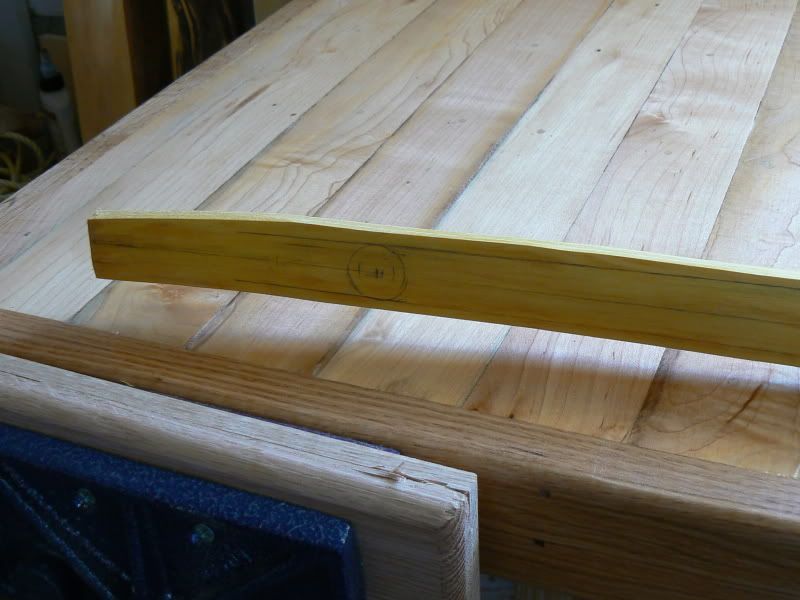
The questions I have now is, do I want to put the bow on the form now and bend the limbs, before taking any more wood off.  I have been floor tillering the bow bending it 2-3 inches, and there haven't seemed to be any problems there. It has about 2-3" of reflex, would like a little more on the tips though.
Well as you can see I am confused as ever, if this confusion continues much longer, I may need to take a ride to Big Sky one weekend???  :confused:    :)  
Thanks for all the help and patience.......
Tim

TGMM Family of the Bow

I guess if we run into the bear that is making these tracks, we oughta just get off the trail.......He seems to like it!  
My good friend Rudy Bonser, while hunting elk up Indian Creek.

Offline tim roberts

  • TGMM Member
  • Trad Bowhunter
  • ***
  • Posts: 1460
Re: Coming along....... Finished bow picture added
« Reply #5 on: April 02, 2009, 09:41:00 PM »
ttt
Tim

TGMM Family of the Bow

I guess if we run into the bear that is making these tracks, we oughta just get off the trail.......He seems to like it!  
My good friend Rudy Bonser, while hunting elk up Indian Creek.

Offline Eric Krewson

  • Trad Bowhunter
  • **
  • Posts: 3126
Re: Coming along....... Finished bow picture added
« Reply #6 on: April 02, 2009, 11:33:00 PM »
I would wait until you get your bow strung before you narrow the tips. You will have some room to move the string over one way or another with them as wide as you have them now. Definitely go to 1/2" or less after you see how it looks strung.

Online Walt Francis

  • Administrator
  • Trad Bowhunter
  • ****
  • Posts: 3089
Re: Coming along....... Finished bow picture added
« Reply #7 on: April 03, 2009, 12:25:00 AM »
Looking good Tim.

Like Eric said, leave the tips wide until you get it strung.  I leave mine wide until I reach about 18-20" on the tillering tree.

Let's see a couple of pictures of the profile, front and side, and one looking down its length on the back side.
The broadhead used, regardless of how sharp, is nowhere as important as being able to place it in the correct spot.

Walt Francis

Regular Member of the Professional Bowhunters Society

Offline tim roberts

  • TGMM Member
  • Trad Bowhunter
  • ***
  • Posts: 1460
Re: Coming along....... Finished bow picture added
« Reply #8 on: April 03, 2009, 08:29:00 AM »
I will get some pictures posted tonight after work.
Thanks,
Tim

TGMM Family of the Bow

I guess if we run into the bear that is making these tracks, we oughta just get off the trail.......He seems to like it!  
My good friend Rudy Bonser, while hunting elk up Indian Creek.

Offline tim roberts

  • TGMM Member
  • Trad Bowhunter
  • ***
  • Posts: 1460
Re: Coming along....... Finished bow picture added
« Reply #9 on: April 04, 2009, 11:30:00 AM »


Here are some more pictures.  
It almost looks like there is a little bit of propeller twist in the lower limb, I haven't cut the ends off yet and looking at it most of it appears to be in the end that I will end up loosing.  
I am not sure whether to start taking wood off, or to heat it and put some bend in the limbs first.  The stave has some reflex to it already, and I have been floor tillering to 3-4 inches.
Tim

TGMM Family of the Bow

I guess if we run into the bear that is making these tracks, we oughta just get off the trail.......He seems to like it!  
My good friend Rudy Bonser, while hunting elk up Indian Creek.

Offline George Tsoukalas

  • TG HALL OF FAME
  • Trad Bowhunter
  • *****
  • Posts: 2922
Re: Coming along....... Finished bow picture added
« Reply #10 on: April 04, 2009, 02:26:00 PM »
I usually leave the nocks an inch wide and the handle full width until at least its first stringing. Jawge

Offline George Tsoukalas

  • TG HALL OF FAME
  • Trad Bowhunter
  • *****
  • Posts: 2922

Offline tim roberts

  • TGMM Member
  • Trad Bowhunter
  • ***
  • Posts: 1460
Re: Coming along....... Finished bow picture added
« Reply #12 on: April 05, 2009, 05:11:00 PM »
Well, last night I was working on my bow, and just as I was to put it on the tillerin'tree I noticed a spot about 3-4 inches long that was to wide.  So then I made a big mistake, real big mistake, I put the bow in the vise and grabbed my draw knife and proceeded to take a deep gash out of the full lenght of the top limb.  So I spent the rest of the evening getting the top and bottom limbs the same width again.  
Today, I started getting the edge of the limbs down to 3/8" thick.  This is where I started...


And this is where I ended up at.....


The lower limb (left side of picture is 1 1/2" shorter.  Considering that I think the limbs are bending pretty good?  the upper limb may need some off closer towards the tip, and maybe the same on the lower????
Some of you guys that are experienced it there is something you see I would appericate any pointers, as I am somewhere I have never been!
Thanks,
Tim

TGMM Family of the Bow

I guess if we run into the bear that is making these tracks, we oughta just get off the trail.......He seems to like it!  
My good friend Rudy Bonser, while hunting elk up Indian Creek.

Offline George Tsoukalas

  • TG HALL OF FAME
  • Trad Bowhunter
  • *****
  • Posts: 2922
Re: Coming along....... Finished bow picture added
« Reply #13 on: April 05, 2009, 08:03:00 PM »
Nothing has to be the same. They just have to look the same. Your stave is only bending at mid limb. It needs to bend more close to the handle. The last 8 inches need to bend more also. This internet thing is good ha? Jawge

Offline gordonf

  • Trad Bowhunter
  • **
  • Posts: 216
Re: Coming along....... Finished bow picture added
« Reply #14 on: April 05, 2009, 10:43:00 PM »
Like George said, your bow is bending too much in the mid-limbs.

Offline Art B

  • Trad Bowhunter
  • **
  • Posts: 1398
Re: Coming along....... Finished bow picture added
« Reply #15 on: April 06, 2009, 07:24:00 AM »
I will have to disagree will George and Gordan somewhat, respectfully of course. You're using a tillering string that is a mile to long and that's putting extra stress on the inner limbs. Here, by beefing up the inner limbs and using that mile long tillering string, your are in effect, helping the situation. Now, if you were to us a proper length tillering string then maybe you could work the inner limbs a bit.

What's your draw length for selfbows Tim?

ART B

Offline tim roberts

  • TGMM Member
  • Trad Bowhunter
  • ***
  • Posts: 1460
Re: Coming along....... Finished bow picture added
« Reply #16 on: April 06, 2009, 10:29:00 AM »
The draw length for this bow will be 26".  The length the bow is 64".  My tillering string is made out of 600# paracord, should I be using something else?  Also while tillerin' the bow I lost some of the reflex making the string look longer, how does one know what lenght of string to use?
Thanks again for all the help,
Tim

TGMM Family of the Bow

I guess if we run into the bear that is making these tracks, we oughta just get off the trail.......He seems to like it!  
My good friend Rudy Bonser, while hunting elk up Indian Creek.

Offline Art B

  • Trad Bowhunter
  • **
  • Posts: 1398
Re: Coming along....... Finished bow picture added
« Reply #17 on: April 06, 2009, 12:08:00 PM »
Make your string just long enough to fit on the bow with little or no slack Tim. What happens with an overly long tillering sting is that it places greater strain on the inner portion of the limbs created by the steeper downward angle of the string. With the shorter permanant bow string the stresses are from tip to tip placing more strain on the outer portion of the limbs.

Here's a good demostration of what I'm talking about. Take one of those cheap plastic rulers and hold it out in front of you. Now pull down on one end (mimicking a long tillering string) and watch where the greater bend is. Now press inward (mimicking a shorter/permanant bow string) and check for the greater bend.

Tillering string profile and permanant bow string profile will show somewhat different. But the shorter the tillering string the less the differences. You can get quite a surprise sometimes while showing a perfect long string tillering job and then suddenly going to a shorter string. Good luck.

ART B

Offline George Tsoukalas

  • TG HALL OF FAME
  • Trad Bowhunter
  • *****
  • Posts: 2922
Re: Coming along....... Finished bow picture added
« Reply #18 on: April 06, 2009, 01:13:00 PM »
Good point, Art, but the way I use a tillering stick the length of the tillering string doesn't matter. Info is on my site under Bow Making Directions, tim. Jawge
 http://georgeandjoni.home.comcast.net/~georgeandjoni/

Offline Art B

  • Trad Bowhunter
  • **
  • Posts: 1398
Re: Coming along....... Finished bow picture added
« Reply #19 on: April 06, 2009, 01:40:00 PM »
But still George, that "extra" stress on the inner limb is there with the steeper string angle. That fact can't be dismissed.

ART B

Users currently browsing this topic:

0 Members and 2 Guests are viewing this topic.
 

Contact Us | Trad Gang.com © | User Agreement

Copyright 2003 thru 2024 ~ Trad Gang.com ©