Author Topic: St Jude's Longbow Build-a-long  (Read 2408 times)

Offline TradBowyer

  • Trad Bowhunter
  • **
  • Posts: 362
St Jude's Longbow Build-a-long
« on: August 02, 2009, 01:42:00 PM »
DWT was the St Judes auction winner of a custom Dry Ridge Archery bow. He was interested in some pics and i've never done a build a long before so I thought...why not?? Unfortunately, we lost our camera for a period of time so the glueups of the limb were done with no photographic evidence. but we'll try to make it up from here on out...the bow requested is a T/D longbow..bloodwood and osage footed riser. The limbs are going to be osage on the belly and snake skins on the front. Because we are using snakes, i used black glass on the back to help them stand out better. Here are the components...the 2 glued limbs, the bloodwood and osage riser blocks


we will start with the riser. I'm doing the riser in 2 steps. The first step will glue the 2 blocks together and the next step will be the cutting and glueing of the "swoosh". I use Urac185 for the riser glueup..the ratio of the 2 components are 13:100...doing the math, I use 1.2 grams of powder to 8.9 grams of liquid. Since I'm gluing a total of 4 surfaces (bloodwood, osage,and a thin accent), I'll double this mixture.


When combined, you get a dark slurry mixture


Here are the riser pieces clamped and ready to go into the 100 degree box.


We will pick up on  Monday. thanks for following along

Offline Dano

  • Trad Bowhunter
  • **
  • Posts: 2660
Re: St Jude's Longbow Build-a-long
« Reply #1 on: August 02, 2009, 01:56:00 PM »
We like build a longs!!!    :bigsmyl:
"If the women don't find you handsome, they should at least find you handy" Red Green

Offline dutchwarbow

  • Trad Bowhunter
  • **
  • Posts: 326
Re: St Jude's Longbow Build-a-long
« Reply #2 on: August 02, 2009, 07:26:00 PM »
yeah dano, we sure do! this looks the start of a great one  :D

Nick
in the old days religion had it's use to keep nations together. Today, religion tears nations apart.

Nick

Offline DWT

  • Contributing Member
  • Trad Bowhunter
  • ****
  • Posts: 479
  • 2312062446
Re: St Jude's Longbow Build-a-long
« Reply #3 on: August 02, 2009, 08:59:00 PM »
The coolest thing about this build along is that it eventually is coming to my house. Looks good so far Tim.

Offline Peckerwood

  • Contributing Member
  • Trad Bowhunter
  • ****
  • Posts: 374
Re: St Jude's Longbow Build-a-long
« Reply #4 on: August 04, 2009, 10:59:00 PM »
:wavey:  Question - does the Urac185 dry clear ?
NO matter where you go there you  are !

Offline Dano

  • Trad Bowhunter
  • **
  • Posts: 2660
Re: St Jude's Longbow Build-a-long
« Reply #5 on: August 04, 2009, 11:01:00 PM »
Nope, light brown.
"If the women don't find you handsome, they should at least find you handy" Red Green

Online kennym

  • TG HALL OF FAME
  • Trad Bowhunter
  • *****
  • Posts: 17318
Re: St Jude's Longbow Build-a-long
« Reply #6 on: August 04, 2009, 11:16:00 PM »
I like it!!  More,more!!
Stay sharp, Kenny.

   https://www.kennysarchery.com/

Offline TradBowyer

  • Trad Bowhunter
  • **
  • Posts: 362
Re: St Jude's Longbow Build-a-long
« Reply #7 on: August 10, 2009, 11:51:00 PM »
I got the rest of the riser glued and cured...ready to go put this bow all together now. Its late...I"ll load the pics tomorrow. Stay tuned

Offline dutchwarbow

  • Trad Bowhunter
  • **
  • Posts: 326
Re: St Jude's Longbow Build-a-long
« Reply #8 on: August 11, 2009, 08:41:00 PM »
aahhh  :)  sounds good!
in the old days religion had it's use to keep nations together. Today, religion tears nations apart.

Nick

Offline Shore08

  • Trad Bowhunter
  • **
  • Posts: 165
Re: St Jude's Longbow Build-a-long
« Reply #9 on: August 11, 2009, 08:47:00 PM »
What a great idea (the build along on the St. Jude's bow).

Offline TradBowyer

  • Trad Bowhunter
  • **
  • Posts: 362
Re: St Jude's Longbow Build-a-long
« Reply #10 on: August 11, 2009, 10:04:00 PM »
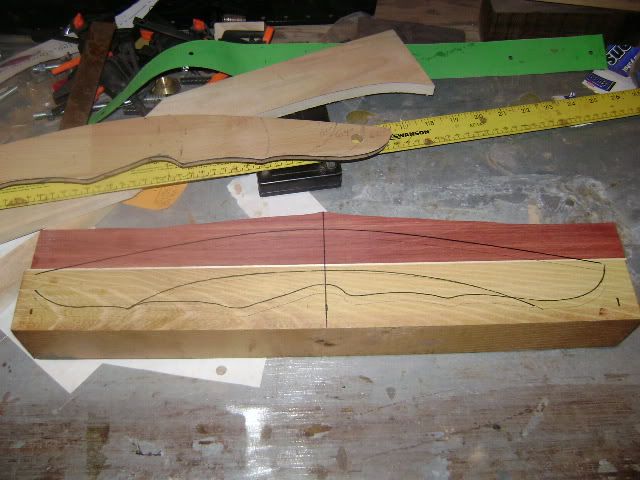
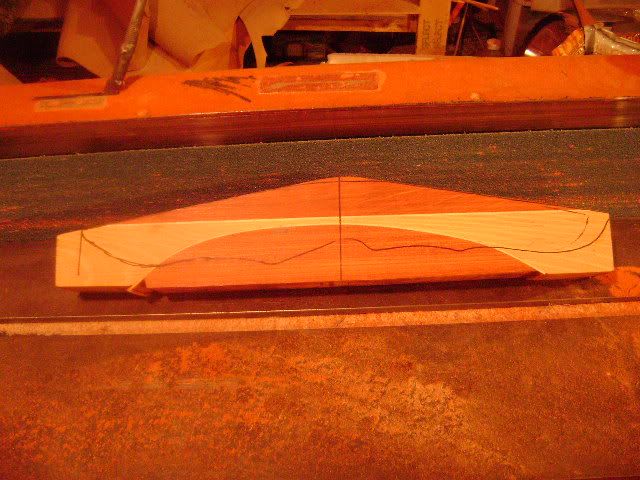
ok here we go...round 2...after the initial riser glueup, i flatten on side for a square surface and draw the swoosh


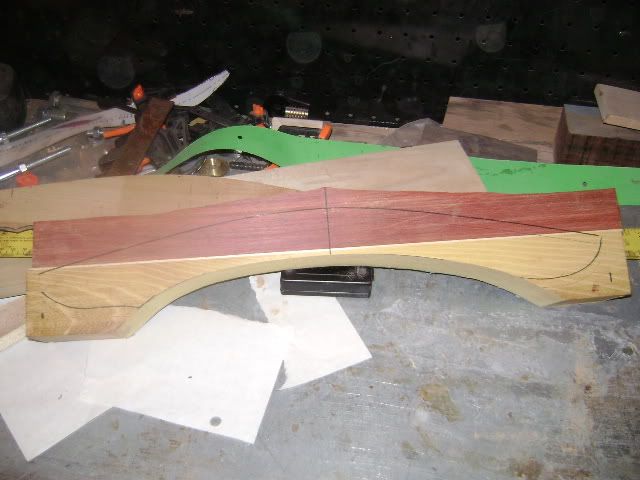
I cut this out on the bandsaw and sand with a spindle sander to flatten adn square.


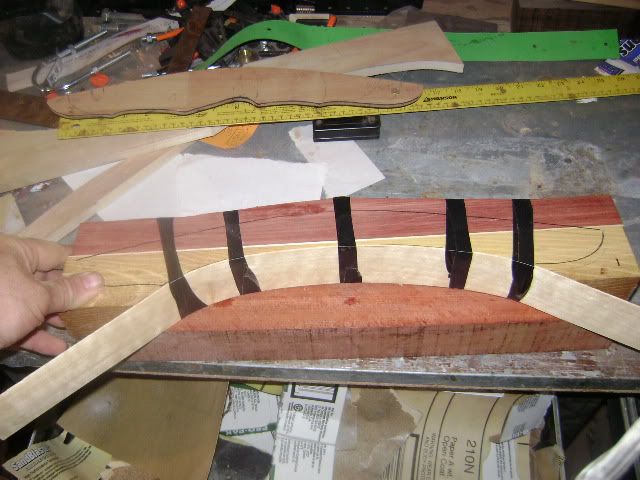
Then I need to use this as a pattern to draw the other bloodwood swoosh. since I am using an accent stripe, I always draw the line with the accent stripe thickness accounted for. THis helps alleviate internal riser stresses on the glue joints. Here, I just taped the accent stripe to the inside swoosh and trace the profile


the next step is the most tedious for me. I have to perfectly match the pieces so there is no gaps when clamped. This can take me a couple hours to do. Sand close to the line, clamp, check for gaps. Mark hte high points, unclamp. Sand  the high points, repeat, repeat, repeat...you get the picture


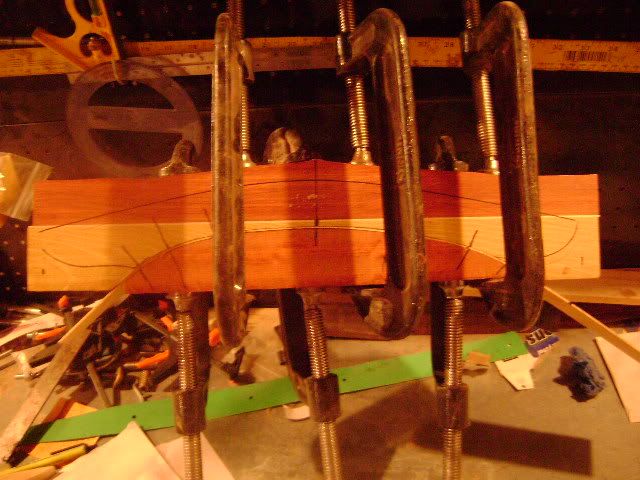
once that is done, mix the glue as before, clamp and let cure


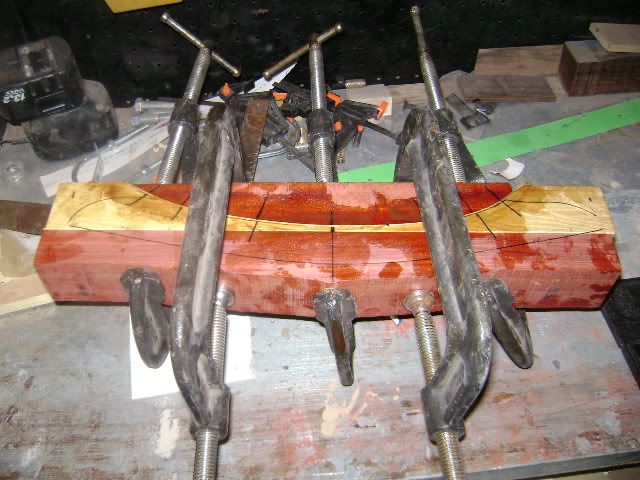
once its cured, i flatten the one side again, draw the riser pattern, cut and square the angles.


tomorrow we will start the process of getting the limbs mounted and drilling holes

Thanks for following

Offline TradBowyer

  • Trad Bowhunter
  • **
  • Posts: 362
Re: St Jude's Longbow Build-a-long
« Reply #11 on: August 17, 2009, 11:09:00 PM »
ok lets start getting this thing to look like a bow...

laying out the limb pattern


the limbs are then cut to the line on the bandsaw and then fine tuned on the edge sander. Since the jig I use is for a riser block that is already square and flat on the one side (unlike the Bingham one that makes you draw a center line), I can "pre mount" my limbs flush with the side of hte riser to check for limb alignment. If the limbs tips are out of line at this point, i know i have issues and its easier to correct now than later.


everything looks good.

Once the profiles are cut, its time to drill the holes for the pin and the insert. The next few pics show my jig. I have a insert I use for the 5/16" hole which I use to drill the hole in the limbs. Remove this insert to drill the hole in the riser for the threaded insert...anyway..not to get ahead of myself...


now that the holes are drilled, time to tap the riser hole for the insert.


I install the insert using a couple dabs of loctite. I also like to counterset the insert so I know there is no interference between the limb and the insert.


Offline TradBowyer

  • Trad Bowhunter
  • **
  • Posts: 362
Re: St Jude's Longbow Build-a-long
« Reply #12 on: August 17, 2009, 11:10:00 PM »
at this point, we are ready to mount the limbs, check for twist, tiller and initial weight.


everything is good. Weight is 64@28 which is right where I want to be to hit a final goal of 57@28. Tiller is just at 1/4" and the limbs are tracking straight. This is the most nerving step for me. Nothing like getting a string on for the first time...just never know what you are going to find. At this point with the limbs tracking straight and good for weight, its all down hill from here. Next step is to get the riser roughed out and  the tip overlays on. Should be able to throw some arrows out of it Wednesday.

Here is a pic of the osage on the belly. Don't know how the pic will turn out but there is some nice flat grain in this stuff.


thanks for following along

Offline Moen

  • Trad Bowhunter
  • **
  • Posts: 136
Re: St Jude's Longbow Build-a-long
« Reply #13 on: August 18, 2009, 05:41:00 AM »
That was a beautiful profile!! I like, i like.. Selfmade limbform?
Never believe that you are worthless .... you can always be used as a bad example!

Offline DWT

  • Contributing Member
  • Trad Bowhunter
  • ****
  • Posts: 479
  • 2312062446
Re: St Jude's Longbow Build-a-long
« Reply #14 on: August 18, 2009, 08:48:00 AM »
Looking very cool Tim. I love the lines, very graceful. That is some nice looking osage.This build along is very cool even though its alot of extra work for you I hope it will get you some orders.

Offline TradBowyer

  • Trad Bowhunter
  • **
  • Posts: 362
Re: St Jude's Longbow Build-a-long
« Reply #15 on: August 18, 2009, 09:36:00 PM »
not much to see tonight just a lot of grinding, filing and sanding but did get the riser roughed out. It was requested to leave a little on the riser so its a little larger than I normally make my longbow risers but I like it. I like to feel I'm holding something other than a soda straw  :)


tomorrow we will shoot to get the tip overlays on and maybe throw some arrows out of it.

Online kennym

  • TG HALL OF FAME
  • Trad Bowhunter
  • *****
  • Posts: 17318
Re: St Jude's Longbow Build-a-long
« Reply #16 on: August 19, 2009, 10:02:00 PM »
Very good job goin there Tim! I like your drillin jig better than Binghams! Waaay better alignment I'll bet!  :thumbsup:
Stay sharp, Kenny.

   https://www.kennysarchery.com/

Offline TradBowyer

  • Trad Bowhunter
  • **
  • Posts: 362
Re: St Jude's Longbow Build-a-long
« Reply #17 on: August 19, 2009, 10:40:00 PM »
Kenny,
Yeah, its a good jig. The problem I have with Binghams is that all in all, you are drawing 4 center lines. If you are just 1/32" off on each line, thats a total of 1/8" off and thats enough to throw the limb tips out and you end up with limbs out of alignment. With this jig, you take that all out of the equation.

Online kennym

  • TG HALL OF FAME
  • Trad Bowhunter
  • *****
  • Posts: 17318
Re: St Jude's Longbow Build-a-long
« Reply #18 on: August 19, 2009, 11:06:00 PM »
Yeah ,don't ask how I know all that!LOL

1/8" at the riser can be a BUNCH 20 some inches out!!
Stay sharp, Kenny.

   https://www.kennysarchery.com/

Offline TradBowyer

  • Trad Bowhunter
  • **
  • Posts: 362
Re: St Jude's Longbow Build-a-long
« Reply #19 on: August 31, 2009, 10:41:00 PM »
ok, much has happened since the last post...pics are dragging a little. Time to put on the skins..here's how I do it. Others are much better at this than I but i get decent results doing it this way. Feel free to pipe in with suggestions if you have a better way... Here are the skins


I soak my skins in warm water to soften. oh yeah, make sure you have an understaning wife if you do this in the sink like I do


while the skins are soaking, i get the limbs ready. I use Titebond II and i have had instances in the past where the glue refused to stick to the glass so I have to lay a layer of glue down, let dry and then glue the skins on. I'm not crazy about the 2 layers of glue adding weight to the limbs but I don't know how else to do it.


it usually takes about 45 min for this coat to dry. Once dry I "pre cut" the skins in length. i put the end of the skin against the tip overlays and trim the bottom. I leave a little extra. once cut, i add another layer of fresh glue and apply the skin. I use a clamp at the end to anchor the skin so I don't have to worry about it moving on me as i'm working the air bubbles out.


Users currently browsing this topic:

0 Members and 1 Guest are viewing this topic.
 

Contact Us | Trad Gang.com © | User Agreement

Copyright 2003 thru 2024 ~ Trad Gang.com ©