Author Topic: Marty 300 Build Along  (Read 3375 times)

Offline metsastaja

  • TGMM Member
  • Trad Bowhunter
  • ***
  • Posts: 1165
Re: Marty 300 Build Along
« Reply #20 on: March 30, 2010, 02:04:00 PM »
Randy these guys are still around. Pretty sure
"We can put you on them" if I can keep Pete out of the stand. It is one of this favorites for sunrise.


When you get to camp you may see some similar bows handing around.

Here is Marty with his "Peanut Master"


me with "Lighting"
 

Pete with "Chocolate Swirl"
 
Les Heilakka
TGMM Family of the Bow  
Some times the uneventful nights are just as good if not better than the eventful ones

Offline FerretWYO

  • TG HALL OF FAME
  • Trad Bowhunter
  • *****
  • Posts: 5099
Re: Marty 300 Build Along
« Reply #21 on: March 30, 2010, 02:46:00 PM »
Those are huge.
Beautiful bows. I can't wait to meet you all.
TGMM Family of The Bow

Offline Pennsyltuckey pete

  • Trad Bowhunter
  • **
  • Posts: 301
Re: Marty 300 Build Along
« Reply #22 on: March 30, 2010, 10:08:00 PM »
Tommy,

To answer your band saw question, mine is a Craftsman 12 inch one HP.  Nothing fancy BUT!!!! there are a few things that I have done to make sure it cuts well.  First involved with set up, I change my blade trailing bearings at the first sign of imperfection.  THse are the bearings that the blade bumps in to if you put too much tension on the blade.  I constantly smooth the blade guide pins.  My next set is going to be teflon coated if I can find something that will work.  Third I adjust the set up of the saw very close.  The trailing bearings are set so that they just barley spin with the saw on and no pressure on the blade.  The guide pins are set so that a dollar bill will not fall out from between the blade and the guide.  CLOSE.  the final trick is to cut slowly!  I push the wood very gently through the saw.  IT is not a race. If I take 10 minutes to make one cut it is very easy to control the cut and it does not pressure the saw or burn the wood.  Patience must be in supply.

Marty as far as the custom bows...
 
The more detail that is in the riser the longer it will take to build the bow.  For example, the riser in Les longbow,


involved three fittings and glue ups just to make the riser block and then I had to do all of the shaping before it even got near the bow form.  That right there is three days of wait time.  When I build a bow I can figure 30-40 hours.  Seeing that I hold down a full time job... YEA it takes time.  This bow will get done because I have cleared the decks to get it done.  Wifey knows that I am under the gun because of work... so the honey do list is canceled along with all social obligations.  In other words I am locked In my SHOP  YEA!  YES!  OH I LOVE IT!

Now on to the build,

No Metsastaja glue up is not next.  I have to finish shaping the riser.  After the bottom of the riser is light tight I have to finish shaping the belly portion of the riser.  To do this I taped the riser and used my clear plastic form to trace the outline on to the block.


taking my time I stay outside of the line!


The tape is on the riser block that will be used for the bow.  I have set the  nock off back in place in this picture.


and then I sand to the line


When both sides are done to the line it is time to finish the fades!

pete
Love one woman, Many Bows

Offline Bow-cephus

  • Trad Bowhunter
  • **
  • Posts: 67
Re: Marty 300 Build Along
« Reply #23 on: March 30, 2010, 10:21:00 PM »
Absolutely amazing Pete!!! Bravo my man, can't wait to see the next step!!!

TJW
Mathew 17:20-21

Offline Pennsyltuckey pete

  • Trad Bowhunter
  • **
  • Posts: 301
Re: Marty 300 Build Along
« Reply #24 on: March 30, 2010, 10:46:00 PM »
Ferret,

I let ya down and didn't take pics of the fade grinding.  So I have to go back to a previous build and show ya.  First, Credit needs to be given where credit is due.  Cutting the fades used to be one of those things that I found difficult until Apex Predator showed me how.  IT is easy now!

The entire trick is to back the riser block with a solid piece of wood.  IT makes it easy.  And again I thank Apex for sharing.


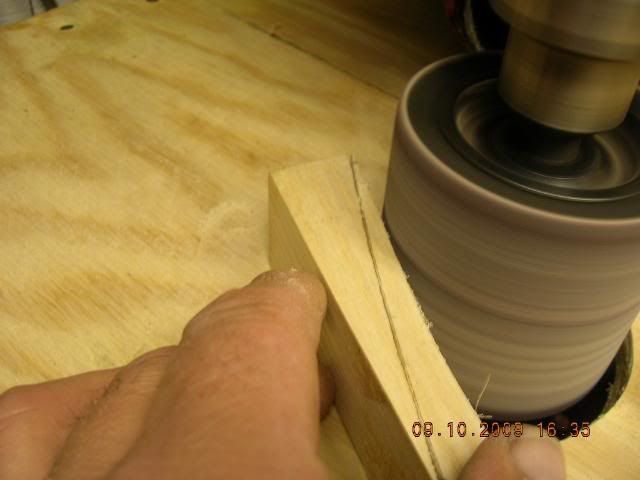
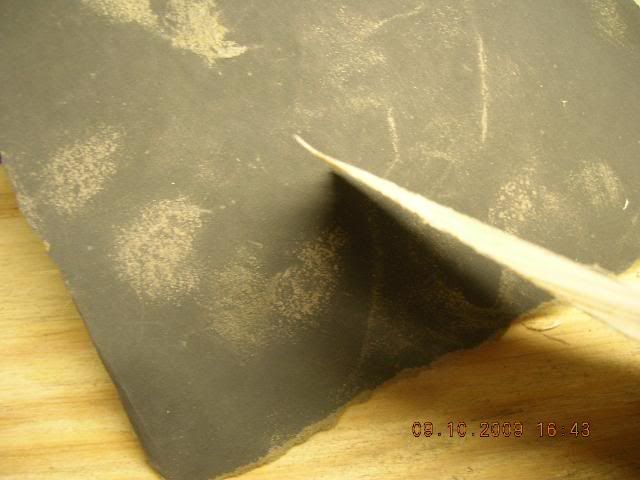
I can make it thin enough that light shines through the wood.


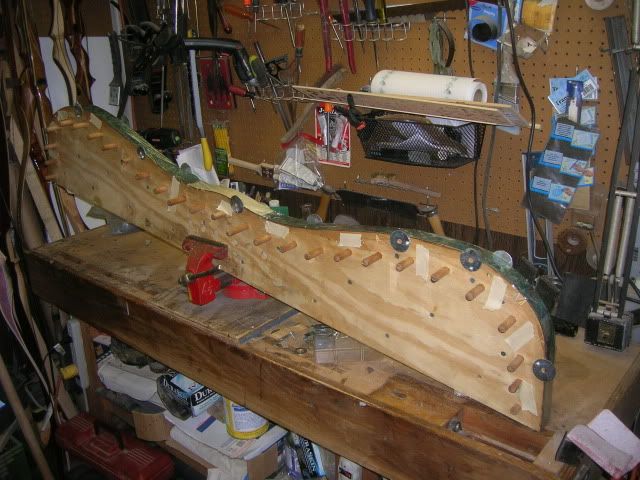
After the block is to this level it is toothed on the belly and then set aside to prep for the dry run and glue up.  Dry run and Glue up is a process that I use a check list on because if you forget one thing you are screwed.

DO NOT ASK HOW I KNOW THIS!!!!! Ok you can ask but I am likely to not answer you!

First process in the dry run/glue up is to prep the press.  Here my bow form is ready for the glue up.  FIrst thing I do is wax the form anywhere within 5 inches of the gluing surface.  I then put plastic wrap over the glue surface and hold it in place with masking tape.  Then I attache the eccentric washers. In this pic you can see the tape that I put in place to make the form light tight to the riser block.


The eccentric washers are used to keep everything lined up on the form.  OF all the tricks I have learned this one is one I consider a requirement.

Then I begin laying out all of the supplies I will need. Paper towel, Rubber bands or air hose and air pump, strapping tape, Clear plastic wrap, glue cups, mixing sticks, nitrile gloves a box of them, alcohol, scisors,... This list goes on!

A dry run is then done to make sure that every thing fits together and works.  I have to admit something here.  I do not do a full dry run.  I have built a fair number of bows and now know where things go wrong.  I do put all parts on the form but do not attach all the bands.  I also do not glue the back laminations together until I am ready to do the glue up because they break apart under the stress.  I will explain this later.  That is all for now...

pete
Love one woman, Many Bows

Offline metsastaja

  • TGMM Member
  • Trad Bowhunter
  • ***
  • Posts: 1165
Re: Marty 300 Build Along
« Reply #25 on: March 30, 2010, 10:59:00 PM »
So now it's time for the glue up.

 You didn't let on my riser looked that cool.  How about you send that and the training bow ahead.  I could get some practice in.    :bigsmyl:
Les Heilakka
TGMM Family of the Bow  
Some times the uneventful nights are just as good if not better than the eventful ones

Offline highpoint forge

  • Trad Bowhunter
  • **
  • Posts: 1106
Re: Marty 300 Build Along
« Reply #26 on: March 31, 2010, 12:28:00 AM »
You'd be surprised what comes out of your nose after working with ebony........
Black Widow PSAX Bocote 57# @28, 58 AMO
Black Widow PLX Tiger Myrtle 60# @28, 64 AMO
J.D. Berry Osage Argos 60# @28, 66 AMO

Offline SveinD

  • Trad Bowhunter
  • **
  • Posts: 971
Re: Marty 300 Build Along
« Reply #27 on: March 31, 2010, 04:25:00 AM »
Sweet! I'll be watching this one as well!
Centaur 58" Glass XTL 40@28

~Those who believe in telekinetics, raise my hand~ Kurt Vonnegut

Offline metsastaja

  • TGMM Member
  • Trad Bowhunter
  • ***
  • Posts: 1165
Re: Marty 300 Build Along
« Reply #28 on: March 31, 2010, 10:44:00 AM »
Quote
Originally posted by highpoint forge:
You'd be surprised what comes out of your nose after working with ebony........
Knowing my brother he was probably wearing an
AOSsaftey 8051 Chemical Cartridge face mask.
NO WORRIES LAst thing he wants is black boogers in his glue boogers
Les Heilakka
TGMM Family of the Bow  
Some times the uneventful nights are just as good if not better than the eventful ones

Offline Shore08

  • Trad Bowhunter
  • **
  • Posts: 165
Re: Marty 300 Build Along
« Reply #29 on: March 31, 2010, 11:02:00 AM »
Nice build along, thanks. It is looking great!

Offline FerretWYO

  • TG HALL OF FAME
  • Trad Bowhunter
  • *****
  • Posts: 5099
Re: Marty 300 Build Along
« Reply #30 on: March 31, 2010, 02:12:00 PM »
This brings a while new appreciation for the bow. It is looking great.
TGMM Family of The Bow

Offline Hooked

  • Trad Bowhunter
  • **
  • Posts: 837
Re: Marty 300 Build Along
« Reply #31 on: March 31, 2010, 03:09:00 PM »
Looking great, Pete!
"But, the bestest doctor of all is God!"  Katie Jones (7 years old)

Offline metsastaja

  • TGMM Member
  • Trad Bowhunter
  • ***
  • Posts: 1165
Re: Marty 300 Build Along
« Reply #32 on: March 31, 2010, 07:39:00 PM »
Spoke to Pete... He is changing out his band saw blades. that was at 4:30
Les Heilakka
TGMM Family of the Bow  
Some times the uneventful nights are just as good if not better than the eventful ones

Offline Robertfishes

  • Trad Bowhunter
  • **
  • Posts: 3490
Re: Marty 300 Build Along
« Reply #33 on: March 31, 2010, 08:58:00 PM »
nice build a long, thanks for posting the pics.

Offline Bow-cephus

  • Trad Bowhunter
  • **
  • Posts: 67
Re: Marty 300 Build Along
« Reply #34 on: March 31, 2010, 09:57:00 PM »
This is awesome, can't wait to see more Also I love those bows in the hunting pics!!!
Mathew 17:20-21

Offline stickbowguy

  • Trad Bowhunter
  • **
  • Posts: 116
Re: Marty 300 Build Along
« Reply #35 on: March 31, 2010, 09:58:00 PM »
I really like this kind of stuff, I need to get a kit and start building these along with you all. I only made one self bow from hickory and that turned out real nice. I changed a few things from the plans and it seems to work great. I was shooting nocks off last night with the ole girl

Offline Bow-cephus

  • Trad Bowhunter
  • **
  • Posts: 67
Re: Marty 300 Build Along
« Reply #36 on: March 31, 2010, 10:28:00 PM »
We'd love to see pics I'm sure stick!!!! Of the bow I mean
Mathew 17:20-21

Offline Pennsyltuckey pete

  • Trad Bowhunter
  • **
  • Posts: 301
Re: Marty 300 Build Along
« Reply #37 on: March 31, 2010, 11:28:00 PM »
OK I have the time and where with-all left in my wits to start the glue up procedure.

What do I mean by that? The glue up is kind of like the point of no return once you start applying the glue.  I always like to have plenty of time.  It usually only takes me 45 minutes from the time I have the glue mixed but set up and the double check of everything is critical.

First I go over my glue up check list and make sure that I have everything taken care of.  Hot box on and laminations warming.  Normally I would warm the riser too but a friend of mine who has worked with ebony suggested that I not heat it because of the oil.  Greywolf has never lead me astray so I figured I would follow his lead.

Well here we go. Here I am gluing the laminations together with ca gel so they do not spread apart when they are in the bow form. You will also notice that the fiberglass has blue tape on the shiney side.

 
Now here comes the bummer part.  I was in a hurry and did not get to take pics of the glue up so, here is a vid of a glue up of the same design bow.


after all of the parts are smeared with glue it is time to cover them with clear plastic wrap and strap the bow down to the form. Here you can see the strapping tape and the start of the rubber bands that apply the pressure.


here you can see the eccentric washers keeping the laminations in line.


here is the form in the oven ready for 7 hours at about 150-170 degrees

 
Love one woman, Many Bows

Offline FerretWYO

  • TG HALL OF FAME
  • Trad Bowhunter
  • *****
  • Posts: 5099
Re: Marty 300 Build Along
« Reply #38 on: April 02, 2010, 12:36:00 AM »
That is awesome.
TGMM Family of The Bow

Offline metsastaja

  • TGMM Member
  • Trad Bowhunter
  • ***
  • Posts: 1165
Re: Marty 300 Build Along
« Reply #39 on: April 02, 2010, 11:12:00 AM »
Wait till Pete gets his posts caught up to where he is in the process.   :thumbsup:    :thumbsup:    :thumbsup:
Les Heilakka
TGMM Family of the Bow  
Some times the uneventful nights are just as good if not better than the eventful ones

Users currently browsing this topic:

0 Members and 1 Guest are viewing this topic.
 

Contact Us | Trad Gang.com © | User Agreement

Copyright 2003 thru 2024 ~ Trad Gang.com ©