Author Topic: Marty 300 Build Along  (Read 3374 times)

Offline FerretWYO

  • TG HALL OF FAME
  • Trad Bowhunter
  • *****
  • Posts: 5099
Re: Marty 300 Build Along
« Reply #40 on: April 02, 2010, 11:53:00 AM »
I dont want to wait   :biglaugh:  

This just keeps getting better.
TGMM Family of The Bow

Offline Pennsyltuckey pete

  • Trad Bowhunter
  • **
  • Posts: 301
Re: Marty 300 Build Along
« Reply #41 on: April 02, 2010, 09:48:00 PM »
What day is it?

I have been busier than the posts because of work and time restraints I have been focusing on getting the bow done not posting.  Well I have it in the oven baking and have a few so I will try to get a little closer than I have been.  

Now WHere was I?

THe bow was in the oven! TIme to come out!
 (This was actually Tuesday)

This next photo shows the bow form out of the oven with all of the rubber bands removed.  If you look at the top of the form you see the pressure strips that are put on the top of the bow.  THese keep the pressure from the bands square to the top of the bow.  The strips are a 1/16 strip of aluminum that is wrapped in plastic wrap and on the top a piece of Masonite.  The strapping tape is used to keep the slimy glue and wood and fiberglass mess in place.


At this point you start cutting the tape and removing the pressure strips from the top of the bow.  You end up with a bow form with a bow on the top held securely to the form with what I call Glue Boogers.  The good thing about lots of glue boogers is that it means the bow is not glue starved.  You need to be careful pulling the bow off the form because you can cut yourself on the glue if you are not careful. Here is the bow coming off the form.


Meet a glue booger and the tool I use to remove them.  An old pair of nock pliers.


my next chore is to clean  up the bow blank.  Normally I do this outside on my large table belt sander but it was night and I had to get it done so I used the tabletop model with the dust collection system.  It still puts a little dust in the air so use a respirator.  No dust mask for me.  I use a HEPA/acid Gas/chlorinated solvent cartridge. Fiber Glass is nasty.


Here is a hint of what it might look like.


pete
Love one woman, Many Bows

Online kennym

  • TG HALL OF FAME
  • Trad Bowhunter
  • *****
  • Posts: 17318
Re: Marty 300 Build Along
« Reply #42 on: April 02, 2010, 10:02:00 PM »
That first pc of tape is always a cliffhanger!! Lookin good Pete!!
Stay sharp, Kenny.

   https://www.kennysarchery.com/

Offline metsastaja

  • TGMM Member
  • Trad Bowhunter
  • ***
  • Posts: 1165
Re: Marty 300 Build Along
« Reply #43 on: April 02, 2010, 10:45:00 PM »
Pete it's Friday.  Come on give Randy a break
Les Heilakka
TGMM Family of the Bow  
Some times the uneventful nights are just as good if not better than the eventful ones

Offline Shore08

  • Trad Bowhunter
  • **
  • Posts: 165
Re: Marty 300 Build Along
« Reply #44 on: April 02, 2010, 11:03:00 PM »
Wow, you are really keeping me on the edge of my seat haha. I keep hoping you haven't gone to bed yet!

Offline Apex Predator

  • Trad Bowhunter
  • **
  • Posts: 3372
Re: Marty 300 Build Along
« Reply #45 on: April 03, 2010, 07:57:00 AM »
Looking great buddy!
I didn't claw my way to the top of the food chain to eat vegetables!

Offline Pennsyltuckey pete

  • Trad Bowhunter
  • **
  • Posts: 301
Re: Marty 300 Build Along
« Reply #46 on: April 03, 2010, 06:27:00 PM »
First things first,

THANK you KENNY M.  This bow is going to be a success only because of you!  THANK YOU for saving MY butt.  Film at 11:00.  Note I did not say tonight.  May not get there for a day or so but you helped me avert disaster!

Now,  Where were we?  Hm I know where I am today but I need to go back a page and see where I left off.  Ahhhh yes the first glimpse of the bow with tape removed. One of the things I really don't like about building bows is removing the tape.  It always seems to take too long by a factor of 100.  Well anyway it is a necessary step.

Here is the cleaned up bow blank.  This is always a nervous time for me.  Is there a flaw in the the  Fiber Glass, a spot with no glue, or a hair under the glass?  Inspection of this bow showed no issues that I could pick up. WHEWW. Under fluorescent light.


and under natural light.


The next step is to measure the limb length.  There are two marks.  The first is the location of the string nock and the second the end of the limb which is cut.  You will notice that the bow is taped up again this time with white masking tape.  This allows easy visual acquisition of pencil marks on dark wood and there are going to be a number of them.  The other thing that the tape does is protect the finish of the glass.  And just in case you are wondering why I work on a piece of carpet there are a few reasons.  First it is a soft surface that will not mar wood or fiberglass.  Second it allows the bow to settle down in to the knapp of the carpet and helps it to stay in place when I am working on it.  Third it gives saw dust a place to settle without spreading all over the place.  A quick hit with the vacuum cleaner and it is gone. I build my bows in a bedroom turned shop.  Dust is a problem.  When cutting the bow ends it is critical to back up the cutting with a piece of wood lest you pull up a splinter of the glass.


Next we need a center line. I have used a number of methods since I began building bows and have settled on a method using string.  The first step is to find the center of the back of the bow.  To do this I use a diagonal measuring method. You will notice that I have the ruler diagonally placed across the limb.  With the limb width being 1 1/2 inches I measure two inches across the limbs.  IT makes the inch mark the center.  I draw a line along the ruler.  I then twist the ruler to the other diagonal and repeat the process and I have an x marking the center of the bow.


I then mark the center of the limb at the end and stretch a weighted string across the length of the bow.  I line up the string by eyeball on the center marks that I made in the center of the bow and rest the string on the other limb.  By marking the spot where the string hits the limb I have center points.


Fixing the centerline is easy using a flexible straight edge and a number of spring clamps.


 pete
Love one woman, Many Bows

Offline Shore08

  • Trad Bowhunter
  • **
  • Posts: 165
Re: Marty 300 Build Along
« Reply #47 on: April 03, 2010, 06:40:00 PM »
Don't stop now    :D

Looking great

Offline metsastaja

  • TGMM Member
  • Trad Bowhunter
  • ***
  • Posts: 1165
Re: Marty 300 Build Along
« Reply #48 on: April 03, 2010, 06:51:00 PM »
Way to go bro.  I can tell it's posting time..I'll bet you have even shot the bow..

Anticipation and suspense for the new owner..
Les Heilakka
TGMM Family of the Bow  
Some times the uneventful nights are just as good if not better than the eventful ones

Offline FerretWYO

  • TG HALL OF FAME
  • Trad Bowhunter
  • *****
  • Posts: 5099
Re: Marty 300 Build Along
« Reply #49 on: April 03, 2010, 06:56:00 PM »
Yes stopping now is not nice
TGMM Family of The Bow

Offline Pennsyltuckey pete

  • Trad Bowhunter
  • **
  • Posts: 301
Re: Marty 300 Build Along
« Reply #50 on: April 03, 2010, 07:19:00 PM »
Still Posting,  I have a lot of catch up!

With the center line drawn it it time to lay out the limbs. To do this I use a template that is made out of Formica.  It has a line drawn across the location of the string nock and a v notch cut in the end.  This allows me to get the template in the exact same spot on the limb by putting the v notch right on the center line.


After I trace the one side of the limb I flip the template over and trace the other side. In this pic you can see how I marked the limb template to show which side is to be used.  No means NO!!!! The reason I flip the template is to keep the sides as close to identical as possible.  This little trick has made tillering much easier in the long run. (Sometimes totally unnecessary!)


After marking out the limbs I use my band saw to cut them down to size.  About this you need to understand the Fiber Glass destroys band saw blades in about 15 seconds.  I use a 1/2 inch 6TPI blade to cut the limbs.  I run it slowly outside of the line.  After cutting the limbs I remove the blade from the saw, coil it and tape it and and mark it FG only for the next time that I need it.


Then I go outside and use my bench sander to sand to the line.  This is done outside because of the amount of dust.


After the limbs are sanded to the line it is time to file the string nocks in to place.  To do this I refer to a couple of pencil lines that were drawn before the limb was shaped. (Easier to keep square.)  The line on the back of the limb is connected to the line on the belly of the limb.  This gives the same angle on both sides of the limb for the nock groves.


and then the depth of the nock grove is measured on both sides of the limb.


I use a triangle file to initially cut the string nock.  you can see this on the right side of the limb in the photo below.  I then use a small chain saw file to round the nock grove as seen on the left side of the limb. A key for good tiller is to make sure that the groves are even.  You can see that I had to "Lower" the right side nock grove a little to match the left.


pete
Love one woman, Many Bows

Offline Pennsyltuckey pete

  • Trad Bowhunter
  • **
  • Posts: 301
Re: Marty 300 Build Along
« Reply #51 on: April 03, 2010, 08:28:00 PM »
Sorry I have to come up for air every so often!  Still posting.  Yea it has flung an arra or two.

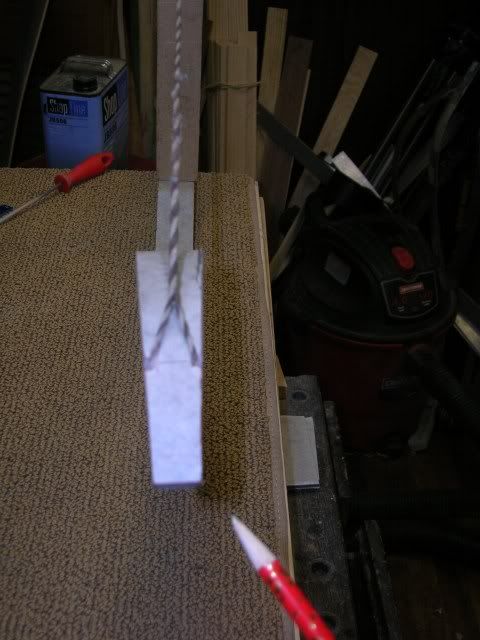
After all of the nocks are filed it is time to put a string on the bow and tiller it.  The way that I build a bow there are two ways that it is tillered. The first phase is to make sure that the limbs are pulling straight back from the bow and not twisting.  To check this you look at the bow down the length and look to see if the tip of the bow is pulling to one side or the other.  A quick look at this one showed that the limbs were straight at low brace.  I then use a 20 inch tillering stick on the bow to check it at 1/2 draw.  In this next picture you can see that the limb tip is pointing to the pencil.  To balance the limb I had to remove a small amount of material from the strong side of the limb.  The strong side is the side it is pointing to.  If you look carefully you can see the pencil mark on the tape that shows which side I needed to remove the wood from.  The reason I mark it is because it is easy to get twisted around when you unstring the bow and lay it down.


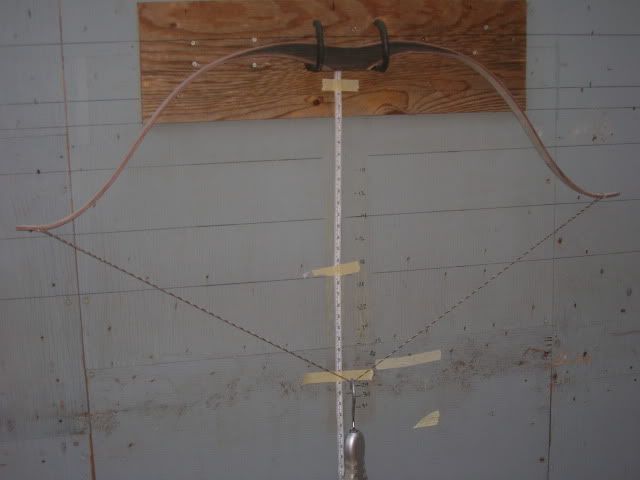
After a few tries I had both limbs of the bow pulling straight.  Then it was time to check the balance tiller of the limb top limb to bottom limb.  To do this I measure the fades using a bow square.  I want the lower limb to be 1/8 to 1/4 of an inch stronger than the top limb.


The initial readings were 7 3/16 inches and 7 1/2 inches.  To balance the limb I sanded the lower limb using 120 grit paper.  I use a long straight edge and remove a few swipes from each side of the limb and then I sand the glass surface using a rubber sanding block.  Once I have the limbs in balance I put the bow on my tillering tree and view the limbs from a few feet back and I also watch them bend.  This is also when I check the initial weight. The Marty 300 came in at a whopping 82#.  Just right for a neanderthal!  What am I going to do!  Oh April Fools day was a couple days ago.  It actually came in at 65# at 28".  This is not too bad.  I am aiming for 57# at 28".  A tiny bit hefty but the bow will end up in the neighborhood. Notice the balance in the bending of the limbs and how the top and bottom tips are similarly balanced above the black line.  This is a good thing.


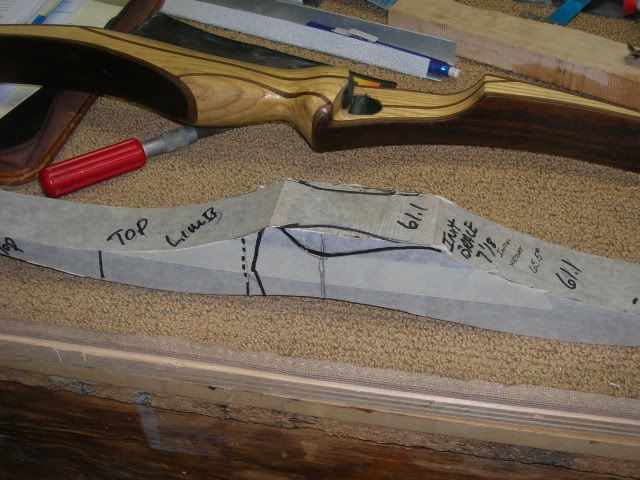
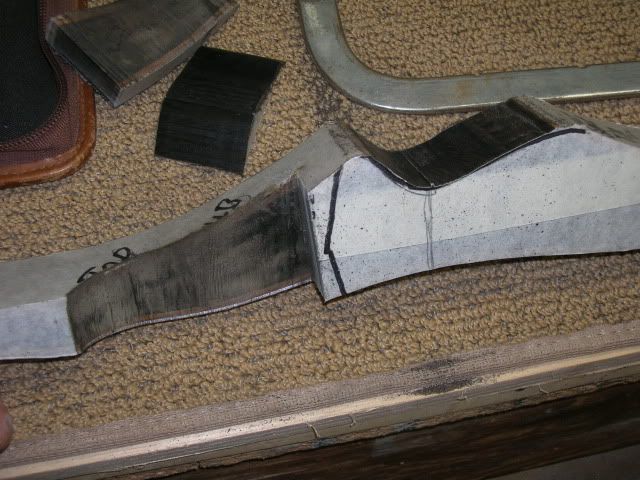
Weight loss is accomplished by thinning the width of the limb and the thickness.  It is a slow easy process with continual check of the tillers.  It is easy to go slowly and keep it balanced. With the bow down to 60 # it was time to move forward and really make this thing look like a bow.  This next photo shows the initial layout of the bow.  I used a black marker to make it easy to see. normally I use a pencil.  I also marked all my little notes with marker so you could see them.  Weight and tiller measurements don't get lost this way.


Additional layout markings.


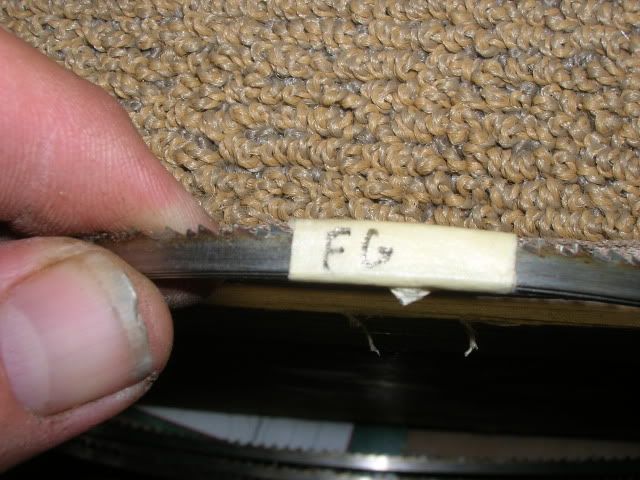
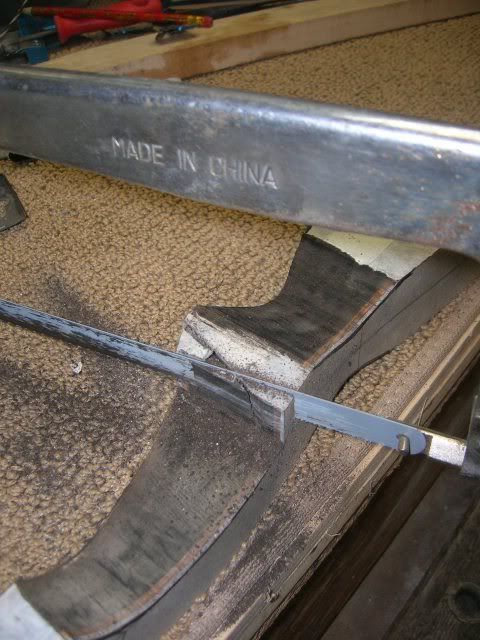
Remember that blade I mentioned?  It is again time to cut fiberglass...To cut out the riser I use a 3/8 6tpi.  I have a number of blades marked FG.


CUT AWAY!


and how I cut the shelf out.


I then use a hack saw blade to continue the sight window cut down to the shelf. The next step is to start rounding the square blocky riser in to a thing of comfort and beauty. This is one of the most exciting phases of bowyering because you go from Blocky to comfortable in less time than a glue up!


pete
Love one woman, Many Bows

Offline bjansen

  • Trad Bowhunter
  • **
  • Posts: 2263
Re: Marty 300 Build Along
« Reply #52 on: April 03, 2010, 08:35:00 PM »
Excellent build along Pete...I cant wait to see that riser come to life.

Offline Pennsyltuckey pete

  • Trad Bowhunter
  • **
  • Posts: 301
Re: Marty 300 Build Along
« Reply #53 on: April 03, 2010, 08:50:00 PM »
This has been a power build followed by a power posting session.

The main tool used to go from blocky to sexy is the bench sander but the files, card scraper and sanding block get a lot of use too.  This photo shows how I hold the riser still when I am using the hand tools.


with a little sanding it is starting to look like a bow.


Do you remember that big block of wood that I started with?  THe one that I cut the riser out of?  It is time to go did it out of the wood pile and get my next part.  A quick cut with the band saw along the line...


hm where does it go???


Oh said the blind bowyer as he picked up his hammer and saw! It is also time to cut the limb pads out of the blocks that were cut off of the riser.


To shape these to the curve of the limb I usually use dry heat and bend the wood gently to match the curve of the limb.  I do not want stress built in to the limb because the ebony is straining to pull away from the glue joint. I want this as close as I can make it.


Here we are close. If you look carefully near the tip of the limb you can see my problem.  THe ebony is starting to split.


I cut a second piece and got it really close to fitting.  In this pic you can see that I have it clamped to the limb but this took more pressure than I liked.  As I was bending this piece to fit it too cracked.  


What to do?  I quit for the night at this point to think about my options.

pete
Love one woman, Many Bows

Offline Shore08

  • Trad Bowhunter
  • **
  • Posts: 165
Re: Marty 300 Build Along
« Reply #54 on: April 03, 2010, 08:56:00 PM »
Wow, really great build along. That bow is really making tracks!

Offline metsastaja

  • TGMM Member
  • Trad Bowhunter
  • ***
  • Posts: 1165
Re: Marty 300 Build Along
« Reply #55 on: April 03, 2010, 09:04:00 PM »
Your like the energizer bunny tonight you keep on going and going and going.. Pete you know the other half of the ebony...I call dibs.
Les Heilakka
TGMM Family of the Bow  
Some times the uneventful nights are just as good if not better than the eventful ones

Offline FerretWYO

  • TG HALL OF FAME
  • Trad Bowhunter
  • *****
  • Posts: 5099
Re: Marty 300 Build Along
« Reply #56 on: April 03, 2010, 10:36:00 PM »
Its looking awesome.
TGMM Family of The Bow

Offline Pennsyltuckey pete

  • Trad Bowhunter
  • **
  • Posts: 301
Re: Marty 300 Build Along
« Reply #57 on: April 04, 2010, 01:17:00 AM »
dibbs, schmibbs...

possession is nine tenths of the law. Hmmmm.  I may just need to forget to get this one one the plane!

   :bigsmyl:    :bigsmyl:    :bigsmyl:    

pete
Love one woman, Many Bows

Offline steadman

  • Trad Bowhunter
  • **
  • Posts: 4498
Re: Marty 300 Build Along
« Reply #58 on: April 04, 2010, 02:17:00 AM »
Pete, that is a fantastic looking bow! WOW!! I'm not a recurve guy, but yours look incredible. What a beauty.
" Just concentrate and don't freak out next time" my son Tyler(age 7) giving advise after watching me miss a big mulie.

Offline Apex Predator

  • Trad Bowhunter
  • **
  • Posts: 3372
Re: Marty 300 Build Along
« Reply #59 on: April 04, 2010, 05:41:00 AM »
I think you are gonna just have to thin the piece more buddy!  Maybe two layers?
I didn't claw my way to the top of the food chain to eat vegetables!

Users currently browsing this topic:

0 Members and 1 Guest are viewing this topic.
 

Contact Us | Trad Gang.com © | User Agreement

Copyright 2003 thru 2024 ~ Trad Gang.com ©