Author Topic: Hand tools & Osage bows  (Read 4707 times)

Offline Osagetree

  • TGMM Member
  • Trad Bowhunter
  • ***
  • Posts: 3512
Hand tools & Osage bows
« on: January 16, 2011, 07:54:00 PM »
Well, all this talk of swapping bows and rabbit hunting got me off my duff today...

There's a bunch of building going on here and some good input so, I thought I'd document my share too. Time for me to give a little back to the "BENCH".

Follow along on four attempts of mine to make shootable osage bows built with only simple hand tools. Anyone that has a drawknife, rasp & saw can do it. I'll try and explain the basics I use as I go along with this thread. SHOOT,,, I might even get someone to help me a bit.

 I realize many of you in this section are more experienced than myself but, I hope those more experienced & others may learn something from how I do this building of selfbows.

Oh,,, Not sure how long this will take but should keep me out of trouble for awhile.....

DAY ONE; 10am to 2pm

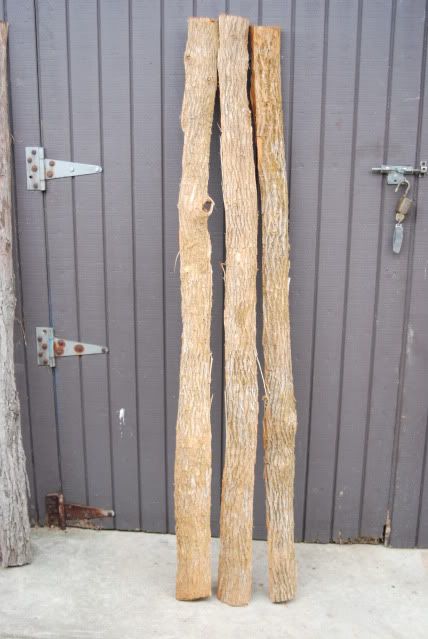
I'll start off with 3 staves... the forth one not shown yet comes in in to play in just a bit. My plan was for 3 staves but when I realized I had all 4 quarters of this log, I decided to make it 4 bow staves and do the entire tree trunk.

The staves were hand cut with my buck saw, split with metal wedges into quarters and their ends were sealed with shellac over two years ago. They are 73" long osage orange staves and are around 5" to 3" across the back or bark side of each quarter stave.
       

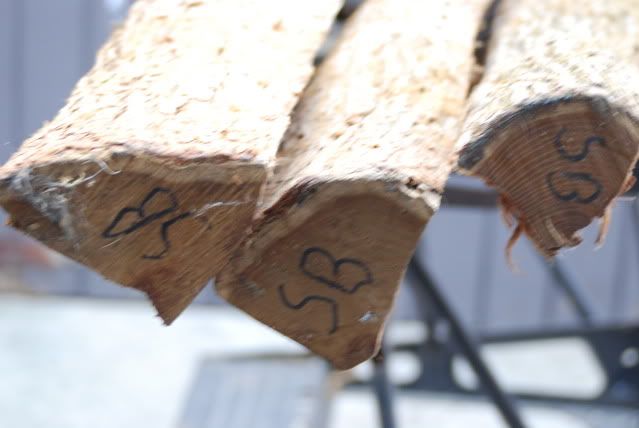
 Here you can see the growth rings in the 1st 3 staves. The fourth staves rings were thinner and has a few waves in it. This side of the tree was growing against another tree if I recall correctly, making this staves rings a bit thinner.
       

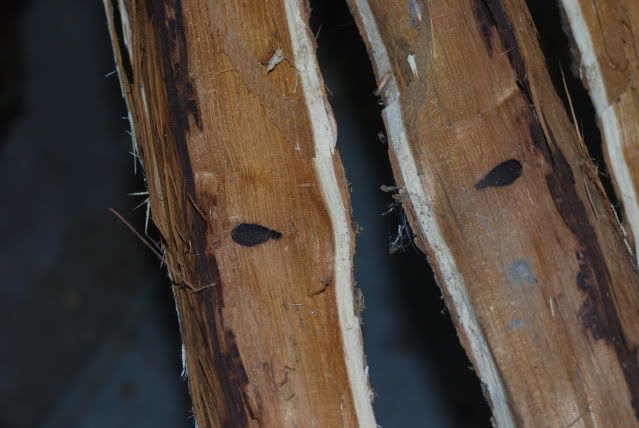
And, here are all four quarter staves. You can see where the knots and holes used to be on the inside of the tree where they are now split apart. Also, I believe this tree had maybe been in a fire at one time due to some of the black and damage in the wood. Maybe not, maybe just a weird or pithy vein and old bug holes grown over???
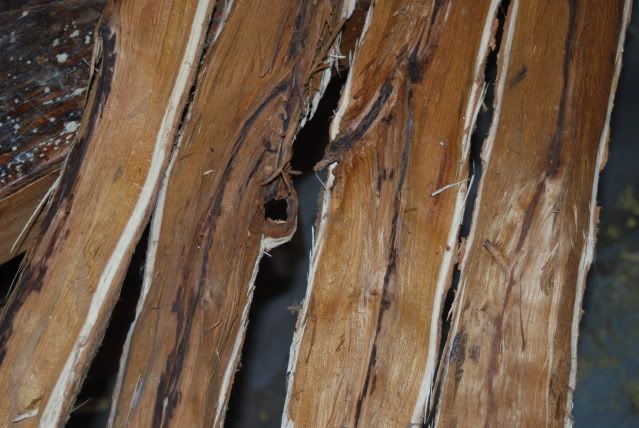
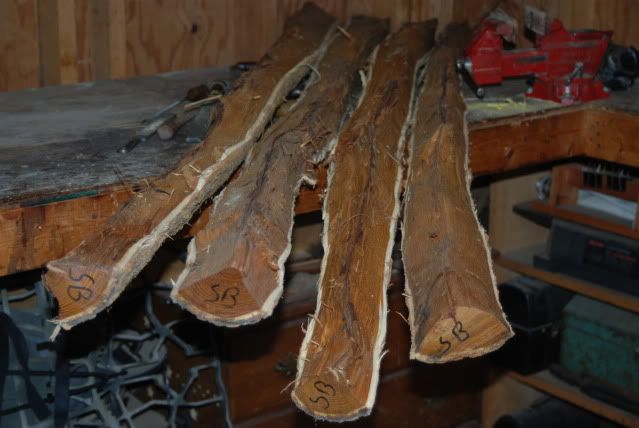


Here are some of the matching holes that were in the log along with the black or burnt looking wood inside of them??? Some of the knots, limb viens and holes you see here and above will be cut away and not in the end result. There's still alot of wood to come off these staves!
       

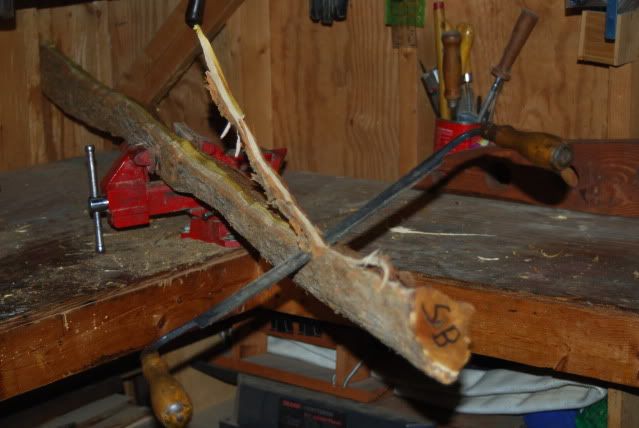
Okay, now clamp one stave on its side in the vise and get to work. At this point, the staves are pie shaped and I need to square them up a bit.

I trim the edges at the bark and whitewood (crust of the pie shaped stave) to square up the staves some. This effort helps keep the stave secure in the vise.

I finally clamp the stave in the vise, bark up and start ripping off the whitewood edge with a drawknife.
       

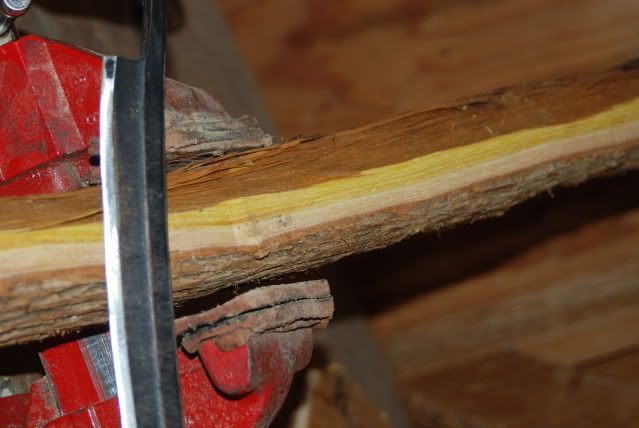
This effort above will also show you where the whitewood and heartwood meet. And, a more squared surface provides the vise something to hold on to while you work the stave.

Here you can see a squared off edge as it transitions from the bottom up,,, from bark to whitewood and then on to the heartwood. Note the darker oxidized heartwood on top. When my wood has aged to this color, I feel it is ready to reduce to a rough bow.
     

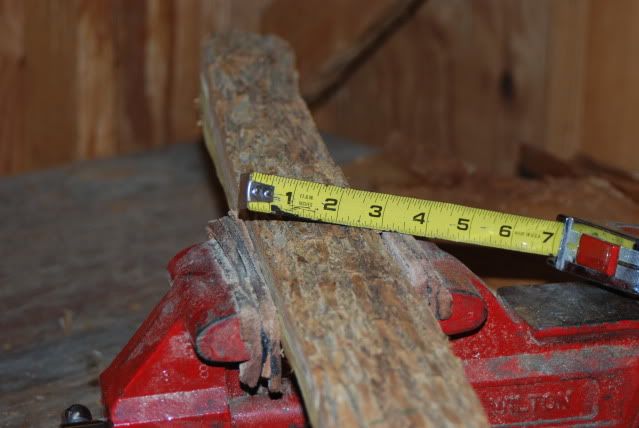
Squared off and clamped in the vise; we are ready to get serious with the drawknife!

 To do this work of removing wood with a DK (drawknife), I always wear fingerless gloves or weight lifters gloves are another choice of mine. Gloves prevent blisters and blisters will slow you down. Or, stop your wood removal altogether!
     
>>--TGMM--> Family of the Bow

Offline Osagetree

  • TGMM Member
  • Trad Bowhunter
  • ***
  • Posts: 3512
Re: Hand tools & Osage bows
« Reply #1 on: January 16, 2011, 07:55:00 PM »
I always work from the middle or handle area out to the ends or tips. Some would rather start at the tips and work towards the handle. Your choice really.

I dont intend to chase a ring at this stage,,, just getting down to the heartwood without mangling it up. I'll chase a single growth ring for the backing after I get down to the heartwood.

With the stave clamped in the middle, start down one side or the other side with the drawknife bevel side up, taking off the squared edges of the stave. Avoid digging in too deep with the DK, just go in deep enough to take off the whitewood and not dig into the heartwood too much if it can be avoided.


And then do the otherside of the stave the same way,,, long strokes; this is the easy part! Take wood off at an angle that does not go into the heartwood. Remember we are just taking off the edge of the bark and whitewood now.


Then take the DK down the middle of the stave. You can go hard and fast here. Removing 1/2 or most of the whitewood at this point is benificial later. You'll see it is tough and that getting into the heartwood is impossible if you're slicing more than tearing the wood. Slicing is key when using a drawknife. With a little experience one will find a good angle for the DK blade and the amount of wood one is trying and remove that makes using the drawknife a real pleasure. Where, one is taking off controled slices rather than tearing wood off.


Once I've removed the bark and some levels of whitewood, I'll go back to the middle of the stave and find the heartwood. I dig in withthe drawknife there until I see that addictive yellerwood that is heartwood! This picture shows you what the bow wood or heartwood looks like & when to stop and not go any deeper onto this yellow heartwood if at all possible.

If your chosen ring for the backing is deep within the stave then compromising a ring or two on the back now will not be a problem later. You'll have to go below any rings you've compromised so the damage will be removed when chasing the chosen ring later on in the process.


Using the drawknife and starting from the yellow wood (middle) out to the end of the stave (the tips), I remove the rest of the whitewood with the DK (Drawkinfe). You can feel a sensation in the drawknife,,, when the wood is seperating at the heartwood growth ring and where the whitewood ends. The DK just kinda feels like scraping or chattering rather than cutting. When your blade angle is correct, you'll feel it and it comes off almost too easy. I said almost!


You can see in this picture where one should be in depth and in relation to the ring you want for your backing.
Whitewood (top left).
The chosen ring is one ring below where I am now. Leaving one extra ring on top of the chosen ring now, may be benificial in the future!


The ring on top of this stave (pic below) is not a chased ring. I still have some rings of whitewood left on the heartwood in some places.

Once the bark and whitewood are removed, a end veiw of the stave below allows you to see that the stave is almost back to pie shaped and our chosen ring is probably the second ring from the top.


Flipping the stave over,,, bellyside up, I use the drawknife to remove heartwood that splintered when I split this log. This not only helps reduce the size of the stave somewhat, it lets you see the usable wood that is left intact for a bow & allows for better gripping when being rotated and worked in the vise.

Here is one of the holes shown on the belly of a stave earlier.

     
>>--TGMM--> Family of the Bow

Online Roy from Pa

  • Administrator
  • Trad Bowhunter
  • ****
  • Posts: 20689
Re: Hand tools & Osage bows
« Reply #2 on: January 16, 2011, 08:03:00 PM »
I'll be watching Joe, thanks.. Roy

Offline Osagetree

  • TGMM Member
  • Trad Bowhunter
  • ***
  • Posts: 3512
Re: Hand tools & Osage bows
« Reply #3 on: January 16, 2011, 08:14:00 PM »
Some tips on knots;

When I take off whitewood and come to a knot with the drawknife, I stop short of it and lift the knife to oneside. Usually the wood comes off around the knot. Just dont go cutting into a knot when you see yellerwood (heartwood) now and especially not later when chasing a ring!


Once it pops loose, grab it and flip it over the knot. It should come off fairly clean.


Just keep doing that until its yeller all around the knot. Sometimes turning the stave around and working the knot back the opposite direction helps in removing whitewood neatly around a knot such as this one.


With the stave being 73" and this knot in the last 6" toward the end or tips,,, it may be cut completely off the stave when we go to lay out the bow on the back of the stave but I am still unsure as to where I want to lay out the bow for this stave.


When it looks like this I am ready to start chaising a ring.


I did this stave next and boy it has some character to it!


The third stave was a bit bent out of shape in profile.


And here is the four staves together.

   
>>--TGMM--> Family of the Bow

Offline Osagetree

  • TGMM Member
  • Trad Bowhunter
  • ***
  • Posts: 3512
Re: Hand tools & Osage bows
« Reply #4 on: January 16, 2011, 08:15:00 PM »
Before skinning off the bark and whitewood.


After skinning and awaiting to reduce & chase rings for the bow backings.

 
>>--TGMM--> Family of the Bow

Offline Stiks-n-Strings

  • Moderator
  • Trad Bowhunter
  • ***
  • Posts: 3226
Re: Hand tools & Osage bows
« Reply #5 on: January 16, 2011, 08:21:00 PM »
This ought to be good!
Striker stinger 58" 55# @ 28
any wood bow I pick off the rack.
 2 Cor. 10:4
 TGMM Family of The Bow
 MK, LLC Shareholder
Proud Member of the Twister Twelve

Offline Osagetree

  • TGMM Member
  • Trad Bowhunter
  • ***
  • Posts: 3512
Re: Hand tools & Osage bows
« Reply #6 on: January 16, 2011, 08:24:00 PM »
Or really embarrassing!
>>--TGMM--> Family of the Bow

Offline seabass

  • Trad Bowhunter
  • **
  • Posts: 860
Re: Hand tools & Osage bows
« Reply #7 on: January 16, 2011, 08:48:00 PM »
man,i want you to teach me to make a bow.i will shuck bark for days for a lesson.i want to make my own bow real bad.i have the fever,steve

Offline H8nonCubs

  • Trad Bowhunter
  • **
  • Posts: 140
Re: Hand tools & Osage bows
« Reply #8 on: January 16, 2011, 08:51:00 PM »
Makes a man feel good to work a whole tree

Happiness is a giant pile of osage shavings!
"I never make the same mistake twice, i make it three or four times. You know just to make sure."

Offline hova

  • Trad Bowhunter
  • **
  • Posts: 1307
Re: Hand tools & Osage bows
« Reply #9 on: January 16, 2011, 10:04:00 PM »
i need to pick me up some of that south point hedge. wonder how far north it grows...

i love that character stick , thing looks wicked.
keep it up , pics are awesome.


-hov
ain't got no gas in it...mmmhmmm...

Offline George Tsoukalas

  • TG HALL OF FAME
  • Trad Bowhunter
  • *****
  • Posts: 2922
Re: Hand tools & Osage bows
« Reply #10 on: January 16, 2011, 11:02:00 PM »
That's some nice work right there! Jawge

Offline DVSHUNTER

  • Trad Bowhunter
  • **
  • Posts: 2717
Re: Hand tools & Osage bows
« Reply #11 on: January 16, 2011, 11:18:00 PM »
That is just like I do it Joe. All muscel at first then finesse em in.
"There is a natural mystic flowing through the air; if you listen carefully now you will hear." Bob Marley

Online Pat B

  • TG HALL OF FAME
  • Trad Bowhunter
  • *****
  • Posts: 15027
Re: Hand tools & Osage bows
« Reply #12 on: January 17, 2011, 12:28:00 AM »
I bet Kelly wishes you posted this 2 weeks ago! d;^)   Nice build along, Joe. Lots of good info here.   Too bad that open knot wasn't incorperated in the limb better! Oh well, nice stuff anyway.
 It will be cool to see how the 4 sides of a log compared to each other as bows. Do you have any predictions from what you see now?
Make the most of all that comes and the least of all that goes!
TGMM Family of the Bow

Offline Osagetree

  • TGMM Member
  • Trad Bowhunter
  • ***
  • Posts: 3512
Re: Hand tools & Osage bows
« Reply #13 on: January 17, 2011, 05:18:00 AM »
Thanks gang!

Steve, come on down for a lesson.

Pat, not till I chase a ring, then I can predict what they may be a little easier.
>>--TGMM--> Family of the Bow

Offline SteveD

  • Trad Bowhunter
  • **
  • Posts: 545
Re: Hand tools & Osage bows
« Reply #14 on: January 17, 2011, 07:49:00 AM »
Wow Looks good

Offline Jim Dahlberg

  • Trad Bowhunter
  • **
  • Posts: 105
Re: Hand tools & Osage bows
« Reply #15 on: January 17, 2011, 08:36:00 AM »
Looking good!  The only thing we're NOT seeing is the pile of shavings on the floor!  LOL

Offline KellyG

  • Trad Bowhunter
  • **
  • Posts: 4254
Re: Hand tools & Osage bows
« Reply #16 on: January 17, 2011, 10:48:00 AM »
:bigsmyl:  

This would have be really nice 2 weeks ago. Again nice work Joe,
Kelly

Offline Osagetree

  • TGMM Member
  • Trad Bowhunter
  • ***
  • Posts: 3512
Re: Hand tools & Osage bows
« Reply #17 on: January 18, 2011, 08:41:00 AM »
I burn may shavings as I go... Its been a tradition for me since I began. Used to pile them up at first but, being a smoker I was always concerned about burning down my shed. Besides, I hate stepping all over them to get around the stave.


Better here


Than here

 
>>--TGMM--> Family of the Bow

Offline DVSHUNTER

  • Trad Bowhunter
  • **
  • Posts: 2717
Re: Hand tools & Osage bows
« Reply #18 on: January 18, 2011, 02:47:00 PM »
joe, we use them to heat the shop, and only sweep every now and then. I personally love the crunching of shavings under my feet, but you really need to keep an eye on tools.
"There is a natural mystic flowing through the air; if you listen carefully now you will hear." Bob Marley

Online Pat B

  • TG HALL OF FAME
  • Trad Bowhunter
  • *****
  • Posts: 15027
Re: Hand tools & Osage bows
« Reply #19 on: January 18, 2011, 03:03:00 PM »
Every time I clean up shavings in my shop I find that tool I'd been looking for. Like having money in the bank! d;^)
Make the most of all that comes and the least of all that goes!
TGMM Family of the Bow

Users currently browsing this topic:

0 Members and 2 Guests are viewing this topic.
 

Contact Us | Trad Gang.com © | User Agreement

Copyright 2003 thru 2024 ~ Trad Gang.com ©