Author Topic: Savage Buildalong #2 NEW PICS  (Read 1264 times)

Offline Savage

  • Trad Bowhunter
  • **
  • Posts: 238
Savage Buildalong #2 NEW PICS
« on: February 15, 2011, 12:19:00 PM »
I will be building a TD Recurve with a laminated riser of Bubinga and Zebrawood with Bubinga limbs and Zebrawood tips. I am shooting for 58" 50#@26". I will try to get the first pics up tonight.
US Army
Kosovo - 2005
Iraq - 2008

Offline PEARL DRUMS

  • Trad Bowhunter
  • **
  • Posts: 3457
Re: Savage Buildalong #2 NEW PICS
« Reply #1 on: February 15, 2011, 12:30:00 PM »
Tear it up Savage! Have fun and enjoy every second.

Offline SveinD

  • Trad Bowhunter
  • **
  • Posts: 971
Re: Savage Buildalong #2 NEW PICS
« Reply #2 on: February 15, 2011, 12:34:00 PM »
That sounds like a sweet one!
Looking forward to reading and viewing  :)
Centaur 58" Glass XTL 40@28

~Those who believe in telekinetics, raise my hand~ Kurt Vonnegut

Offline greyhawk39

  • Trad Bowhunter
  • **
  • Posts: 160
Re: Savage Buildalong #2 NEW PICS
« Reply #3 on: February 15, 2011, 02:43:00 PM »
Nice wood combination!!she will look great.
Good luck with the build along.

Offline Green

  • Trad Bowhunter
  • **
  • Posts: 3003
Re: Savage Buildalong #2 NEW PICS
« Reply #4 on: February 15, 2011, 03:03:00 PM »
Looking forward to this one.
ASL's, Selfbows, and Wood Arra's
Just because you are passionate about something, doesn't mean you don't suck at it.

Offline Osagetree

  • TGMM Member
  • Trad Bowhunter
  • ***
  • Posts: 3512
Re: Savage Buildalong #2 NEW PICS
« Reply #5 on: February 15, 2011, 03:42:00 PM »
Just make it a lefty for me  :biglaugh:
>>--TGMM--> Family of the Bow

Offline Savage

  • Trad Bowhunter
  • **
  • Posts: 238
Re: Savage Buildalong #2 NEW PICS
« Reply #6 on: February 15, 2011, 03:46:00 PM »
Sorry Osage, all of my tools are right handed! hahaha
US Army
Kosovo - 2005
Iraq - 2008

Offline Savage

  • Trad Bowhunter
  • **
  • Posts: 238
Re: Savage Buildalong #2 NEW PICS
« Reply #7 on: February 15, 2011, 10:22:00 PM »
Ok, a couple of guys asked that I be a little more thorough on this buildalong so here goes. Got my parts a little early today but the wife suprised me by leaving my youngest baby with me so I didn't get as much done as I would've liked. Yesterday I did maintenance on all of my tools, changed blades and made some adjustments to make sure they are all cutting clean and true. I also did a thorough cleaning of the shop so that there would be no dust floating around to land on my limbs during the glue up. Before starting on the lams I prepped my form by waxing the whole thing to keep the glue from sticking to it and then covered it with saran wrap. I also checked the fire hose for leaks to make sure it maintains pressure during the curing process. I did a quick inventory or the parts to make sure everything was there.
   
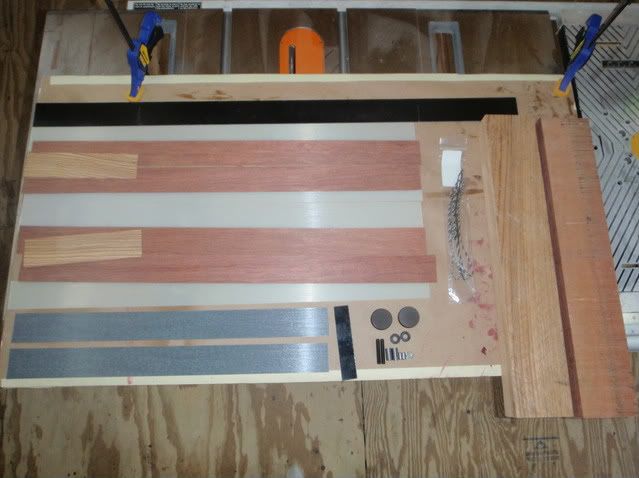
Everything appears to be in order so I laid out my lams in order, glass, tapered, wedge, parellel and glass. Once I taped the glass and marked the centerline and cleaned off all the lams I was ready to glue them up.
   
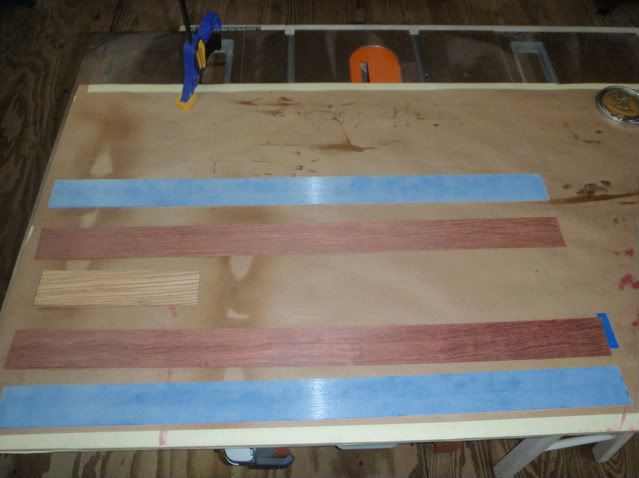
I mixed up my Smooth On and applied it to each lam ensuring there was no debris and that I had complete coverage with no dry spots. After I had all the lams stacked I put it all together on the form.
   
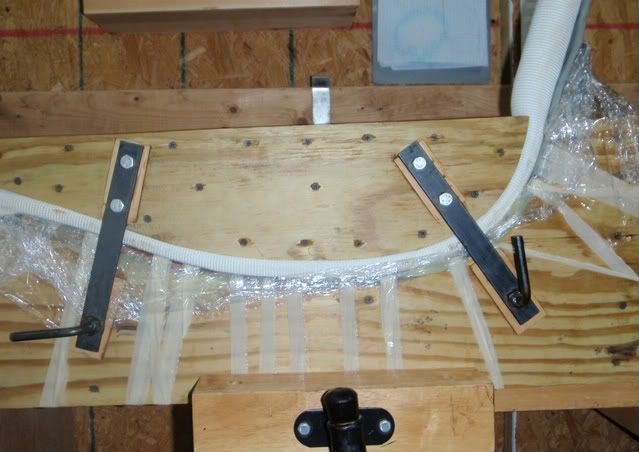
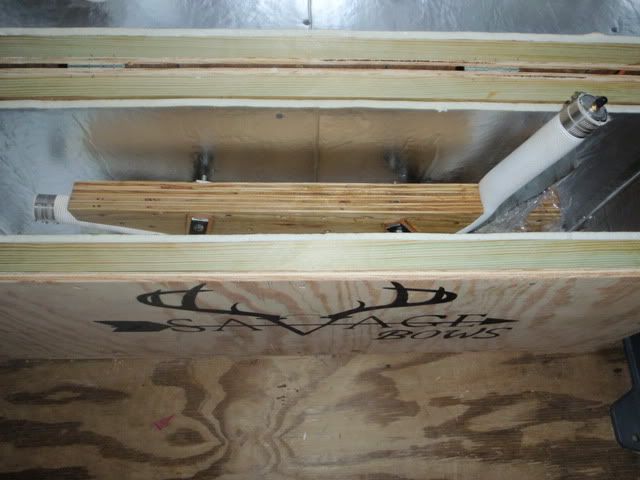
I aired up the hose to 60psi and checked to make sure everything was lined up properly before puttin the whole thing in the oven. It will cure for 8 hours at 180 degrees.
   
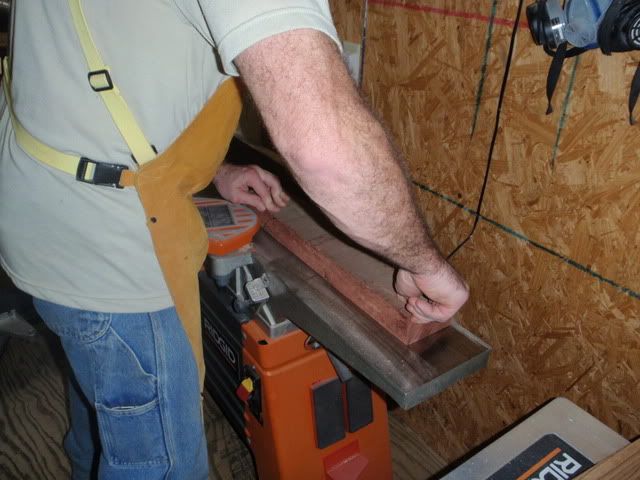
Now that the first limb is in the oven I can start on the riser. First order of business is to get some squared edges to work with so it was off to the jointer and planer.
   
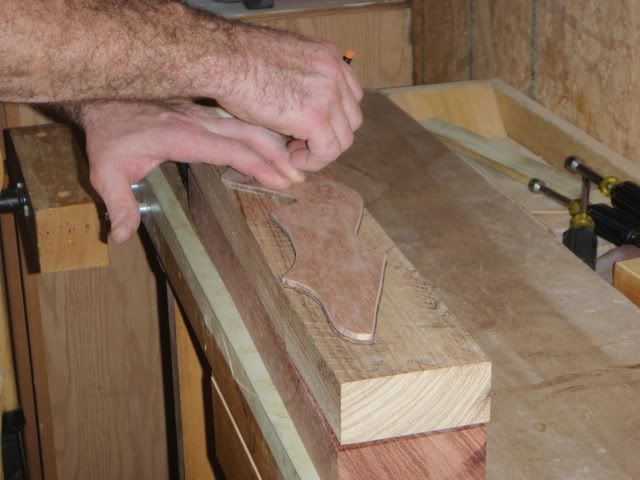
With a couple edges squared I took my rough template and layed it out on my riser pieces. I will be making a laminated riser so I used 2 sided tape to connect my risers. If all works out right I will have two opposite risers when its all done.
   
The baby is giving me a hard time about now so thats about all I will get done tonight. Tomorrow I will put together the next limb and cut out the rough riser shape on the bandsaw. Hopefully I will have time to true up the fadeout on the jointer.
US Army
Kosovo - 2005
Iraq - 2008

Offline 1oldbowguy

  • Trad Bowhunter
  • **
  • Posts: 614
Re: Savage Buildalong #2 NEW PICS
« Reply #8 on: February 15, 2011, 10:27:00 PM »
This is going to be a good one I can tell.  Can't wait for more.
Always say what you mean, that way people will know you mean what you say.

Offline Savage

  • Trad Bowhunter
  • **
  • Posts: 238
Re: Savage Buildalong #2 NEW PICS
« Reply #9 on: February 15, 2011, 10:38:00 PM »
I can't wait either, I'm about half tempted to head back out there and do some more. If it weren't for that regular job in the morning I could be out there making some progress tonight. Hahaha. I'll be back at it after work tomorrow. Stay tuned!
US Army
Kosovo - 2005
Iraq - 2008

Offline SEMO_HUNTER

  • Trad Bowhunter
  • **
  • Posts: 2792
Re: Savage Buildalong #2 NEW PICS
« Reply #10 on: February 15, 2011, 11:58:00 PM »
At some point I think I'm going to take the next step into laminated bows. I'm still kinda on the fence about it, but if I do I think I'll lean more toward the R/D longbows like a few of the regulars around here have been building lately. I really love the looks of those and every body talks about how sweet shooting they are.

You got a good start on it Savage, I'll be watching your progress on this one cause I have a take down started right now that I can't decide what to go on the limbs yet. I may do some laminated ones like you are?

So teach me well!   :thumbsup:
~Varitas Vos Liberabit~ John 8:32

Offline John Cooper

  • Trad Bowhunter
  • **
  • Posts: 130
Re: Savage Buildalong #2 NEW PICS
« Reply #11 on: February 16, 2011, 02:47:00 AM »
I don't know if I'd be complaining so much about the baby being around.  The kid takes pretty nice pictures!

Offline Savage

  • Trad Bowhunter
  • **
  • Posts: 238
Re: Savage Buildalong #2 NEW PICS
« Reply #12 on: February 16, 2011, 08:17:00 AM »
Well he's a pretty good kid until he's ready to go to the house right after I get my epoxy mixed up. He took about 20 pics and had 16 of his hand, 3 of the floor and 1 of my back. hahaha But he gave it a good try!
US Army
Kosovo - 2005
Iraq - 2008

Offline Savage

  • Trad Bowhunter
  • **
  • Posts: 238
Re: Savage Buildalong #2 NEW PICS
« Reply #13 on: February 16, 2011, 09:21:00 PM »
Ok, back in the shop this evening. I pulled the limb out of the oven, glued up and put number 2 in. Then I cleaned off the excess glue from the limb on the drum sander.
 
While I'm waiting on the second limb I will get back to the riser. First I cut out the fadeouts on the bandsaw.
 
After rough cut out the edges are a little rough, I true them up and get a nice flat surface on the planer
 
Once Im done with the fade outs I trace my pattern out on the riser and cut out the pieces with the bandsaw. Here is how they look cut out. We will be building the one in the front. The other one I will build at a later date.
 
Now back to the drum sander to start sanding the edges. This is the slow and painful process of eliminating all the gaps so that there are no weak spots in the riser.
 
In this picture you can see there are still some considerable gaps to work on. I will end here for tonight. Tomorrow I will clean up the second limb and continue working on the riser.
 
Stay tuned for more...
US Army
Kosovo - 2005
Iraq - 2008

Online kennym

  • TG HALL OF FAME
  • Trad Bowhunter
  • *****
  • Posts: 17317
Re: Savage Buildalong #2 NEW PICS
« Reply #14 on: February 16, 2011, 09:50:00 PM »
Those are probably difficult to fit!

At times, I block one pc up above the other a bit after getting the edge of it nice ,smooth and sleek. Then scribe around it with something the thickness of the largest gap and a pencil or sharpie.

Clamping em together helps too.

Gonna be a looker!  :thumbsup:
Stay sharp, Kenny.

   https://www.kennysarchery.com/

Offline Savage

  • Trad Bowhunter
  • **
  • Posts: 238
Re: Savage Buildalong #2 NEW PICS
« Reply #15 on: February 16, 2011, 09:55:00 PM »
Yeah, I put some screw clamps on it and the gaps weren't as bad as they look in the pic. Seems these Irwin clamps don't put enough pressure on it for this type riser. I will have to pic up some more screw clamps tomorrow.
US Army
Kosovo - 2005
Iraq - 2008

Offline Over&Under

  • TG HALL OF FAME
  • Trad Bowhunter
  • *****
  • Posts: 5108
Re: Savage Buildalong #2 NEW PICS
« Reply #16 on: February 16, 2011, 10:25:00 PM »
Very much likeing this Savage!  Well done on the how-to.

That riser design with the center ribbon of wood is very unique.  Looking forward to how this one comes out.
“Elk (add hogs to the list) are not hard to hit....they're just easy to miss"          :)
TGMM

Offline Savage

  • Trad Bowhunter
  • **
  • Posts: 238
Re: Savage Buildalong #2 NEW PICS
« Reply #17 on: February 16, 2011, 11:01:00 PM »
Thanks. Yes, this is one of 4 patterns I came up with a couple weeks ago. I'm kind of excited to finally build it. I'm dreading the hours of sanding tomorrow though. That seems to be the toughest part of the build getting the riser pieces to fit together without gaps.
US Army
Kosovo - 2005
Iraq - 2008

Offline Savage

  • Trad Bowhunter
  • **
  • Posts: 238
Re: Savage Buildalong #2 NEW PICS
« Reply #18 on: February 17, 2011, 10:21:00 AM »
Any questions, comments or concers up to this point? Any input would be great!
US Army
Kosovo - 2005
Iraq - 2008

Offline Apex Predator

  • Trad Bowhunter
  • **
  • Posts: 3372
Re: Savage Buildalong #2 NEW PICS
« Reply #19 on: February 17, 2011, 01:48:00 PM »
I would never be able to fit those pieces properly myself.  Too many turns for me!  Good luck with it.

Tighter clamping isn't usually the answer, and can cause induced stresses in the final glued up riser.
I didn't claw my way to the top of the food chain to eat vegetables!

Users currently browsing this topic:

0 Members and 2 Guests are viewing this topic.
 

Contact Us | Trad Gang.com © | User Agreement

Copyright 2003 thru 2024 ~ Trad Gang.com ©