Author Topic: Repair Along BBO  (Read 2632 times)

Offline Eric Krewson

  • Trad Bowhunter
  • **
  • Posts: 3126
Repair Along BBO
« on: February 21, 2011, 02:09:00 PM »
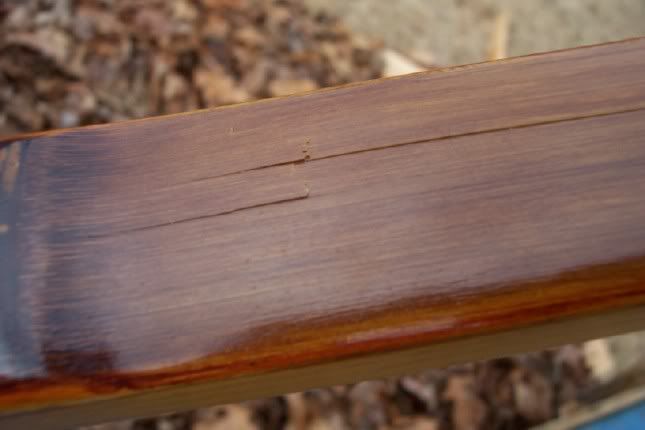
I made a bow for a friend of mine with all the bells and whistles. As some times happens, natural materials fail, in this case the bamboo cracked.

He asked if there was anything I could do to fix it. I could give it a super glueing and a wrap or I could replace the bamboo. I chose the latter so it would look like it did when I first made it, without a patch.

I took a ton of pictures so this is going to be a long thread and I don't know the outcome yet so here goes.

Here is the problem.


The first step it to grind off most of the old bamboo on a belt sander. Hard to put a beautiful bows back on the sander.


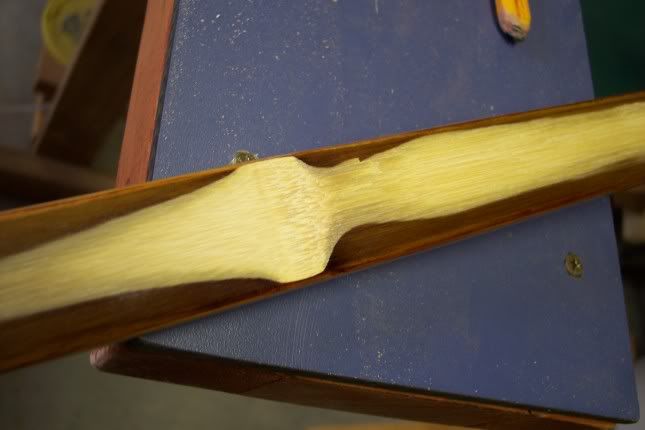
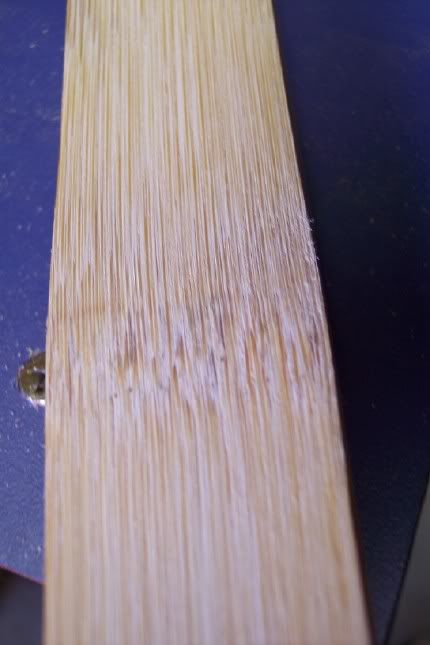
I like to leave a thin piece of bamboo to glue the new backing to so I won't loose bow poundage on the repair. This is about 1/16" thick. The initial crack was very shallow, I wet the surface of the bamboo to expose any cracks after a trip to the belt sander. None were visible.


Offline Dave Bowers

  • Trad Bowhunter
  • **
  • Posts: 1391
Re: Repair Along BBO
« Reply #1 on: February 21, 2011, 02:13:00 PM »
Wow this is gonna be a cool thread   :thumbsup:

Offline SEMO_HUNTER

  • Trad Bowhunter
  • **
  • Posts: 2792
Re: Repair Along BBO
« Reply #2 on: February 21, 2011, 02:14:00 PM »
This could get interesting Eric, I'll be following along.
~Varitas Vos Liberabit~ John 8:32

Offline Eric Krewson

  • Trad Bowhunter
  • **
  • Posts: 3126
Re: Repair Along BBO
« Reply #3 on: February 21, 2011, 03:17:00 PM »
I picked a nice piece of local bamboo, looks green but that is the color this bamboo dries to.

I drew a centerline on the bamboo belly.


Space the nodes evenly.


Line the bow tips up with the center line and use the bow to make a pattern on the bamboo.


The finished pattern.


Offline Eric Krewson

  • Trad Bowhunter
  • **
  • Posts: 3126
Re: Repair Along BBO
« Reply #4 on: February 21, 2011, 03:23:00 PM »
I cut the larger pieces of bamboo off with a band saw, don't want to get too close to the line.


I use a belt sander to carefully sand to my lines. I leave a little extra that I will have to sand off after the glue-up is complete.


Offline Eric Krewson

  • Trad Bowhunter
  • **
  • Posts: 3126
Re: Repair Along BBO
« Reply #5 on: February 21, 2011, 03:29:00 PM »
Next I carefully thin and taper the bamboo on my belt sander. I have found if you make every edge 1/16" thick, stem to stern on your bamboo, it will be just right. I often see bamboo backed bows with bamboo that is much too thick

The picture is of the thinned tip of the slat.


Offline caleb0100

  • Trad Bowhunter
  • **
  • Posts: 186
Re: Repair Along BBO
« Reply #6 on: February 21, 2011, 03:44:00 PM »
Very interesting so far. I will be staying tuned. I love to see how other , more experienced people work.

Offline Art B

  • Trad Bowhunter
  • **
  • Posts: 1398
Re: Repair Along BBO
« Reply #7 on: February 21, 2011, 03:56:00 PM »
Was that the upper limb that failed Eric? Of all the boo backs that I've had fail, it was always the upper or top part of the boo (upper limb). Never the lower or trunk end of the boo (lower limb)....Art

Offline Eric Krewson

  • Trad Bowhunter
  • **
  • Posts: 3126
Re: Repair Along BBO
« Reply #8 on: February 21, 2011, 04:00:00 PM »
Time for the glue-up. I didn't take pictures of me buttering up the bamboo with Urac-185 because I always get more glue on me than the bamboo and didn't want it on my camera.

I prepped the bamboo and bows back with a toothing plane iron.


I lined up the center line on my bamboo with the bows tips and applied my clamps. I was careful to see than nothing shifted and I had a little overlapping bamboo on each side. I glued in a little over 3" of reflex.


It was cool in the shop so I put my yard sale comforter/tent over my glue-up with a drop light for heat to cure the Urac.


Offline Eric Krewson

  • Trad Bowhunter
  • **
  • Posts: 3126
Re: Repair Along BBO
« Reply #9 on: February 21, 2011, 04:05:00 PM »
Looks pretty good out of the clamps.


Initial edge clean up with my belt sander. Had to be careful and not get into the bow.


Finished the cleanup with my file. You can see the thin strip of old bamboo I left.


Offline Eric Krewson

  • Trad Bowhunter
  • **
  • Posts: 3126
Re: Repair Along BBO
« Reply #10 on: February 21, 2011, 04:16:00 PM »
Tip overlay time. I ground off the tip overlays while prepping for the bamboo.

Measuring for a new overlay, I like 2 1/4" overlays.


I have selected a new piece of osage burl for the overlay. I have also flattened the bow tip and bamboo for the new overlay. I cut the surface at an angle toward the bows belly so my overlay will blend into the bows back and not be a huge lump on the back of my bow.


Glue-up time. I use a Popsicle stick for a clamp pad as it will conform to the round belly shape and not let the clamps slip.


Turned a block of wood into a tip overlay, needs a little more sanding.


Offline Shaun

  • TG HALL OF FAME
  • Trad Bowhunter
  • *****
  • Posts: 3619
Re: Repair Along BBO
« Reply #11 on: February 21, 2011, 04:17:00 PM »
Good stuff Eric, watching with interest.

Online Walt Francis

  • Administrator
  • Trad Bowhunter
  • ****
  • Posts: 3091
Re: Repair Along BBO
« Reply #12 on: February 21, 2011, 04:18:00 PM »
Eric,
Looking good!    :thumbsup:
The broadhead used, regardless of how sharp, is nowhere as important as being able to place it in the correct spot.

Walt Francis

Regular Member of the Professional Bowhunters Society

Online Roy from Pa

  • Administrator
  • Trad Bowhunter
  • ****
  • Posts: 20644
Re: Repair Along BBO
« Reply #13 on: February 21, 2011, 04:46:00 PM »
Very nice as usual Eric, I have done the same thing, however I only sanded the boo off the one limb. Then I had a piece of boo here that was split on one end. So I cut off the good end, laid out my bow pattern on it and glued her back up, worked out great.

Here she is, the top limb on the right is the one I replaced the boo on.


Offline Eric Krewson

  • Trad Bowhunter
  • **
  • Posts: 3126
Re: Repair Along BBO
« Reply #14 on: February 21, 2011, 05:07:00 PM »
Because round handle bows want to roll on a tillering tree I made a Vee block to cradle the handle. Still a little touchy but much better than before.


First pull on the long string, not too bad but a little stiff from mid limb out.


First check with the gizmo.


Yep, stiff from mid limb out.


That's it for today, time to take a break and start tillering in the morning

Offline John Scifres

  • TGMM Member
  • Trad Bowhunter
  • ***
  • Posts: 4540
Re: Repair Along BBO
« Reply #15 on: February 21, 2011, 05:33:00 PM »
How do you spell the whistle sound you make at a hot chick walking down the street  :)

Very pretty.
Take a kid hunting!

TGMM Family of the Bow

Offline PEARL DRUMS

  • Trad Bowhunter
  • **
  • Posts: 3457
Re: Repair Along BBO
« Reply #16 on: February 21, 2011, 06:04:00 PM »
That comforter and light is the best-cheapest hot box yet. I am going to "build" one myself Eric. Plus, it doesnt take up shop space. Good one! Nice repair as well.

Offline SEMO_HUNTER

  • Trad Bowhunter
  • **
  • Posts: 2792
Re: Repair Along BBO
« Reply #17 on: February 21, 2011, 07:45:00 PM »
That popsicle trick on the tip overlays is pretty slick, I'm going to chalk that one up to memory.
Nice job Eric.
~Varitas Vos Liberabit~ John 8:32

Offline John Cooper

  • Trad Bowhunter
  • **
  • Posts: 130
Re: Repair Along BBO
« Reply #18 on: February 21, 2011, 09:53:00 PM »
Thanks for documenting this process.  I have a Boo-massaranduba bow that raised a nasty splinter...of course after all the work was done finishing it!  It'll be a little trickier with the d/r profile, but it should work.  Thanks again.

~John

Offline Eric Krewson

  • Trad Bowhunter
  • **
  • Posts: 3126
Re: Repair Along BBO
« Reply #19 on: February 22, 2011, 01:03:00 PM »
Finished the tillering on the long string. With the gizmo the length of the marks get shorter and shorter until they disappear. No marks on the bottom limb and only a short mark on the top limb.


When the gizmo makes no marks on the either limb accept at the tips  it is time to go to the short string. I left the tips a little stiff because the short string puts more tension in that area.

As you can see in the picture the bottom limb(left) is a little stiff. The poundage is 60#@22", I am shooting for 64#@31". That little strip of bamboo I left and the glued in reflex really boosted the poundage.


I should be shooting this bow at my 25" draw this afternoon, more pictures to follow.

Users currently browsing this topic:

0 Members and 1 Guest are viewing this topic.
 

Contact Us | Trad Gang.com © | User Agreement

Copyright 2003 thru 2024 ~ Trad Gang.com ©