Author Topic: Bamboo/Osage Project Follow Along **Complete W/Pics**  (Read 2491 times)

Offline SEMO_HUNTER

  • Trad Bowhunter
  • **
  • Posts: 2792
Bamboo/Osage Project Follow Along **Complete W/Pics**
« on: April 11, 2011, 08:02:00 AM »
I'm not calling this a build along because this is my first time working with bamboo. If I had experience and success with this type of build then I may feel confident enough to say build along with me, but I don't. Not yet anyway.

So this is more of a follow along and if you like what you see and want to try this the way I'm doing it, feel free to do so at your own risk.

Comments and advice welcome, play nice.    :D  

This is what I started with and this Osage blank was an original splice in the handle, then I added the Oak overlays on the back and belly. It wasn't until I got a good deal on some bamboo that I decided to go ahead and back this spliced bow blank. So that's what I started with.


I flattened the back off as much as I possibly could to make a nice even glue surface for the bamboo backing. I removed almost all of the white oak lam on the back side of the handle area while doing so. The boo that I'm using is right there next to it and hasn't been flattened yet.


To be continued..................
~Varitas Vos Liberabit~ John 8:32

Offline Living_waters

  • Trad Bowhunter
  • **
  • Posts: 392
Re: Bamboo/Osage Project Follow Along **Complete W/Pics**
« Reply #1 on: April 11, 2011, 09:06:00 AM »
Dang dude you let them get to ya...... You cleaned up how can you do a follow along and find the tools you need for it LOL

Seriously that is some big bamboo, what I ordered was decent but not nearly that big. After thinning you should have a pretty uniform backing.
"Whoever believes in me, as the Scripture has said, ‘Out of his heart will flow rivers of living water.'” Jesus

Offline SEMO_HUNTER

  • Trad Bowhunter
  • **
  • Posts: 2792
Re: Bamboo/Osage Project Follow Along **Complete W/Pics**
« Reply #2 on: April 11, 2011, 09:49:00 AM »
Yes it is some nice bamboo just from what I can tell. I don't really have any previous knowledge to use as a comparison, but it looks pretty clean and uniform. If I could just get better at thinning it down I believe I can make the job go alot easier. For one thing I need a new sanding belt with a coarser grit and that would be a good start.

I'll post some more pics shortly and bring yall up to speed on where I'm at right now.
~Varitas Vos Liberabit~ John 8:32

Offline raghorns

  • Trad Bowhunter
  • **
  • Posts: 340
Re: Bamboo/Osage Project Follow Along **Complete W/Pics**
« Reply #3 on: April 11, 2011, 10:42:00 AM »
Semo,
Thanks for tak'in us along...I'm looking forward to seeing the process.

Lyle
Ps 119:105 "Thy word is a lamp unto my feet, and a light unto my path."

Offline Lee Slikkers

  • Trad Bowhunter
  • **
  • Posts: 237
Re: Bamboo/Osage Project Follow Along **Complete W/Pics**
« Reply #4 on: April 11, 2011, 10:51:00 AM »
Most excellent!     :campfire:
~ Lee

~~~~~~~~~~~~~~~~~~~~~~~~~~~~~~~~~~~
"The last word in ignorance is the man who says of an animal or plant: 'What good is it?"
— Aldo Leopold
~~~~~~~~~~~~~~~~~~~~~~~~~~~~~~~~~~~

Online Roy from Pa

  • Administrator
  • Trad Bowhunter
  • ****
  • Posts: 20645
Re: Bamboo/Osage Project Follow Along **Complete W/Pics**
« Reply #5 on: April 11, 2011, 11:05:00 AM »
I hope you left the bow stave a little wider than your intended finished bow. I flatten the back of the boo, then draw out my actual bow pattern on the flat belly of the boo and then cut it out, and taper it from 1/8 thick at the center to 1/16th thick at the tips. Then glue it up, then cut it out to the edge of the boo bow pattern, ya dig Chris? Ya also want to taper your stave to 1/8th thinner at the tips than at the flares.

However since you already have that wood on the back of the handle, I'd say your going to have to cut the boo in half now. It's all fun Chris, and the more you make, the better you will become.

Offline SEMO_HUNTER

  • Trad Bowhunter
  • **
  • Posts: 2792
Re: Bamboo/Osage Project Follow Along **Complete W/Pics**
« Reply #6 on: April 11, 2011, 12:48:00 PM »
Patience my friend, the white oak on the back of the handle is all but gone now, only a faint memory in the form of a tiny sliver of oak.

I apologize for not taking any pics of the bamboo back sanding, but it was so dusty and I had the stuff all over me I didn't want to handle my camera. It wasn't anything special, just sanding the back down on the belt sander until I got it all flat.
I wish I had made it thinner than what I did, but the edges were getting very thin and I was afraid of going to far with it. After glue up and cleaning my edges of the bow I realized I could have went even thinner with the boo.

So here we jump straight to the outfit clamped in my caul and you can see I lined it with carboard to accommodate the nodes which are facing downward, then I masked everything off with blue painters tape to keep the Urac glue from getting all over everything including my caul.


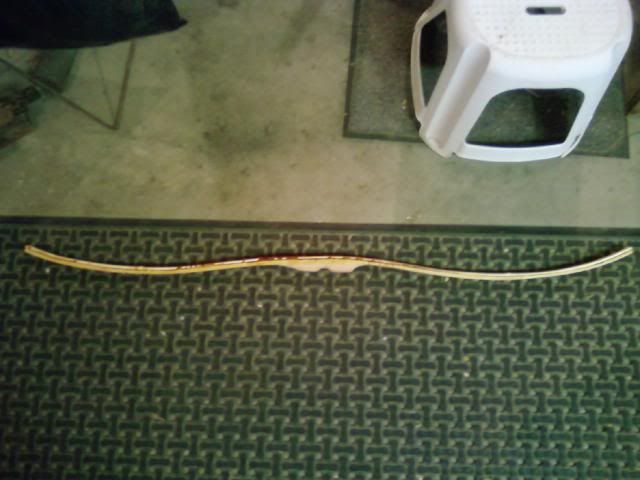
Here it is out of the caul after about 8hrs clamped up.
I love this shape!! First bow off the new caul and it performed awesome! Take a good look Lee this is what your future selfbows are gonna look like!     :thumbsup:    


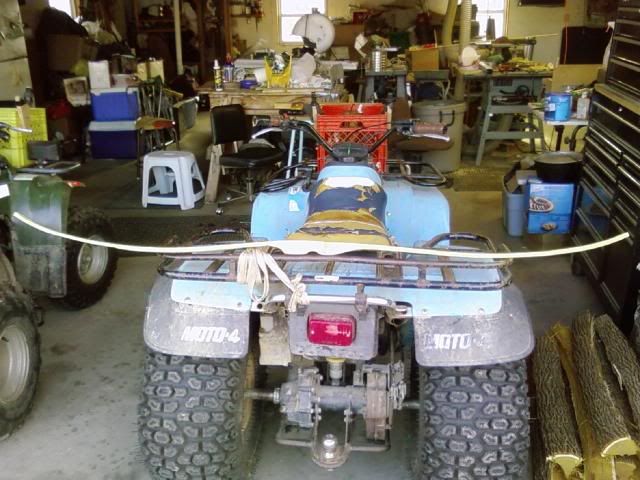
This is the before boo glue up that I forgot to add earlier. I actually put some bend in my blank with heat first to make clamping it all up easier.
This one gives a good comparison that the boo kept the blank perfect the way it was before and now it ain't going nowhere.


More coming later..........
~Varitas Vos Liberabit~ John 8:32

Offline Lee Slikkers

  • Trad Bowhunter
  • **
  • Posts: 237
Re: Bamboo/Osage Project Follow Along **Complete W/Pics**
« Reply #7 on: April 11, 2011, 01:08:00 PM »
That is awesome Semo!  I love the tip about pre-heating/bending the osage on the caul prior to doing the Boo glue up.  That makes sense to me as the Boo & glue don't have to work as hard in making the osage keep or maintain that shape.

I REALLY think you let us down with no pics of the Boo prep...LOL, heck that is the only part of these type of build that really don't understand or can't make complete sense of...oh well.  so you sand them flat on the boo belly and remove all traces of the inner nodes, correct?

Keep going and I can't wait to see this bow at full draw.  Toss in some layout dimensions too if you don't mind...i.e. handle width, length from handle to fades, width of fades and width at tips & OAL.

Thanks!
~ Lee

~~~~~~~~~~~~~~~~~~~~~~~~~~~~~~~~~~~
"The last word in ignorance is the man who says of an animal or plant: 'What good is it?"
— Aldo Leopold
~~~~~~~~~~~~~~~~~~~~~~~~~~~~~~~~~~~

Offline bjansen

  • Trad Bowhunter
  • **
  • Posts: 2263
Re: Bamboo/Osage Project Follow Along **Complete W/Pics**
« Reply #8 on: April 11, 2011, 01:19:00 PM »
Looking good!

Offline StoneAK

  • Trad Bowhunter
  • **
  • Posts: 432
Re: Bamboo/Osage Project Follow Along **Complete W/Pics**
« Reply #9 on: April 11, 2011, 01:25:00 PM »
When you heated it up did you use a heat gun or what Semo? I just started my caul today and was going to do a glue up in the next couple of days so any advice would be greatly appreciated. Your caul gave that bow a beautiful shape   :notworthy:
"He never promised that the cross would not be heavy and the hill wouldn't be hard to climb"
"I don't want to gain the whole world, and lose my soul"

10 Year Active Army Disabled Vet.

Online Roy from Pa

  • Administrator
  • Trad Bowhunter
  • ****
  • Posts: 20645
Re: Bamboo/Osage Project Follow Along **Complete W/Pics**
« Reply #10 on: April 11, 2011, 04:43:00 PM »
Not too shabby for a rookie. ^5 Chrissy:)

Offline SEMO_HUNTER

  • Trad Bowhunter
  • **
  • Posts: 2792
Re: Bamboo/Osage Project Follow Along **Complete W/Pics**
« Reply #11 on: April 11, 2011, 05:07:00 PM »
Thanks Guys, I'm glad your enjoying it.
If this bow makes it all the way to the end I'm sure it's going to be the nicest and fastest one I've made to date. It's looking sweeter with every stroke of the rasp.

Lee- The boo prep is kinda a pain in the arse. My suggestions on prepping the bottom flat is to use the advice that Eric gave in his Bambo Repair along. I'm not qualified to give any advice on the boo prep because I'm sure I didn't do it right. This one was a learning experience so maybe on the next one when I can get a handle on what I did right and what I did wrong I'll give more details. I just don't want anybody following my lead on that part and screwing up their material. If you use Eric's advice to prep the boo I think you'll hit it perfect.
Here's the link >>----->  http://tradgang.com/cgi-bin/ultimatebb.cgi?ubb=get_topic;f=125;t=005458;p=1

I'll give you all the dimensions when I'm finished. I'm still working the limbs down and they will probably get a little narrower at the tips for the last 6-8" before I'm done. So it's a bit premature to give the dims quite yet.

Thanks Brad, you played an instrumental part in helping me along with this. Thank you buddy!   :knothead:  

More pics coming later on, maybe tonight or tomorrow morning.
~Varitas Vos Liberabit~ John 8:32

Offline SEMO_HUNTER

  • Trad Bowhunter
  • **
  • Posts: 2792
Re: Bamboo/Osage Project Follow Along **Complete W/Pics**
« Reply #12 on: April 11, 2011, 05:13:00 PM »
Quote
Originally posted by Roy from Pa:
Not too shabby for a rookie. ^5 Chrissy:)
If I wasn't so dang happy being me Roybert, I'd wanna be you.  :p     :saywhat:
~Varitas Vos Liberabit~ John 8:32

Offline Lee Slikkers

  • Trad Bowhunter
  • **
  • Posts: 237
Re: Bamboo/Osage Project Follow Along **Complete W/Pics**
« Reply #13 on: April 11, 2011, 05:33:00 PM »
Quote
Originally posted by SEMO_HUNTER:
 
Quote
Originally posted by Roy from Pa:
Not too shabby for a rookie. ^5 Chrissy:)
If I wasn't so dang happy being me Roybert, I'd wanna be you.   :p       :saywhat:  [/b]
:laughing:
~ Lee

~~~~~~~~~~~~~~~~~~~~~~~~~~~~~~~~~~~
"The last word in ignorance is the man who says of an animal or plant: 'What good is it?"
— Aldo Leopold
~~~~~~~~~~~~~~~~~~~~~~~~~~~~~~~~~~~

Offline PEARL DRUMS

  • Trad Bowhunter
  • **
  • Posts: 3457
Re: Bamboo/Osage Project Follow Along **Complete W/Pics**
« Reply #14 on: April 11, 2011, 06:06:00 PM »
If Ol' Roy was any happier he'd hafta' be twins!

Offline PEARL DRUMS

  • Trad Bowhunter
  • **
  • Posts: 3457
Re: Bamboo/Osage Project Follow Along **Complete W/Pics**
« Reply #15 on: April 11, 2011, 06:07:00 PM »
By the way your glue up looks prett dang nice Chris. Give me a buzz when your ready to finish it up............................... and I will give you Royberts cell number!!!

Offline JSMOFFITT03

  • Trad Bowhunter
  • **
  • Posts: 257
Re: Bamboo/Osage Project Follow Along **Complete W/Pics**
« Reply #16 on: April 11, 2011, 09:33:00 PM »
I like the shape,  Ill be watching this on.... Hope to graduate to lams soon... been messing around with board bows


Were did you get your boo at?

Offline red hill

  • Trad Bowhunter
  • **
  • Posts: 2025
Re: Bamboo/Osage Project Follow Along **Complete W/Pics**
« Reply #17 on: April 11, 2011, 09:38:00 PM »
Looking good, SEMO. Keep it comin'.
Stan  :thumbsup:

Offline JSMOFFITT03

  • Trad Bowhunter
  • **
  • Posts: 257
Re: Bamboo/Osage Project Follow Along **Complete W/Pics**
« Reply #18 on: April 11, 2011, 09:41:00 PM »
"I love this shape!! First bow off the new caul and it performed awesome!"

Sorry for the one post after another,  Just a quick question.  What is a Caul?  im new to this so would you be refering to your form?

Either way it looks like a winner so far....

Offline SEMO_HUNTER

  • Trad Bowhunter
  • **
  • Posts: 2792
Re: Bamboo/Osage Project Follow Along **Complete W/Pics**
« Reply #19 on: April 11, 2011, 10:13:00 PM »
Yes, it's the form that the bow was clamped to. Mostly they are used for heat treating wood to bend some shape into them, but you can do glue ups on them too. There are many different designs and apparatus to bend wood and this is just one way.

Thanks guys.
I'll have some more pics up in the morning.

Hey Pearl, could you PM me Roybert's number? I need it for an online dating profile that I'm filling out.   :goldtooth:
~Varitas Vos Liberabit~ John 8:32

Users currently browsing this topic:

0 Members and 3 Guests are viewing this topic.
 

Contact Us | Trad Gang.com © | User Agreement

Copyright 2003 thru 2024 ~ Trad Gang.com ©