Author Topic: First bow build 2012...BBO Finished!!!  (Read 1756 times)

Offline bowhntineverythingnh03743

  • Trad Bowhunter
  • **
  • Posts: 1201
First bow build 2012...BBO Finished!!!
« on: February 20, 2012, 07:59:00 PM »
Come hell or high water I am going to be chasing gobblers with a BBO from my hands with cedar arras... Tonight I started to thin out the bamoo with a block planer.

I have been talking with Roy who has been wonderful with the tips along the way.

One tip side of the boo


Other side


Side profile

     
Here is what I have so far tonight... Looking to take my time.
My first question for you guys is when measuring for thickness is this done from the center of the radius or the side profile... looking for 1/8 in the middle and 1/16 at the tips.

I am going to contiue on working down the boo and looking to pick up a toothing plane
Think I am off to an OK start!!!

Offline fujimo

  • Trad Bowhunter
  • **
  • Posts: 3619
Re: First bow build 2012...BBO Finished!!!
« Reply #1 on: February 20, 2012, 08:02:00 PM »
cant see yer pics, or is it just me!!

Offline bowhntineverythingnh03743

  • Trad Bowhunter
  • **
  • Posts: 1201
Re: First bow build 2012...BBO Finished!!!
« Reply #2 on: February 20, 2012, 08:04:00 PM »
I just fixed them!!! wrong button LOL

Offline fujimo

  • Trad Bowhunter
  • **
  • Posts: 3619
Re: First bow build 2012...BBO Finished!!!
« Reply #3 on: February 20, 2012, 08:23:00 PM »
i have used a sawzall blade held in my hand for a toothing plane. and it has worked really well- no delaminations yet.
this is what i like to do- but firstlky i must say i defer to roy and other more experienced bowyers here- but this is what Bert Frelink told me to do- to rough out your belly wood, then rough out your bamboo to slightly oversize to your belly wood- then you can see a lot more accurately what thickness you are getting- you just have to be carefiul during glue up, that nothing shifts. it has worked really well for me.

see what the other guys have to say

Offline PEARL DRUMS

  • Trad Bowhunter
  • **
  • Posts: 3457
Re: First bow build 2012...BBO Finished!!!
« Reply #4 on: February 20, 2012, 08:52:00 PM »
Ol' Roybert Redford is up to it again! He is the bamboo backed man. Do what he says and you will have a BBO turkey bow. Meausure the center thickness. As you taper the boo's width down it will thicken up. Dont sweat it if the edges get a touch "sharp". Try 50 grit on a good sanding block for leveling the surface for glue and removing material rather quickly.

Offline bowhntineverythingnh03743

  • Trad Bowhunter
  • **
  • Posts: 1201
Re: First bow build 2012...BBO Finished!!!
« Reply #5 on: February 20, 2012, 09:05:00 PM »
Sounds good PD... do you use a caliper or something to measure it. Spanky new to this

Offline tenbrook

  • Tradbowhunter
  • Trad Bowhunter
  • *
  • Posts: 1025
Re: First bow build 2012...BBO Finished!!!
« Reply #6 on: February 20, 2012, 09:27:00 PM »
Look here lots of GREAT info!  http://poorfolkbows.com/ipe1.htm

Also I am going to be doing a BBI buildalong very soon that will help.  Keep an eye out for it.

hope this helps!

tenbrook

Offline jtbluefeather871

  • Trad Bowhunter
  • **
  • Posts: 118
Re: First bow build 2012...BBO Finished!!!
« Reply #7 on: February 20, 2012, 09:53:00 PM »
I'm going to be devouring these BBO and BBI build alongs... Then trying one or two myself!
I learned "Semper Fi" as a Marine, and have lived it every day since.

Offline trentcur

  • Trad Bowhunter
  • **
  • Posts: 84
Re: First bow build 2012...BBO Finished!!!
« Reply #8 on: February 21, 2012, 12:12:00 AM »
tenbrook..... that site is awesome. full of info..........

Anybody tried thinning bamboo out (rough) with a power planer and then finish up with a belt sander?
"The true picture of our charecter will be painted when nobody is watching"

53@28 Black Widow SAX T/D
52@28 Great Plains T/D Rio Bravo
60@28 Great Plains T/D Woodland Hunter
55@28 Great Plains T/D Longbow
70@28 Bear Kodiak

Offline fujimo

  • Trad Bowhunter
  • **
  • Posts: 3619
Re: First bow build 2012...BBO Finished!!!
« Reply #9 on: February 21, 2012, 02:26:00 AM »
ask ber frelink- a sponsor on here, and an awesome bow builder about his experience of thinning boo with a jointer i think it was, oh.. and the hospital time and the time away from bow building and shooting etc etc.
 unless you have exactly the right power too- i know i dont have!!
stick to hand tools as much as you can.

Online Roy from Pa

  • Administrator
  • Trad Bowhunter
  • ****
  • Posts: 20651
Re: First bow build 2012...BBO Finished!!!
« Reply #10 on: February 21, 2012, 07:32:00 AM »
I use a jointer set at 1/8th inch cut to thin the boo down to a flat surface on the belly side. Jointers are very dangerous and will remove fingers in the blink of an eye. I use the push blocks to control the boo as I work it down. Once the belly side is flat I trace my bow pattern onto it and cut that out on a bandsaw. Then I thin the boo down to 1/8 th thick at the handle and taper it to 1/16th thick at the tips. I do this on a belt sander, and again I use push blocks to control the boo. I try to get the boo  to a butter knife edge along the sides. Also if there are any thinner spots on the back of the boo, I am real careful not to make that area too thin.

One tip here Justin, if you look at the nodes on the boo, you will notice that the space between them gets longer compared to one end to the other end. You want the end with the nodes closer together to be your bottom limb. You will also have to align the boo on your pattern and you will either have a node centered in the handle or a node equaly spaced one way or the other at your flares. You can slide the boo one way or the other to decide, then mark the exact center of the boo with the exact center of your pattern. Then trim off the ends of the boo to match the pattern, leaving yourself an extra 1/4 inch to play with.

Once your bow pattern is cut out of the boo, center it on your slat and run a tight string down the center of the boo to keep it straight. I measure from the string to both side edges of the boo all along the bow to get it perfectly straight. Clamp the boo down on the slat and then cut little thin blocks of wood and glue them along the sides of the boo to hold it straight when you glue it up like below.


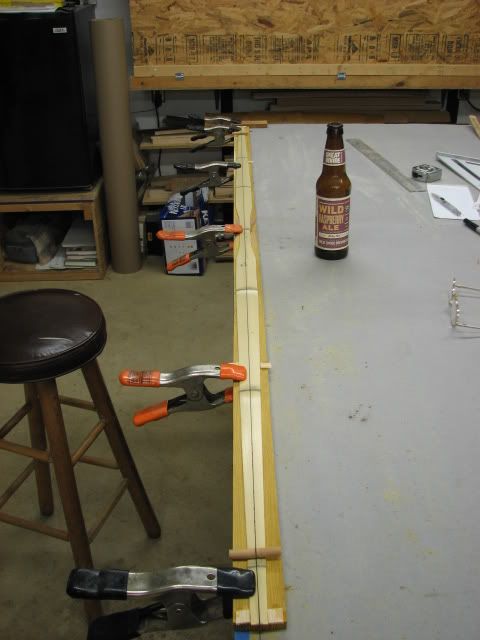
When you glue up the bow, be sure to place padding between the clamps and back of boo and also on the belly side of the wood. This protects the boo and wood from getting crimped from the pressure of the clamps. A thin piece of wood will suffice. The boo is the most critical so protect it well, otherwise the clamps will cause damage and cause it to splinter later on in the tillering process.


Offline bowhntineverythingnh03743

  • Trad Bowhunter
  • **
  • Posts: 1201
Re: First bow build 2012...BBO Finished!!!
« Reply #11 on: February 21, 2012, 11:04:00 PM »
So I worked more on my bow tonight... Made a new pattern on some stiffer wood.

Question for you folks... Anyone have a Z splice pattern for the band saw.... I attempted free hand and they seemed to match up. Gave them a little tap and crack... Ran a crack down the center of one about an inch and a half past it.

Figures I would have problems... Any time I pick up a piece of wood there is issues....UGH!!!

Offline Buemaker

  • Trad Bowhunter
  • **
  • Posts: 3108
Re: First bow build 2012...BBO Finished!!!
« Reply #12 on: February 22, 2012, 05:22:00 AM »
Roy, what a messy shop you have   ;)  Looks like one could eat off that floor. And thanks for the tip. Bue--.

Online Roy from Pa

  • Administrator
  • Trad Bowhunter
  • ****
  • Posts: 20651
Re: First bow build 2012...BBO Finished!!!
« Reply #13 on: February 22, 2012, 05:55:00 AM »
Justin, live and learn. I have done the same thing. You can't push them together too hard. Once I get a Z splice close,I use a rasp to finish it up and just snug them together with a very light tap.

Online Roy from Pa

  • Administrator
  • Trad Bowhunter
  • ****
  • Posts: 20651
Re: First bow build 2012...BBO Finished!!!
« Reply #14 on: February 22, 2012, 05:59:00 AM »
The little crack should be fine, get some urac in it and it will have boo and the riser covering it when done.

Z splice, find the center of the board, measure up 4 inches on each end and draw a line, then connect the points like shown.


Offline bowhntineverythingnh03743

  • Trad Bowhunter
  • **
  • Posts: 1201
Re: First bow build 2012...BBO Finished!!!
« Reply #15 on: February 22, 2012, 12:00:00 PM »
Thanks Roy... Here are some pictures of me laying the ground work on the back of the boo.


I am going to use a file and fix my Z splice after lunch with my girlfriend and will post a picture of what I got

Online Roy from Pa

  • Administrator
  • Trad Bowhunter
  • ****
  • Posts: 20651
Re: First bow build 2012...BBO Finished!!!
« Reply #16 on: February 22, 2012, 12:07:00 PM »
Well the pattern and your boo look very good so far, you must have a good teacher:) But your center line drawn on the pattern is off to the left on this end. Ya might wanna fix that before it leads you down the wrong trail..

Offline gringol

  • Trad Bowhunter
  • **
  • Posts: 1534
Re: First bow build 2012...BBO Finished!!!
« Reply #17 on: February 22, 2012, 12:46:00 PM »
Looks good, except for the bench.  WAY too clean!    :thumbsup:

Offline bowhntineverythingnh03743

  • Trad Bowhunter
  • **
  • Posts: 1201
Re: First bow build 2012...BBO Finished!!!
« Reply #18 on: February 22, 2012, 01:04:00 PM »
I noticed that too roy as I traced it on the boo... Ended up making a new pattern out of stiffer wood. I used Lattus work for this pattern and it was too floppy and made the lines move.

Here is the boo cut out with the new pattern...
I think it looks better. I just used a small block plane to clean up the sides.
I still need to work down the fades and handle area...


Online Roy from Pa

  • Administrator
  • Trad Bowhunter
  • ****
  • Posts: 20651
Re: First bow build 2012...BBO Finished!!!
« Reply #19 on: February 22, 2012, 01:13:00 PM »
Atta boy, gold star so far.

Users currently browsing this topic:

0 Members and 3 Guests are viewing this topic.
 

Contact Us | Trad Gang.com © | User Agreement

Copyright 2003 thru 2024 ~ Trad Gang.com ©