Author Topic: Vacuum chamber  (Read 423 times)

Offline talkingcabbage

  • Trad Bowhunter
  • **
  • Posts: 791
Vacuum chamber
« on: March 19, 2013, 10:47:00 PM »
So this is kind of a quick build along for a little vacuum chamber for coloring or stabilizing wood for accents.  I'm only assuming that this works, since this is my first one, but so far things look good.  I guess the proof's in the puddin', and I'll find out tomorrow when I cut into the piece I'm dying.

So here's what I've got.  I found a tall glass vase at a local store for the chamber.  I wanted something skinny and tall so it would fit the pieces I need, but also not take a ton of wood hardener and dye to fill.  This one is about 3" diameter and around 16" tall.
 

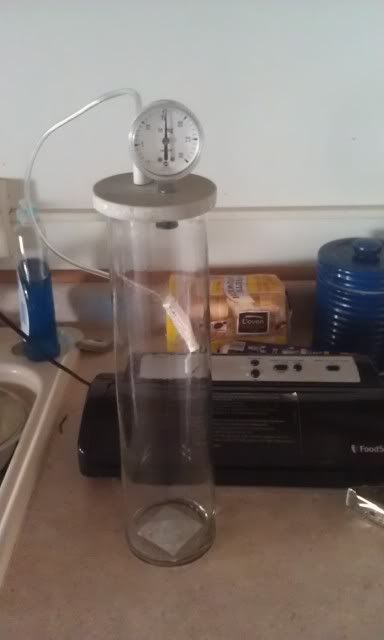
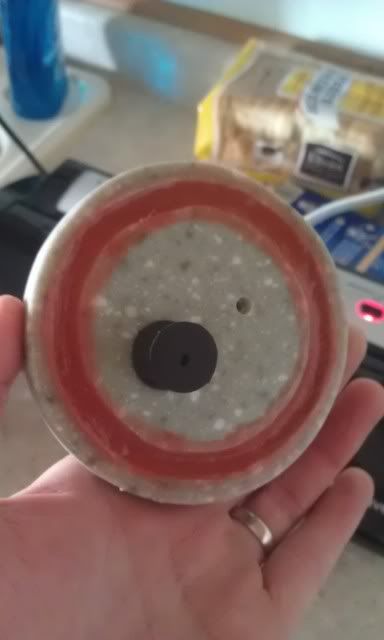
For the lid I used a piece of corian that I cut a groove in with my dremel because I don't have a router.  It fits the lid nice.  Then I filled it with RTV silicone, smoothed it out all around, and let it sit overnight to cure.  This made a real nice gasket to seal onto the glass edge.
 

My vacuum comes from a food saver with a canister port.  The gauge is from a pressure cooker.  I've gotten the food saver to pull about -19 psi, but that's about it.  It should probably be closer to -25, but take what you can get, right?  

Here's the vacuum with everything in it.  I poured in two cans of Minwax wood hardener, and one bottle of Rit dye (royal blue).
 

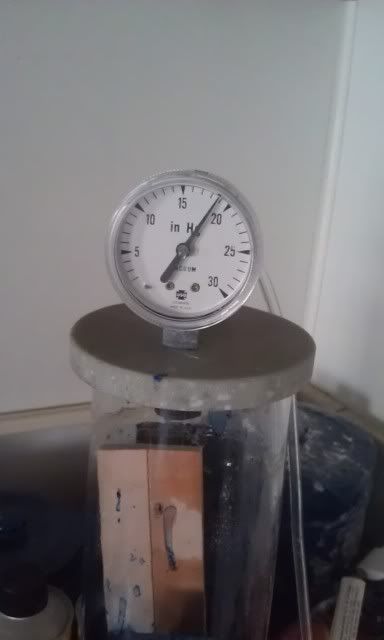
After I pulled vacuum, I pinched off the line and clipped a pinch clamp on it to keep the vacuum, and it has now, for about 7-8 hours.  I'm not really sure how long it needs to be in there.  This is all kind of an experiment for me too.  A couple hours is probably good, but I tend to overbuild everything anyway, so what's another 6, right?  I'm going to take them out before bed and lay it on a piece of butcher paper to dry overnight, then cut into them tomorrow to see if it pulled all the dye into the center of the wood.  So I guess I'll pick it up there tomorrow!
Joe

"If your work speaks for itself, don't interrupt."

One of two things will happen; it'll either work or it won't.

Online Roy from Pa

  • Administrator
  • Trad Bowhunter
  • ****
  • Posts: 20650
Re: Vacuum chamber
« Reply #1 on: March 19, 2013, 10:56:00 PM »
Ya know sumpen Cabbage, some boys could get good use outta that:)

Offline rockkiller

  • Trad Bowhunter
  • **
  • Posts: 434
Re: Vacuum chamber
« Reply #2 on: March 19, 2013, 10:58:00 PM »
Is it tomorrow yet  :)  This like waiting for Christmas morning.

Offline talkingcabbage

  • Trad Bowhunter
  • **
  • Posts: 791
Re: Vacuum chamber
« Reply #3 on: March 19, 2013, 11:20:00 PM »
Sorry rockkiller, not yet.  I did just pull the pieces out, though.


Don't look like much, and they look almost black in the picture, but they are a deep royal blue.  The dye is pretty thick on the outside.  I'm guessing the true color will be a bit lighter, as in, not so dense.  Not exactly a lighter shade, well, ya know.  

Anyway, I poured the remaining stuff back in the cans and out of the two cans it took to fill the thing, I've got a can plus 1/3 left, so they did soak up quite a bit.  If this works, I'm gonna get a lot more use out of it, I'm sure.  I'll start with some cherry red stuff for me  :)
Joe

"If your work speaks for itself, don't interrupt."

One of two things will happen; it'll either work or it won't.

Offline milehi101

  • Trad Bowhunter
  • **
  • Posts: 133
Re: Vacuum chamber
« Reply #4 on: March 20, 2013, 08:27:00 AM »
I did something similar with a break bleeding tool from Harbor Freight a couple years back and it seems to work pretty well.  You can tell when to take them out by watching the bubbles as the air is being sucked out of the wood and the min wax is sucked in the wood.  When the bubbling stops I let it set about 1/2 hour and then remove it.

Offline Troy D. Breeding

  • SPONSOR
  • Trad Bowhunter
  • *****
  • Posts: 1073
Re: Vacuum chamber
« Reply #5 on: March 20, 2013, 08:37:00 AM »
Cabbage,

I did something like that as well several years ago. I was making footed shafts at the time and had a lady that wanted blue footings.

I used Rit Dye and denatured alcohol. I didn't have a vac system to do it so I put the maple footing pieces in a jar with the mix and let it sit for about a week. It did lighten a bit after removing the outside, but the color did go all the way thru.

Me thinks the vac system may be the trick to get better penetration. Of the color, that is.  :bigsmyl:  

Troy
Troy D. Breeding
 www.WoodGallery295.net

Retirement ain't what it's cracked up to be.

Offline Crooked Stic

  • TG HALL OF FAME
  • Trad Bowhunter
  • *****
  • Posts: 6065
Re: Vacuum chamber
« Reply #6 on: March 20, 2013, 05:16:00 PM »
I tried about the same thing on actionboo. I had maybe 20 in. vacuum. My results not good.Hope your luck is better.
High on Archery.

Offline talkingcabbage

  • Trad Bowhunter
  • **
  • Posts: 791
Re: Vacuum chamber
« Reply #7 on: March 20, 2013, 11:24:00 PM »
Well here's where I'm at so far. This is the largest and thickest piece after I ran the straightest side through the jointer a couple times.
 

Looks cool, huh?
Joe

"If your work speaks for itself, don't interrupt."

One of two things will happen; it'll either work or it won't.

Offline talkingcabbage

  • Trad Bowhunter
  • **
  • Posts: 791
Re: Vacuum chamber
« Reply #8 on: March 20, 2013, 11:29:00 PM »
Here is that piece glued up.
 

I've got to cut another set of curves in it tomorrow to create a ribbon look, so that's when I'll know for sure if it went all the way through or not. It looks real promising though.

Milehi, I did watch for the bubbles. I prob went overboard, though. The bubbles only went for about 20 mins or so, but I let it sit for about 8 hours. Better safe than sorry, right?
Joe

"If your work speaks for itself, don't interrupt."

One of two things will happen; it'll either work or it won't.

Offline bigbob2

  • Trad Bowhunter
  • **
  • Posts: 2160
Re: Vacuum chamber
« Reply #9 on: March 21, 2013, 03:57:00 AM »
Forgive my ignorance but what does the minwax wood hardener do, apart from the glaring obvious . Like what uses could you use it for? Seems you nailed the vacuum set up too, great stuff!

Offline Troy D. Breeding

  • SPONSOR
  • Trad Bowhunter
  • *****
  • Posts: 1073
Re: Vacuum chamber
« Reply #10 on: March 21, 2013, 07:14:00 AM »
Looks like you method ended up with better result than I did with the soak and wait method. My dark blue ended up way lighter than what you got.
Troy D. Breeding
 www.WoodGallery295.net

Retirement ain't what it's cracked up to be.

Offline talkingcabbage

  • Trad Bowhunter
  • **
  • Posts: 791
Re: Vacuum chamber
« Reply #11 on: March 21, 2013, 07:48:00 AM »
In this case the wood hardener was more of a carrier for the dye. I really just wanted to see if it would penetrate good wood. In the future I plan on using some crotch wood, or some really burly stuff, and that will need the hardener to stabilize it so it doesn't crack or warp. I suppose I could've used denatured alcohol just as easily. This was kind of an experiment where I wanted to use the piece I was experimenting on.
Joe

"If your work speaks for itself, don't interrupt."

One of two things will happen; it'll either work or it won't.

Offline LittleBen

  • Trad Bowhunter
  • **
  • Posts: 2970
Re: Vacuum chamber
« Reply #12 on: March 21, 2013, 10:28:00 AM »
Very neat. I would love to dye some curly maple.

Maybe a really bright almost blaze orange for some really obnoxious looking deer hunting bow. An ode to gun hunters that make blaze orange necessary.

In all seriousness though this is cool. No I just need to find a vacuum pump .... hmmmmm.

Offline talkingcabbage

  • Trad Bowhunter
  • **
  • Posts: 791
Re: Vacuum chamber
« Reply #13 on: March 21, 2013, 09:08:00 PM »
Here's the piece after I cleaned up the glue from the first glue up and cut the second wave in it. The lighter parts are where the dye did not penetrate the late wood, giving it a tiger stripe appearance. Pretty cool.
 
Joe

"If your work speaks for itself, don't interrupt."

One of two things will happen; it'll either work or it won't.

Offline talkingcabbage

  • Trad Bowhunter
  • **
  • Posts: 791
Re: Vacuum chamber
« Reply #14 on: March 21, 2013, 09:15:00 PM »
And here's after the second glue up. The color is kinda washed out from the phone and dust, but it looks really cool when wet.
 

I glued in a thin strip of white wood on either side of it to set it off, and tomorrow I'm gonna glue in a .030 strip of red glass in an arc, then it'll be done.

One point I should make, though, is the minwax wood hardener was not really made for heat. The first glue up looked real scary when i pulled it out. The epoxy pulled some of the dye/hardener out of the end grain where it was thicker and made a blue mess on the plastic wrap. At first I thought it had all melted out, but it was just from the surface and very end grain. So maybe next time I'll just use alcohol instead, unless I really need the hardener.
Joe

"If your work speaks for itself, don't interrupt."

One of two things will happen; it'll either work or it won't.

Offline goobersan

  • Trad Bowhunter
  • **
  • Posts: 1386
Re: Vacuum chamber
« Reply #15 on: March 21, 2013, 09:51:00 PM »
that's lookin awesome Cabbage. nice job on the vacuum chamber      :clapper:

Users currently browsing this topic:

0 Members and 1 Guest are viewing this topic.
 

Contact Us | Trad Gang.com © | User Agreement

Copyright 2003 thru 2024 ~ Trad Gang.com ©