Author Topic: HH straight bow build... Finished!!  (Read 5373 times)

Online kennym

  • TG HALL OF FAME
  • Trad Bowhunter
  • *****
  • Posts: 17317
Re: HH straight bow build... Finished!!
« Reply #80 on: May 24, 2013, 10:48:00 PM »
:thumbsup:    :thumbsup:
Stay sharp, Kenny.

   https://www.kennysarchery.com/

Offline bigbob2

  • Trad Bowhunter
  • **
  • Posts: 2160
Re: HH straight bow build... Finished!!
« Reply #81 on: May 25, 2013, 03:10:00 AM »
I just round the edges a bit unless i have to reduce poundage, and the shelf on mine is only an arrow width into the riser, but that's just me.

Offline Dan Bonner

  • Trad Bowhunter
  • **
  • Posts: 463
Re: HH straight bow build... Finished!!
« Reply #82 on: May 25, 2013, 04:29:00 PM »
That thing is looking good! Excellent work on the tips and you nailed your weight. Handles are easy,  just keep shaping it till it feels right to your hand and you are done. You are almost there. How does it shoot?
Bonner
 .

Offline bowhntineverythingnh03743

  • Trad Bowhunter
  • **
  • Posts: 1201
Re: HH straight bow build... Finished!!
« Reply #83 on: May 26, 2013, 09:47:00 PM »
Haven't shot it yet... Gonna work on the grip if mother nature cooperate sometime soon

Offline bowhntineverythingnh03743

  • Trad Bowhunter
  • **
  • Posts: 1201
Re: HH straight bow build... Finished!!
« Reply #84 on: June 12, 2013, 10:30:00 AM »
Well today I finally got a break in the weather from the rain that has been coming down about every day for the last couple of weeks. Got my handle shaped and took a few shots at half draw because my string is not served and the nocks really wiggle on it right now. I am impressed with the little hand shock I feel. Probably due to the weight of the coco in the handle. I plan on making a string once I finish this post and then shoot it some more before I do any more shaping.
I think that it may be a tad large for my hand so I may have to slim it up some or round over the back some more but we will see once I shoot it a bunch. Sunday is a 3D shoot in my area so I plan on taking the bow unfinished to it and shooting a few rounds with it. Anyways here is some pictures of the handle area.... Comments are needed and welcomed!!!!


I still haven't decided if I am going to add a leather wrap to this bow or not. I think if I do I will need to thin down the thickness of the handle and that would round out the grip some more instead of having the front kinda flat.... Time will tell... Now it is time to shoot this thing some so I can finish her up!!

Offline jsweka

  • TG HALL OF FAME
  • Trad Bowhunter
  • *****
  • Posts: 3571
Re: HH straight bow build... Finished!!
« Reply #85 on: June 12, 2013, 07:48:00 PM »
Hey Justin - I've been wondering how your bow was coming along and it's lookin' real nice    :thumbsup:  

Don't be afraid to really round over the corners on the back side of the grip.  On my first bow, I was afraid of cutting the glass narrower than the lams in the grip area and that bow feels like I'm holding a 2 x 4 with slightly rounded edges.  Round till it feels good.  Here's an example of one of mine were you can see how narrow the glass gets on the back of the grip area - about 5/8" wide at the narrowest point.

 
>>>---->TGMM<----<<<<

Offline bowhntineverythingnh03743

  • Trad Bowhunter
  • **
  • Posts: 1201
Re: HH straight bow build... Finished!!
« Reply #86 on: June 13, 2013, 03:12:00 AM »
Ok John I am glad you gave me this picture to see the handle of your bow. If I am not mistaken do you round the lams of bamboo over so that they are rounded over as well so the glass is the only flat area of the bow? If that makes sense... I am going to shape some more and make the grip thinner in width because its just too bulky right now for me. I may also add a layer of osage and coco on the back of the bow and try to shape that as well to get the rounded feeling more. it just looks like my handle needs something else since I have the coco and osage tip overlays.

Offline Dan Bonner

  • Trad Bowhunter
  • **
  • Posts: 463
Re: HH straight bow build... Finished!!
« Reply #87 on: June 13, 2013, 07:21:00 AM »
Looking great! I'm with John, keep shaping till it feels like it should in your hand. Adding a couple overlays will make it look cooler and give you the feel you describe. Be sure to make them long enough to see on either side of a wrap if you decide to add one.

Bonner

Offline jsweka

  • TG HALL OF FAME
  • Trad Bowhunter
  • *****
  • Posts: 3571
Re: HH straight bow build... Finished!!
« Reply #88 on: June 13, 2013, 08:49:00 PM »
Justin - Yes, I round right through the laminations.  I also decrease the width of the riser some too.  Whatever makes it feel good in your hand.  I've gone back and reshaped the grips on some of my bows even after they're all finished just to tweak the grip some.  Some bows I'll put overlays on, some I leave them off.  Just depends on the look I'm going for.
>>>---->TGMM<----<<<<

Offline clout shooter

  • Trad Bowhunter
  • **
  • Posts: 10
Re: HH straight bow build... Finished!!
« Reply #89 on: June 18, 2013, 02:20:00 AM »
The bow is looking fantastic, great job. This thread is answering some of the questions I have about Hill bows. Hoping to build my first this year.  What type of finish are you going to use?

Offline bowhntineverythingnh03743

  • Trad Bowhunter
  • **
  • Posts: 1201
Re: HH straight bow build... Finished!!
« Reply #90 on: June 18, 2013, 08:20:00 AM »
Type of finish I am not sure of yet. I need something that doesn't need a spray gun cuz I don't have one. I'm sure when I get there we can figure something out.

Offline bowhntineverythingnh03743

  • Trad Bowhunter
  • **
  • Posts: 1201
Re: HH straight bow build... Finished!!
« Reply #91 on: July 19, 2013, 08:29:00 AM »
So yesterday I got back to working on this bow. I glued on some awesome osage and coco riser overlays at 10 inches long. I also sanded off my tip overlays on this bow because they looked awful and I know I could do better. After gluing the pieces on I placed it in the hot box for 4 hours at 150 degrees. I kept it in the box and let it cool slowly overnight.

Once I am done a detail this morning I plan on working at shaping it all up.

I will get some pictures up later on in the day!

Online Razorbak

  • TGMM Member
  • Trad Bowhunter
  • ***
  • Posts: 818
Re: HH straight bow build... Finished!!
« Reply #92 on: July 19, 2013, 08:55:00 AM »
Can't wait to see.  Try tru oil for a finish. More you add the nicer it becomes. Dries quick
TGMM Family of the Bow

Offline bowhntineverythingnh03743

  • Trad Bowhunter
  • **
  • Posts: 1201
Re: HH straight bow build... Finished!!
« Reply #93 on: July 19, 2013, 03:25:00 PM »
Well my detail for work lasted 5 hours longer than it should have. Oh well I will take the money and order more material from Kenny lol. I was only able to shape one of the tips which took quite a bit of time... Roughly an hour just for this one. I have to sand in the string groove and clean up the fiberglass still but it looks much better than the first ones I put on.

Roughed in tip...
 

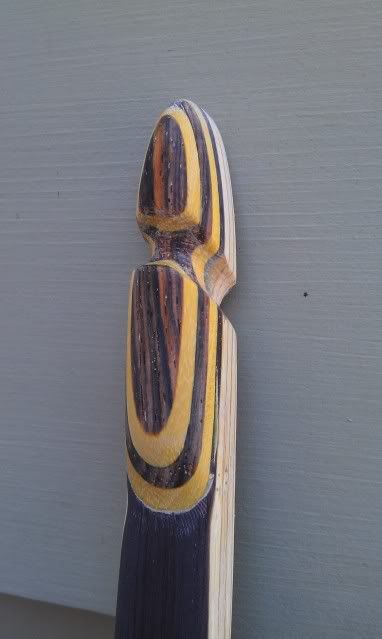
Here is a question for you glass guys...

I have some scratches and am going to sand the fiberglass starting with 150 all the way to 1500. Now I notice when you sand the fiberglass the shine goes away. Will this come back once the clear coat is applied to the bow????

Back at this bow tomorrow... I am still waiting on my metal braces for the R/D bow before I glue it up. I want my form dead straight and get that 1/16 inch bow gone in it.

Another thing is how do you really clean up the inside string groove of the tips? I want it to have no scratches in them... is it just sitting there for a while and sanding them???

Comments and tips please!!!

Thanks guys.... Justin

Online Magnum in Ms

  • Trad Bowhunter
  • **
  • Posts: 293
Re: HH straight bow build... Finished!!
« Reply #94 on: July 19, 2013, 03:41:00 PM »
Your tip are looking good . I use sand paper on a small file to sand the grooves. I don't think there is any need to go to 1500grit on the bow. I don't go past 320grit ,but I have not made that many bows.
Every one is ignorant its just on different subjects

Online Roy from Pa

  • Administrator
  • Trad Bowhunter
  • ****
  • Posts: 20636
Re: HH straight bow build... Finished!!
« Reply #95 on: July 19, 2013, 04:08:00 PM »
Awesome tips Justin.

Offline MoeM

  • Trad Bowhunter
  • **
  • Posts: 491
Re: HH straight bow build... Finished!!
« Reply #96 on: July 19, 2013, 04:57:00 PM »
I juse cloth backed "paper", 40-400 grit. You can tear it to very narrow stripes like sanding strings.
I love those abrasives for rounding edges at risers etc. too.
Little expensive but worth every single cent!
(soft sanding sponges do work too)

Online Razorbak

  • TGMM Member
  • Trad Bowhunter
  • ***
  • Posts: 818
Re: HH straight bow build... Finished!!
« Reply #97 on: July 19, 2013, 05:19:00 PM »
Looks real nice. I wrapped fine grit paper around a nail and go slow and smooth then I grab cotton and buff it and if cotton tears then I go back over spot until I get it smooth
TGMM Family of the Bow

Offline jsweka

  • TG HALL OF FAME
  • Trad Bowhunter
  • *****
  • Posts: 3571
Re: HH straight bow build... Finished!!
« Reply #98 on: July 19, 2013, 08:06:00 PM »
Tips look great Justin!!

Like others have said, you don't need to go down to 1500 grit.  I've gotten scratches out with 320.  And yes, the shine will come back when you apply a finish.  You actually want to sand the glass with fine sandpaper (220 or finer) to knock off the factory shine before applying your finish.
>>>---->TGMM<----<<<<

Offline bowhntineverythingnh03743

  • Trad Bowhunter
  • **
  • Posts: 1201
Re: HH straight bow build... Finished!!
« Reply #99 on: July 20, 2013, 02:36:00 AM »
Well that is good to know I don't need to go that fine with sanding. I have sanded the limbs to 600 grit so far but need they are not fully finished. Today I will work on shaping the rest of the overlays on the bow and hopefully shape the handle so it doesn't feel like a 2x4.

Thanks for the comments on the tips. I definitely like them a whole lot better than my first attempt. I did make one mistake when trying to fade the tip overlay into the glass. You can see I made a indentation next on the sides of the glass right next to the tip. I am hoping with rounding over the corners of the glass some more I can even it out so it is not so pronounced. Hopefully today won't be so hot and I can focus on getting this bow wrapped up....

Users currently browsing this topic:

0 Members and 2 Guests are viewing this topic.
 

Contact Us | Trad Gang.com © | User Agreement

Copyright 2003 thru 2024 ~ Trad Gang.com ©