Author Topic: BBO Follow/Build Along (at brace)  (Read 640 times)

Offline bowhntineverythingnh03743

  • Trad Bowhunter
  • **
  • Posts: 1201
BBO Follow/Build Along (at brace)
« on: December 17, 2013, 12:12:00 PM »
Hey TG-
   It has been a while since I have posted a bow on the site. Since hunting season is over here in New Hampshire it is time to get back into the garage and build. I am starting on a BBO bow for a friend of mine who has traded me his service of butchering my last four deer for a BBO bow. He saw mine one day and wanted one in the worst way. After a few months of waiting for him to get me the material I needed to begin I finally have it. So I figured I would post a follow along and include some of my own tips and advice that I have learned along the way.

Warning- I am no way shape or form a pro at these bows but I have seen quite a bit of debate and intrest in these bows lately. I am going to build a solid huntable bow. This will be my first since the swap of making one of these so since I will be posting my progress it will allow me to slow down so I don't make any huge mistakes.

Now that that is out of the way here are my specs that I am going to work with….

The overall length will be 66 inches tip to tip 50-55# @ 29 inches. It is going to be a straight limb bow and I am going to induce reflex into the tips so that I hope when finished it will be dead straight to very minimal string follow. I have hunted many times with this design and have no issues as of yet and I've been lucky to harvest a spring gobbler with one of these designs.

So here we go…. Let's start building!

Online Mad Max

  • TG HALL OF FAME
  • Trad Bowhunter
  • *****
  • Posts: 6565
Re: BBO Follow/Build Along (at brace)
« Reply #1 on: December 17, 2013, 12:22:00 PM »
For some people who may not know
BBO Bamboo Backed Osage??
Cool, can't wait .
I would rather fail at something above my means, than to succeed at something  beneath my means  
}}}}===============>>

Online Roy from Pa

  • Administrator
  • Trad Bowhunter
  • ****
  • Posts: 20645
Re: BBO Follow/Build Along (at brace)
« Reply #2 on: December 17, 2013, 12:32:00 PM »
I'll be watching, never heard of a BBO...

Offline bowhntineverythingnh03743

  • Trad Bowhunter
  • **
  • Posts: 1201
Re: BBO Follow/Build Along (at brace)
« Reply #3 on: December 17, 2013, 12:32:00 PM »
The materials were purchased from one of our great sponsors here Pinehollow Longbows.

I was given a nice piece of bamboo that needed to be flattened on the bottom side. I used my combo belt/disc sander. It is nothing special of a machine but gets the job done. After about thirty minutes I had a nice flat bottome to draw out my design.

I am using Roy's layout that he passed along to me a few years ago. The bow will be slightly wider to accommodate for the longer draw and heavier poundage than I am used to. I figured I would make it a little wider than the average 1.25 inches and go with 1.5 inches wide. This way I hope to end up with as little set as I can possibly have.

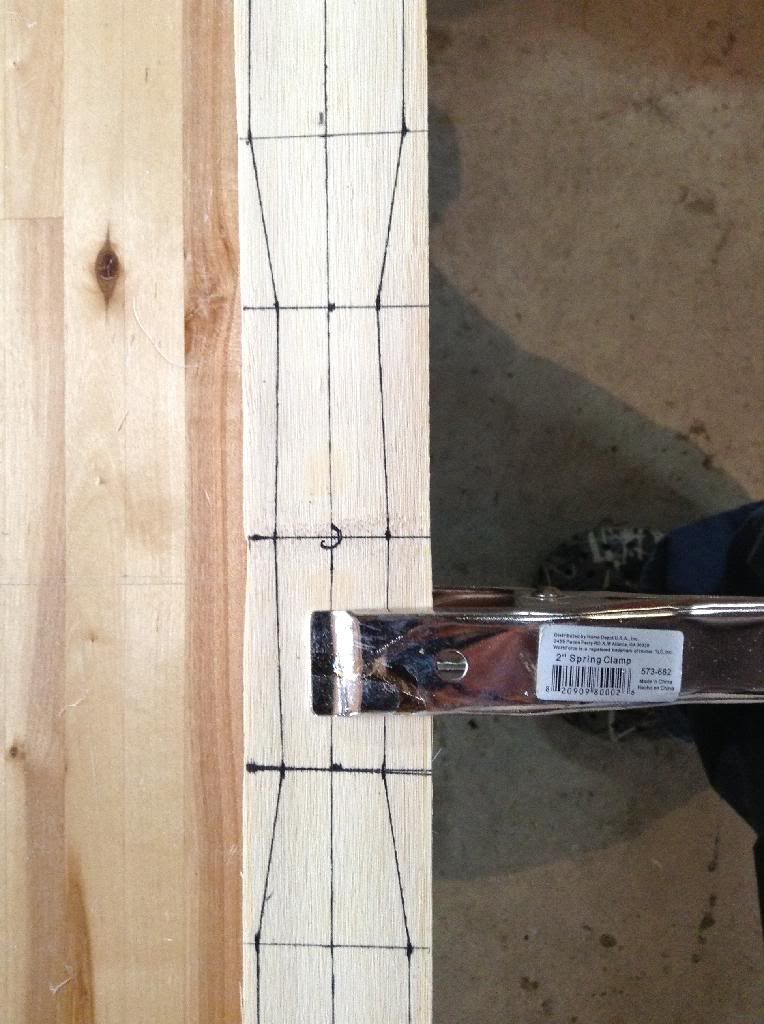
Once the bottom was flat I used some spring clamps and positioned the bamboo so that when I set a piece of string over it with weights on either end the string ran down the middle of the bamboo. After it was in position I made some little tick marks and removed the string. Carefully I removed each clamp and slid a  long straightedge under and was able to draw out my center line.

From there I began laying out the bow. I make my handles 4.5 inches long so that gives me 2.25 inches each side of center. My fades I like to be 1.75 inches long so I measured them out and drew a line across. From my fades I was tought to run the 1.5 inch width out 6 inches. There I made another line. My bow being 66 inches overall would give me 33 inches either side of my center of my handle. I drew lines on either end marking the length out.

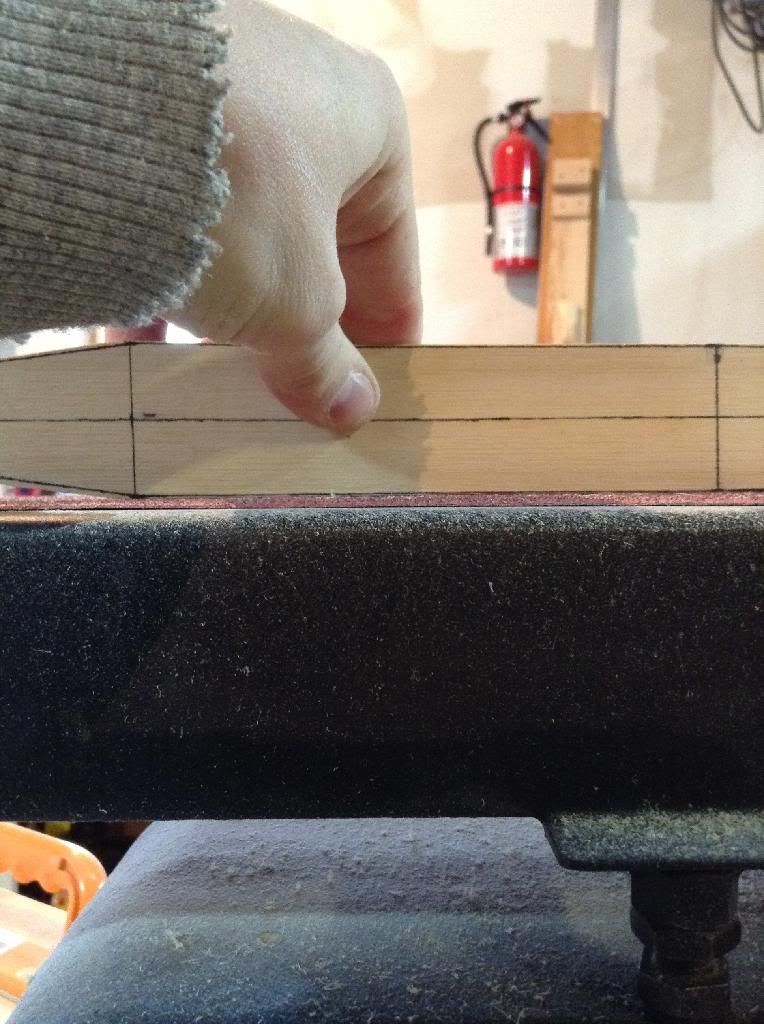
I continued drawing the outline of the bow out and once completed this is what it looked like.


Here is a picture of my handle that I drew.


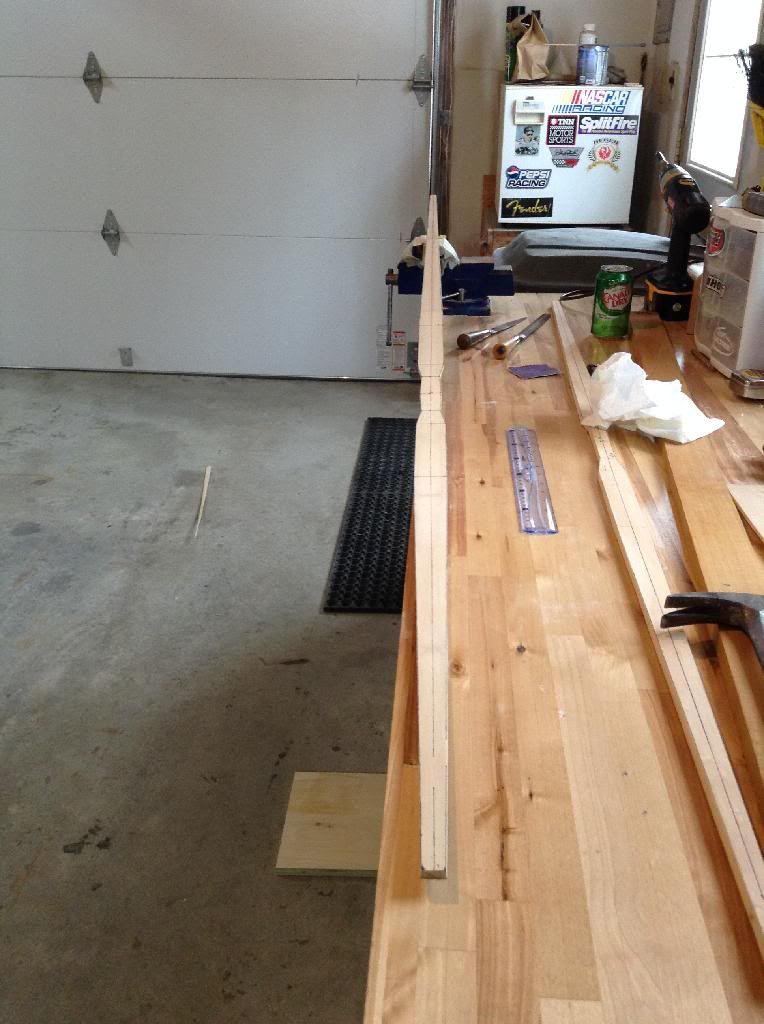
Because I had very little to remove to get the outline of the bow I went to my bandsaw and removed just the tapered part. I then went back to my belt sander and removed the waste until I got it to my line as you can see.


When I was finished shaping the profile of the bow to my lines this is the end result.


Notice that the limbs are not aligned right now. I will have to position them during glue up but once forced into place the tips will be in line and a string will run through the entire center of each limb.

As you can see that once we have the outline of the bow on the bamboo it is very thick still.


 Now I will have to remove some thickness until the bamboo is 1/16 inch at the tips and 1/8 at the fades.

Offline bowhntineverythingnh03743

  • Trad Bowhunter
  • **
  • Posts: 1201
Re: BBO Follow/Build Along (at brace)
« Reply #4 on: December 17, 2013, 12:35:00 PM »
Back to the belt sander I go unti l I get a good amount of thickness removed. Then I will move to hand tools using a toothing plane, card scraper, and sandpaper.

Back to the garage I go…

Offline bowhntineverythingnh03743

  • Trad Bowhunter
  • **
  • Posts: 1201
Re: BBO Follow/Build Along (at brace)
« Reply #5 on: December 17, 2013, 02:01:00 PM »
Well to end the day i got the bamboo all cut to shape and one side tapered from 1/8 to 1/16 towards the tip. All in all I have about 3-4 hours into the bow. Getting everything ready takes quite a bit of time and if you do not take the time with the initial steps you can set yourself up for failure.

I may spend more time on the bow later tonight but if not I will be back at it tomorrow morning for a few hours.

Thanks for the follow gents and if anyone wants to throw some advice in along the way I am sure many including myself would appreciate it!

Justin

Online Roy from Pa

  • Administrator
  • Trad Bowhunter
  • ****
  • Posts: 20645
Re: BBO Follow/Build Along (at brace)
« Reply #6 on: December 17, 2013, 03:25:00 PM »
I guess it look's ok:)

Online Roy from Pa

  • Administrator
  • Trad Bowhunter
  • ****
  • Posts: 20645
Re: BBO Follow/Build Along (at brace)
« Reply #7 on: December 17, 2013, 03:44:00 PM »
Before you glue and clamp it up, do a dry run, string it again in the form clamps with the string tight down the center line. Drill 2 holes in the handle area to hold it like that at glue up. Drill holes at the tips to hold them in position also. After you glue it up, and before you walk away, make damn sure it is straight. Remember your last glue up? :)

Don't get in a hurry now, Justin. It looks good, just think this all through before ya clamp her down. And once ya got her clamped down, stand back and look at it, end to end. If it is not straight, make it straight. Take the clamps off if you have too and get her perfect, son:) You will have time to do that with the glue, before it sets up...

Offline bowhntineverythingnh03743

  • Trad Bowhunter
  • **
  • Posts: 1201
Re: BBO Follow/Build Along (at brace)
« Reply #8 on: December 17, 2013, 07:24:00 PM »
Yes Roy I'm gonna use the tooth pick pins again. That worked like a charm and everything came out great... The bow I was working in before had an issue with the handle section so that's on hold for a takedown bow... Got some rawhide glued in and letting it dry so that I can shape it for the top section of the handle... So that one is still in the mix.

Offline red hill

  • Trad Bowhunter
  • **
  • Posts: 2025
Re: BBO Follow/Build Along (at brace)
« Reply #9 on: December 17, 2013, 07:54:00 PM »
Looks good, Justin. Don't listen to Roy. He don't know bbo. LOL!

Offline Black Mockingbird

  • Trad Bowhunter
  • **
  • Posts: 342
Re: BBO Follow/Build Along (at brace)
« Reply #10 on: December 18, 2013, 07:10:00 AM »
Quote
Originally posted by Roy from Pa:
I'll be watching, never heard of a BBO...
Try one...I think you'll like it    :wavey:     :thumbsup:    

So far so good  ;)

Offline Bowjunkie

  • Trad Bowhunter
  • **
  • Posts: 2324
Re: BBO Follow/Build Along (at brace)
« Reply #11 on: December 18, 2013, 08:37:00 AM »
It can be beneficial to wait until after glue-up to layout and cut out the handle area.

I don't do that until after the blank has been glued up, and handle piece has been glued on.

Offline T Callahan

  • Trad Bowhunter
  • **
  • Posts: 66
Re: BBO Follow/Build Along (at brace)
« Reply #12 on: December 18, 2013, 09:46:00 PM »
Drill holes in the riser and tips?....bowhntineverythingnh03743 (had to copy/paste a name that long)lol Can you post pictures when you do that?

Offline bowhntineverythingnh03743

  • Trad Bowhunter
  • **
  • Posts: 1201
Re: BBO Follow/Build Along (at brace)
« Reply #13 on: December 19, 2013, 12:23:00 AM »
Sure T.C. I will be posting pictures along the way anyways so I will make sure that I add some of that step.

I know my name is long but I couldn't come up with anything... my name is Justin... much shorter

Online Mad Max

  • TG HALL OF FAME
  • Trad Bowhunter
  • *****
  • Posts: 6565
Re: BBO Follow/Build Along (at brace)
« Reply #14 on: January 01, 2014, 09:01:00 PM »
Wake up bowh---------03743!
I'am Jones ing for the BBO
I would rather fail at something above my means, than to succeed at something  beneath my means  
}}}}===============>>

Offline T Callahan

  • Trad Bowhunter
  • **
  • Posts: 66
Re: BBO Follow/Build Along (at brace)
« Reply #15 on: January 01, 2014, 11:04:00 PM »
I know roy told you not to get in a hurry..but I think we are past that now.lol

Online Roy from Pa

  • Administrator
  • Trad Bowhunter
  • ****
  • Posts: 20645
Re: BBO Follow/Build Along (at brace)
« Reply #16 on: January 01, 2014, 11:18:00 PM »
LMAO..

Offline bowhntineverythingnh03743

  • Trad Bowhunter
  • **
  • Posts: 1201
Re: BBO Follow/Build Along (at brace)
« Reply #17 on: January 02, 2014, 12:52:00 AM »
Sorry guys... Been a crazy work schedule and plan on getting my rear in gear. Gonna send my Osage to Roy on Friday for some thinnin. Decided to go tri lam on this one!

Offline bowhntineverythingnh03743

  • Trad Bowhunter
  • **
  • Posts: 1201
Re: BBO Follow/Build Along (at brace)
« Reply #18 on: January 24, 2014, 10:21:00 PM »
Ok guys it has been a while but I am back on track. With the help of our Ol' funny guy Roy, he helped taper my osage so that I can make this into a tri lam.

The past two days I got everything ready and glued up. Unfortunately I forgot to document the flu up process so I only have pictures of where I am at now. I will continue with this follow along and give you the option to follow me.

Anyhow here is the profile of this R/D bow. It is 64 inches tip to tip. I changed it to be 1.25 inches wide and carried it 6 inches past the fades and then straight taper to .5 inch tips.

My form consisted of four blocks with these measurements for each:

6 inch end posts
2.75 inch mid limb posts
3.25 inch center post

I used Unibond 800 glue for it and it seemed to hold to the form really well. I did flip the tips 1.5 inches and for 7 inches down the tip but that did not really hold all that well. I think that I released it from the clamps too early and the warm core did not keep the bend. I only kept about an inch or less for each tip but I don't think that it will hurt my outcome.

Now to the pictures... Hopefully they came out well... I used my new Canon 60D Dslr camera that I got to step up my filming this year while out hunting...


Tomorrow I will clean up the edges and get it looking more like a bow blank to start tillering. I don't believe that there will be very much tillering to do with these tapered lams. Oh and the lams are...
Bamboo back, walnut core, and osage belly with osage handle.

I think that I am going to look for some cow horn tips by searching for knife handle blanks and go that route.

Thats it for now... and as always.... Comments and tips are welcomed!

Thanks
Justin

Online Roy from Pa

  • Administrator
  • Trad Bowhunter
  • ****
  • Posts: 20645
Re: BBO Follow/Build Along (at brace)
« Reply #19 on: January 25, 2014, 12:05:00 PM »
Looks perfect to me dude..

Users currently browsing this topic:

0 Members and 1 Guest are viewing this topic.
 

Contact Us | Trad Gang.com © | User Agreement

Copyright 2003 thru 2024 ~ Trad Gang.com ©