Author Topic: Second longbow finished  (Read 432 times)

Offline EHK

  • Contributing Member
  • Trad Bowhunter
  • ****
  • Posts: 265
Second longbow finished
« on: January 30, 2014, 07:49:00 PM »
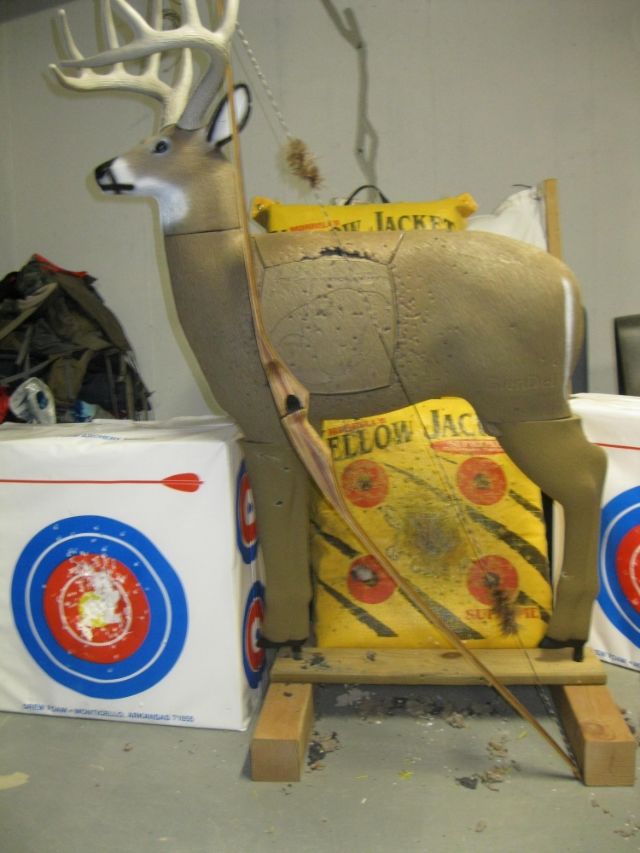
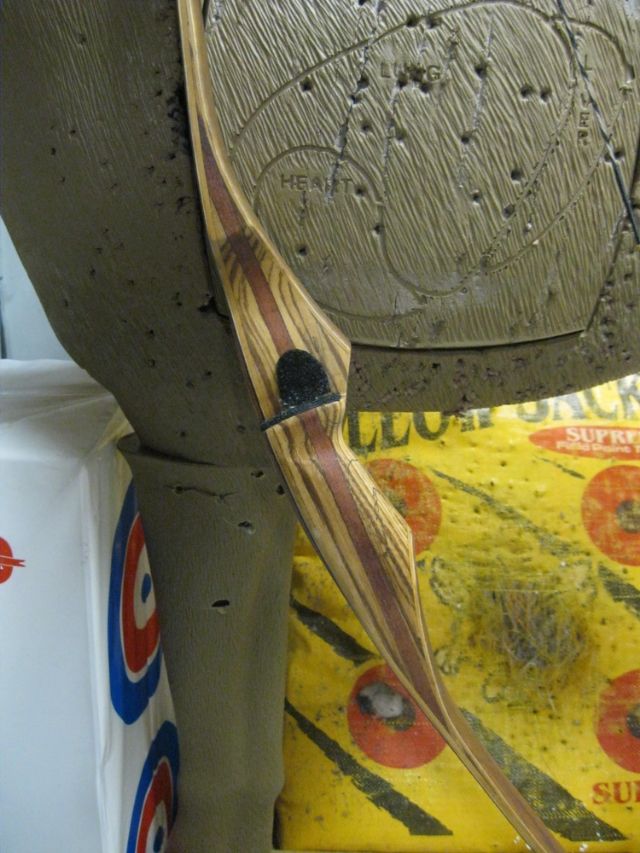
Well, I finished my second Kenny M style longbow.  There are still some finish flaws, but it came out significantly better than my first which is really all I can ask for at this point.  

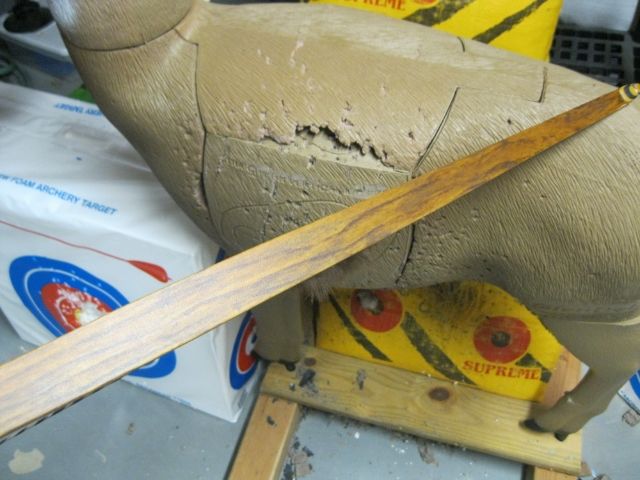
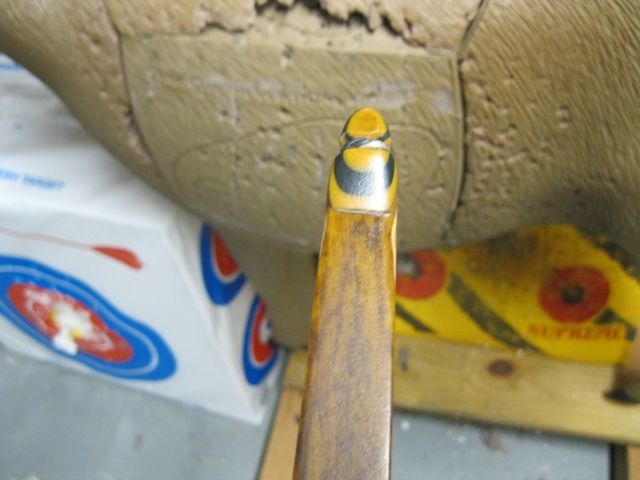
Limb tips still are hardest part for me.  I seem to have a hard time getting the transition from limb to tip smooth.  The limb tip overlays on this one slid on me during glue-up and I really wasn't happy with them.  In grinding them off and re-doing them, I wound up sanding a bit too far into the limb so there's a finish flaw on both limb tips.

Finish flaws and all, I have to say this bow shoots really well.  Really well.  I actually couldn't be happier with the performance.

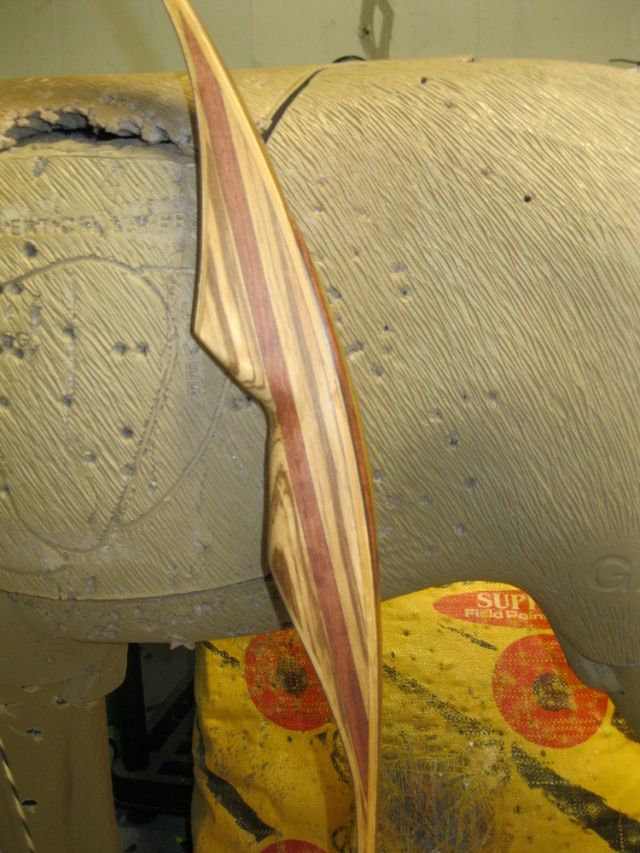
Riser is zebra wood with a dymondwood accent. The veneers are ash that I stained.  Target weight was 45 at 29 and that's right where she finished up.  Looking forward to the next build and hoping I can iron out the flaws.


Offline KellyG

  • Trad Bowhunter
  • **
  • Posts: 4249
Re: Second longbow finished
« Reply #1 on: January 30, 2014, 08:09:00 PM »
and it looks like she turned out sweet.

Offline heartlandbowyer

  • Trad Bowhunter
  • **
  • Posts: 664
Re: Second longbow finished
« Reply #2 on: January 30, 2014, 08:14:00 PM »
Looks pretty darn good for a second. Tip on tips I use around chainsaw file for my tips the round profile helps me with the fade and finish sanding with thumb and sand paper. It won't hour to touch the glass a little just don't go through it. I wouldn't totally sand the tips off and start over get ya a file and work out the fade. They do take some practice.
 

Offline EHK

  • Contributing Member
  • Trad Bowhunter
  • ****
  • Posts: 265
Re: Second longbow finished
« Reply #3 on: January 30, 2014, 08:58:00 PM »
Thank you guys.  Hoping I'll be ready for bow swap 2015!

Offline chackworth3

  • Trad Bowhunter
  • **
  • Posts: 580
Re: Second longbow finished
« Reply #4 on: January 30, 2014, 09:54:00 PM »
That's way better than what my second bow looked like! Nice bow!

Offline Trux Turning

  • Trad Bowhunter
  • **
  • Posts: 1814
Re: Second longbow finished
« Reply #5 on: January 30, 2014, 09:56:00 PM »
Quote
Originally posted by EHK:
Thank you guys.  Hoping I'll be ready for bow swap 2015!
You are ready now.... Nice job on this one!

Offline red hill

  • Trad Bowhunter
  • **
  • Posts: 2025
Re: Second longbow finished
« Reply #6 on: January 30, 2014, 10:23:00 PM »
True is right!  You're good enough now!

I made a device copied from PatB. It's a tile cutting blade I attached to a scrape piece of wood.

Offline fujimo

  • Trad Bowhunter
  • **
  • Posts: 3619
Re: Second longbow finished
« Reply #7 on: January 30, 2014, 11:14:00 PM »
nice job.
awesome bows- those kenny-m's
i just love mine too!
best shooting bow i have ever made myself!!

like they all said- the tips are just practice. what i do is i put a pieca of masking tape across the limb- right snug up against the tip overlay, then apply glue and clamp down.
that way any excess glue is not stuck to the bow, and the tape absorbs any sanding filing errors, until i am down to the last bit of sanding, and all i have to remove is the tape thickness of material with the limb exposed- does that make sense??!! hope its clear   :confused:

Offline cunruhshoot

  • Trad Bowhunter
  • **
  • Posts: 574
Re: Second longbow finished
« Reply #8 on: January 30, 2014, 11:30:00 PM »
Eric - great job on this bow. Love the riser and the glue lines look really nice.
As Iron sharpens Iron so one person sharpens another...Prov. 27:17

Offline D

  • Trad Bowhunter
  • **
  • Posts: 1509
Re: Second longbow finished
« Reply #9 on: January 30, 2014, 11:31:00 PM »
That looks great.  I like the dark limbs.  The way I do my tips is like this.  I glue my layers together in the stack first, then after that dried I sand down the side that is going to facing the limb (fade spot)to an angle to where its is a feathered point.  Then I use the tape to protect the glass and since I already grinded the fade area down before I glued it on the limb there's not much left to "fade" in.  I take a piece of sand paper and wrap it around a round file.  That may be the way everyone else does it or it may not but it works for me.  Like everyone else said it just takes practice just take your time and don't rush it.

Offline fujimo

  • Trad Bowhunter
  • **
  • Posts: 3619
Re: Second longbow finished
« Reply #10 on: January 31, 2014, 01:16:00 AM »
yup ,per square inch, they seem to take the most time- so dont be disheartened if you think it is taking too long- it isnt.

you going to be looking at them for a long time- so take your time.
good tip from D- preshaping them.

i also use the paper round the file

Offline bigbob2

  • Trad Bowhunter
  • **
  • Posts: 2160
Re: Second longbow finished
« Reply #11 on: January 31, 2014, 03:22:00 AM »
great job!

Offline MoeM

  • Trad Bowhunter
  • **
  • Posts: 491
Re: Second longbow finished
« Reply #12 on: January 31, 2014, 04:26:00 AM »
Nice bow! My second didn`t look that good, too...

Offline Buemaker

  • Trad Bowhunter
  • **
  • Posts: 3106
Re: Second longbow finished
« Reply #13 on: January 31, 2014, 06:35:00 AM »
Looking Good. Bue--.   :)

Offline EHK

  • Contributing Member
  • Trad Bowhunter
  • ****
  • Posts: 265
Re: Second longbow finished
« Reply #14 on: January 31, 2014, 08:03:00 AM »
Thanks for the encouragement and the tips, guys!

Offline BenM

  • Trad Bowhunter
  • **
  • Posts: 321
Re: Second longbow finished
« Reply #15 on: January 31, 2014, 07:19:00 PM »
Very nice.  I have to try a r/d next

Offline Bodork

  • Trad Bowhunter
  • **
  • Posts: 1592
Re: Second longbow finished
« Reply #16 on: January 31, 2014, 08:47:00 PM »
Nice job! Those finish flaws are called character marks! The more bows you make the harder they are to see but virtually every bowyer can find a flaw in his bows. Usually not seen by others but there is always a glue line not tight enough, a overlay not blended well enough, a wood grain not filled enough, or even crappy penmanship on the specs! I HATE my handwriting! You will be your biggest critic and that's a good thing! If you hold yourself to a higher standard, everyone will notice.

Online kennym

  • TG HALL OF FAME
  • Trad Bowhunter
  • *****
  • Posts: 17318
Re: Second longbow finished
« Reply #17 on: January 31, 2014, 09:04:00 PM »
Great job Eric, my #bow 2 looked pretty rough compared to that!!    :thumbsup:    :thumbsup:    

A round file wrapped in sandpaper is a good tool too!!
Stay sharp, Kenny.

   https://www.kennysarchery.com/

Offline Dmaxshawn

  • Trad Bowhunter
  • **
  • Posts: 1708
Re: Second longbow finished
« Reply #18 on: January 31, 2014, 09:16:00 PM »
greed with the above.  My #2 wasnt that good.   awesome combo too

Online jess stuart

  • Trad Bowhunter
  • **
  • Posts: 1716
Re: Second longbow finished
« Reply #19 on: February 01, 2014, 02:46:00 PM »
I agree with everyone, great looking bow! So much better than the first several I built.  Tips are one of the things that still give me fits and require a bunch of time.  I have found that if I pre glue them together and pre taper before putting them on the limb it helps.  I also put a piece of glass under the overlay that it just a bit longer than the phenolic and fade the phenolic into it then once installed on the limb I fade the glass into the glass on the limb.

Users currently browsing this topic:

0 Members and 1 Guest are viewing this topic.
 

Contact Us | Trad Gang.com © | User Agreement

Copyright 2003 thru 2024 ~ Trad Gang.com ©