Author Topic: Tillering question (finished bow pics on page two)  (Read 746 times)

Offline Troy D. Breeding

  • SPONSOR
  • Trad Bowhunter
  • *****
  • Posts: 1073
Tillering question (finished bow pics on page two)
« on: June 01, 2015, 02:17:00 PM »
Started a new bow over the weekend and this time I doing something different.

I've always made all my wood bows with equal limb length. On this one the lower limb is 1" shorter.

Now on to the tillering question.

After reading several past threads on tillering I ran into things like, negative tiller and equal limb timing.

Since this is my first attempt at this style bow, this is what I have ran into so far.

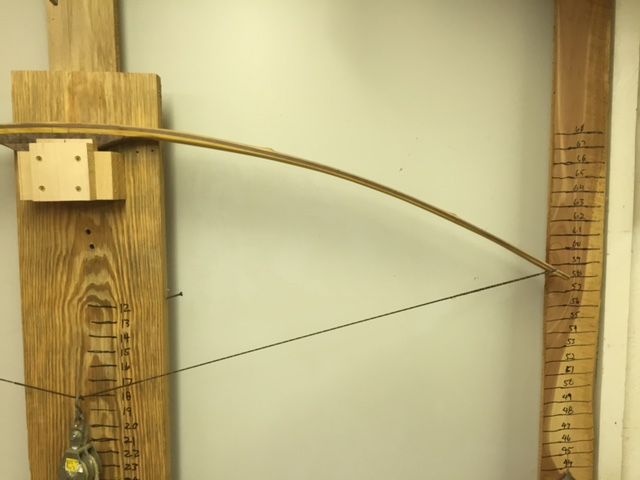
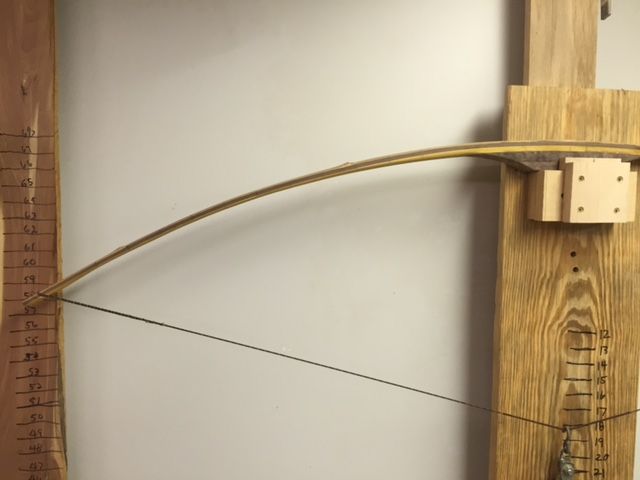
After finally getting the limbs to bend somewhat the tips at brace are at different points on the outer measurement boards.


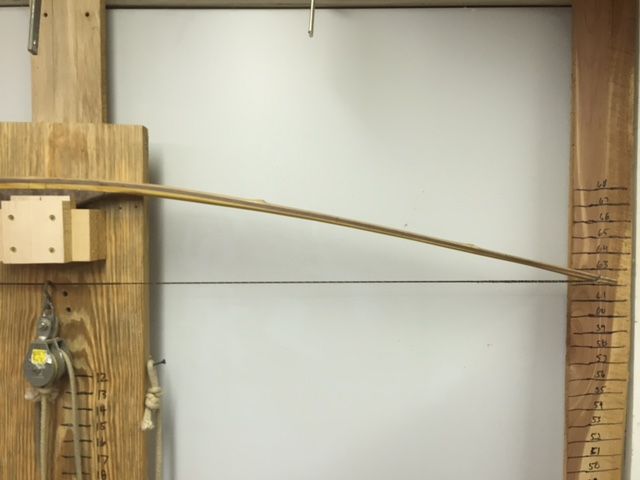
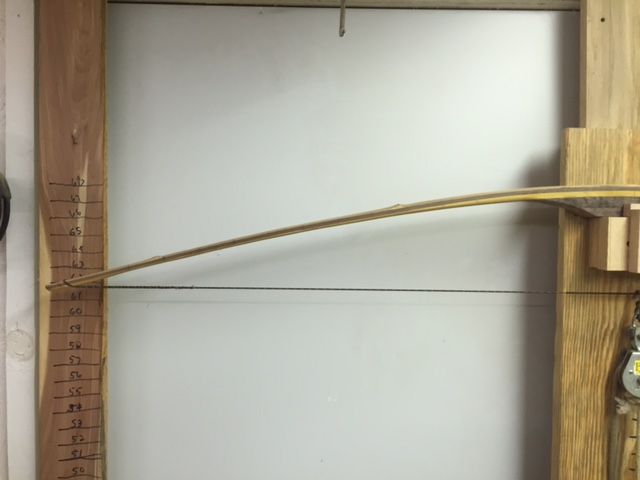
Yet when drawn to 18" they both measure approx. at the same point.


Thoughts?????
Troy D. Breeding
 www.WoodGallery295.net

Retirement ain't what it's cracked up to be.

Online Roy from Pa

  • Administrator
  • Trad Bowhunter
  • ****
  • Posts: 20644
Re: Tillering question (finished bow pics on page two)
« Reply #1 on: June 01, 2015, 02:27:00 PM »
That is fine.. Don't worry about what the tips are doing, just keep the trees pull rope traveling straight down the vertical line on the wall. The tiller will be whatever the bow says it is. Most likely will be a bit of a negative tiller. You do have the pull rope positioned where your hand with grip the bow string, right?

Offline Troy D. Breeding

  • SPONSOR
  • Trad Bowhunter
  • *****
  • Posts: 1073
Re: Tillering question (finished bow pics on page two)
« Reply #2 on: June 01, 2015, 02:43:00 PM »
Roy,

Think I have things right. I have two lines on the riser block. One is at the center of the riser block, the other is 1" above that. Making it the center of the bow. I set the riser block on the tree blocks so that the upper riser line and the tree block line match up. The pull rope is attached approx. 3/4" above the top line.

If  have it right that would have the rope pulling where my finger would be on the string.
Troy D. Breeding
 www.WoodGallery295.net

Retirement ain't what it's cracked up to be.

Online Roy from Pa

  • Administrator
  • Trad Bowhunter
  • ****
  • Posts: 20644
Re: Tillering question (finished bow pics on page two)
« Reply #3 on: June 01, 2015, 02:49:00 PM »
Normally when I tiller for split finger, the pull rope is in line with the arrow rest/shelf. If tillering for three under, the pull rope is 3/4" below the rest/shelf. Draw a straight line down your tree from the mark you are speaking of. You want the pull rope to tow that line all the way down, that means the limbs are timed and bending in sync with each other. Let the tiller measurements be what they may be, doesn't matter as long as the limbs are timed.

This bow below is being tillered for three under. Note the two black lines on the wall.. Left line is for three under  tillering and right line is for split tillering. The right line is exactly in line with the bows arrow shelf. Left line is 3/4" under the shelf.


Offline Troy D. Breeding

  • SPONSOR
  • Trad Bowhunter
  • *****
  • Posts: 1073
Re: Tillering question (finished bow pics on page two)
« Reply #4 on: June 01, 2015, 02:55:00 PM »
I shoot split finger. I'll check for hand placement and where the rest will be. After reading your last post adding the line is my next step. Then I'll check the pull.
Troy D. Breeding
 www.WoodGallery295.net

Retirement ain't what it's cracked up to be.

Offline Troy D. Breeding

  • SPONSOR
  • Trad Bowhunter
  • *****
  • Posts: 1073
Re: Tillering question (finished bow pics on page two)
« Reply #5 on: June 01, 2015, 03:14:00 PM »
Allowing 4-1/4" for my hand and placing the rest at the top of my hand made me move the pull rope over to 1-1/8" above the center line. After doing that I pulled to 18" and rope looks to be tracking right down the line.
Troy D. Breeding
 www.WoodGallery295.net

Retirement ain't what it's cracked up to be.

Online Bowjunkie

  • Trad Bowhunter
  • **
  • Posts: 2324
Re: Tillering question (finished bow pics on page two)
« Reply #6 on: June 01, 2015, 06:02:00 PM »
Troy, when locating your string hand fulcrum position(where you'll place the hook on the string) take into account nock point height above the shelf.

I want the nock of my arrow elevated 1/8" above perpendicular to the shelf and then my middle finger will be up against the arrow nock. So I then measure down half the width of my middle finger, and that's where I hook onto the string. This puts the hook about 1/4" below the shelf.... while Roy puts his right in line wih the shelf.

Point is, do whatever you need to do to mimic YOUR holds and setups, tiller/time it to them, anna you gunna like it.

Offline Troy D. Breeding

  • SPONSOR
  • Trad Bowhunter
  • *****
  • Posts: 1073
Re: Tillering question (finished bow pics on page two)
« Reply #7 on: June 01, 2015, 06:41:00 PM »
Managed to get the bow tillered to 24" without a hitch. At 25" it's showing a tid bit of a flat area close to the riser. Stopped for the day, but will be back on it in the morning.
Troy D. Breeding
 www.WoodGallery295.net

Retirement ain't what it's cracked up to be.

Offline Troy D. Breeding

  • SPONSOR
  • Trad Bowhunter
  • *****
  • Posts: 1073
Re: Tillering question (finished bow pics on page two)
« Reply #8 on: June 02, 2015, 11:19:00 AM »
Finished tillering to 28" this morning. I think I have this one right about where I want it.

67" NtN, got to double check the weight. If what most of you say is right I'll loose a pound or two with final sanding and another couple after shooting in.

At 26" draw it was pulling 49#, at 27" it pulled 52#.

I may cut an inch off each end. I'd like for the final weight after break-in to be around 52#


Click on the picture to watch the video.
Troy D. Breeding
 www.WoodGallery295.net

Retirement ain't what it's cracked up to be.

Online Roy from Pa

  • Administrator
  • Trad Bowhunter
  • ****
  • Posts: 20644
Re: Tillering question (finished bow pics on page two)
« Reply #9 on: June 02, 2015, 12:09:00 PM »
It looks fine, quit being so picky and leave it alone. LOL

Offline Troy D. Breeding

  • SPONSOR
  • Trad Bowhunter
  • *****
  • Posts: 1073
Re: Tillering question (finished bow pics on page two)
« Reply #10 on: June 02, 2015, 01:47:00 PM »
Couldn't leave well enough alone after weighing it again. Forgot I had to scrape a little more to bring the stiff area around the fades into play.

Soooooo, I cut it down to a 64" and only had to do minor tillering on the lower limb to make the pull rope pull straight down the line.

As it stands now I have plenty of weight for final sanding and shooting in.

60#@28"

The 52# I was hoping for was the low side of my expected final weight. If I loose 5 or 7 pounds I'll still be a happy camper.

Just put the tip overlays on, so can't do anything else today.
Troy D. Breeding
 www.WoodGallery295.net

Retirement ain't what it's cracked up to be.

Offline Buemaker

  • Trad Bowhunter
  • **
  • Posts: 3106
Re: Tillering question (finished bow pics on page two)
« Reply #11 on: June 02, 2015, 02:19:00 PM »
Looking good. Bue--.

Offline LittleBen

  • Trad Bowhunter
  • **
  • Posts: 2970
Re: Tillering question (finished bow pics on page two)
« Reply #12 on: June 02, 2015, 05:51:00 PM »
Looking real good Troy. That's a good looking tiller. Wish I had your patience with tilering.

Offline Troy D. Breeding

  • SPONSOR
  • Trad Bowhunter
  • *****
  • Posts: 1073
Re: Tillering question (finished bow pics on page two)
« Reply #13 on: June 02, 2015, 06:14:00 PM »
Ben,

Patience ain't my virtue. I had to run it by ol' Roy before I posted anything. Still I managed to get it right and might even have gotten his blessings.
Troy D. Breeding
 www.WoodGallery295.net

Retirement ain't what it's cracked up to be.

Online Roy from Pa

  • Administrator
  • Trad Bowhunter
  • ****
  • Posts: 20644
Re: Tillering question (finished bow pics on page two)
« Reply #14 on: June 02, 2015, 09:52:00 PM »
I guess it's ok..

Offline Troy D. Breeding

  • SPONSOR
  • Trad Bowhunter
  • *****
  • Posts: 1073
Re: Tillering question (finished bow pics on page two)
« Reply #15 on: June 06, 2015, 05:35:00 PM »
Finished the bow and today was the first time I've had a chance to get a few arrows through it. I've got maybe 25 other wood bows in the racks and this has to be the sweetest one I've ever made.

It's been over a year since I really spent more than a few minutes with s bow in hand. I may feel it in the morning.
Troy D. Breeding
 www.WoodGallery295.net

Retirement ain't what it's cracked up to be.

Offline Troy D. Breeding

  • SPONSOR
  • Trad Bowhunter
  • *****
  • Posts: 1073
Re: Tillering question (finished bow pics on page two)
« Reply #16 on: June 06, 2015, 05:36:00 PM »
Troy D. Breeding
 www.WoodGallery295.net

Retirement ain't what it's cracked up to be.

Offline mikkekeswick

  • Trad Bowhunter
  • **
  • Posts: 988
Re: Tillering question (finished bow pics on page two)
« Reply #17 on: June 07, 2015, 02:14:00 AM »
Nice looking bow and it's interesting to hear your 'journey'!
When a wooden bow is tillered correctly like this you should feel nothing when you release the string. Pure magic  :)

Offline Troy D. Breeding

  • SPONSOR
  • Trad Bowhunter
  • *****
  • Posts: 1073
Re: Tillering question (finished bow pics on page two)
« Reply #18 on: June 07, 2015, 07:41:00 AM »
Your spot on Mike. I've shot a number of glass longbows with more hand shock than this bow. I'll try and get a few pics of the finished bow today.
Troy D. Breeding
 www.WoodGallery295.net

Retirement ain't what it's cracked up to be.

Offline Troy D. Breeding

  • SPONSOR
  • Trad Bowhunter
  • *****
  • Posts: 1073
Re: Tillering question (finished bow pics on page two)
« Reply #19 on: June 07, 2015, 08:16:00 PM »
Well here it is, the final look. When I started shooting it the bow was pulling 60#@28". I've put over 200 arrows through it over the past two days. Haven't checked the weight, but I'd say it has dropped a pound or two. Either that or I'm finally using the proper muscles to pull it.

I used a piece of walnut burl/crotch for the handle.


I stained the boo backing and then sanded the areas between the nodes.


Here is the profile after shooting it for the second time today.


Full look of the boo.

 
Troy D. Breeding
 www.WoodGallery295.net

Retirement ain't what it's cracked up to be.

Users currently browsing this topic:

0 Members and 2 Guests are viewing this topic.
 

Contact Us | Trad Gang.com © | User Agreement

Copyright 2003 thru 2024 ~ Trad Gang.com ©