3Rivers Archery


The Trad Gang Digital Market


Contribute to Trad Gang and Access the Classifieds!

Become a Trad Gang Sponsor!

Traditional Archery for Bowhunters


LEFT HAND BOWS CLASSIFIEDS TRAD GANG CLASSIFIEDS ACCESS RIGHT HAND BOWS CLASSIFIEDS


Author Topic: Watch me finish a Howard Hill bow blank!  (Read 506 times)

Offline LEOPARD

  • Trad Bowhunter
  • **
  • Posts: 1523
Re: Watch me finish a Howard Hill bow blank!
« Reply #20 on: June 13, 2008, 10:58:00 AM »
Very nice bow Apex! Well done!  ;)   :thumbsup:
Nigel Ivy

"The more I practice, the luckier I get...."

Offline SteveD

  • Trad Bowhunter
  • **
  • Posts: 545
Re: Watch me finish a Howard Hill bow blank!
« Reply #21 on: June 13, 2008, 11:51:00 AM »
Wow great job. Really nice

Offline Bjorn

  • Trad Bowhunter
  • **
  • Posts: 8789
Re: Watch me finish a Howard Hill bow blank!
« Reply #22 on: June 13, 2008, 06:11:00 PM »
Nice work!

Offline Rob DiStefano

  • Administrator
  • Trad Bowhunter
  • ****
  • Posts: 12245
  • Contributing Member
    • Cavalier Pickups
Re: Watch me finish a Howard Hill bow blank!
« Reply #23 on: June 13, 2008, 06:23:00 PM »
Really nice job on the bow, congrats!    :thumbsup:

Aside from sprayed Fullerplast or some form of sprayed catalyzed epoxy, the typical sprays of urethane, lacquer or acrylic just aren't durable enough for a hunting bow that'll get drug through the woods and brush.  

I think the Massey (slow set epoxy mixed with some acetone) or water thin CYA finishes are best, and they're super durable and easy to just wipe on.
IAM ~ The only government I trust is my .45-70 ... and my 1911.

Offline RC

  • Trad Bowhunter
  • **
  • Posts: 4450
Re: Watch me finish a Howard Hill bow blank!
« Reply #24 on: June 13, 2008, 08:31:00 PM »
thunderbird is also a very good finish.RC

Offline Benny Nganabbarru

  • TGMM Member
  • Trad Bowhunter
  • ***
  • Posts: 6549
Re: Watch me finish a Howard Hill bow blank!
« Reply #25 on: June 13, 2008, 08:40:00 PM »
Terrific stuff, Apex!
TGMM - Family of the Bow

Offline Doc Blues

  • Trad Bowhunter
  • **
  • Posts: 106
Re: Watch me finish a Howard Hill bow blank!
« Reply #26 on: June 14, 2008, 05:36:00 AM »
Congratulate beautiful Bow, nice work!
Black Widow PCH X 58" 48@28
Wes Wallace Mentor/td 60" 46#@27
Longbow Stegmeyer 66" 48#@27
Bear Kodiak Magnum 1962 52" 50#@28
Selfbow Ash Flatbow, 70" 43#@27
Colt Hunt Master 1967, 52"  45#@28

Offline ghost rob

  • Trad Bowhunter
  • **
  • Posts: 154
Re: Watch me finish a Howard Hill bow blank!
« Reply #27 on: June 14, 2008, 08:14:00 AM »
A finish that I've used in the past is "Defthane". It's a satin poly that won't yellow over time. If you have oily wood on the riser or tips you have to seal them then spray on three coats. It looks a lot like thunderbird when finished and always held up well for me and I hunt a lot. It's made by Deft and you'll usually have to special order it. Use a commercial sharpie for your lettering and it won't run. Rob

Offline Apex Predator

  • Trad Bowhunter
  • **
  • Posts: 3372
Re: Watch me finish a Howard Hill bow blank!
« Reply #28 on: June 14, 2008, 09:50:00 AM »
This morning I started my leather grip. I start with an over-size piece of leather cut square on the edges. Most of mine will be around 4 1/4" tall when finished.


I have to cut this one shorter, because it covers the inked specs. Be sure to stretch it plenty as you are trimming. You want a very good stretched fit. Some leather stretches bunches, this piece does not.


Make sure you use a very sharp blade for your trimming, or it will look ragged. Make sure your top and bottom lines up along the seam.


I always cut a little whoop-te-do for the radiused shelf.


I had to jump ahead with the photos to show you the whoop-te-doo. Dis-regard the holes, because we ain't there yet!  :)  

 
I didn't claw my way to the top of the food chain to eat vegetables!

Offline Apex Predator

  • Trad Bowhunter
  • **
  • Posts: 3372
Re: Watch me finish a Howard Hill bow blank!
« Reply #29 on: June 14, 2008, 09:53:00 AM »
Now you need to mark and cut the width so it lines up, and is the right size. Stretch alot for this measurement and cut. You want to pull it together slightly when stitching it up. You can't pull too hard or you will rip out the holes. A good fit is paramount to a nice grip. It will bunch up under your hand if too big, and have a gap at the seam if too small.


You want enough gap that it takes considerable stretching to get it to meet at the seam.

Time to cut a strike plate piece. You can get fancy here if your want, by making it look like an arrow head (Pearson I think), or indian head (Indian).

I prefer simple and classic.


Fit it as you cut to make sure it looks right to you. I like it to run under the grip wrap at the bottom. Gives it a neater appearance to me.


I didn't claw my way to the top of the food chain to eat vegetables!

Offline Apex Predator

  • Trad Bowhunter
  • **
  • Posts: 3372
Re: Watch me finish a Howard Hill bow blank!
« Reply #30 on: June 14, 2008, 09:57:00 AM »
Make sure that the match up well at the seams.


I use a leather chisel to punch my holes. They can be bought at Tandy leather for $7-8. I used to punch round holes, but found that this tool makes for a more finished looking grip with the small slits.


I put the first chisel blade in the last hole to keep my spacing right for the next set of holes. At the end, I have to use the last two holes for alignment, because I ran out of grip. I keep my outermost holes about 1/8" in for strength. If you cut your holes too close to the edge they will pull out when lacing it up.


Everything should line up nice, and they should have the same number of holes side-to-side. This is all for now. I have to let my finish cure for 24 hours before I lace the grip tonight.
I didn't claw my way to the top of the food chain to eat vegetables!

Offline Apex Predator

  • Trad Bowhunter
  • **
  • Posts: 3372
Re: Watch me finish a Howard Hill bow blank!
« Reply #31 on: June 15, 2008, 01:27:00 PM »
Here we go folks! After polling the good folks on here and other sites, the majority chose the light colored deer skin for my grip. However, many were suggesting black. Black is my favorite, and I found a piece after scrounging around. I prepared it the same as the above piece.

I start out by wrapping the finished piece in position, stretching it until the seams meet, and then marking the belly side so that I can get in the exact position when I apply a little glue.


I then trace out my leather strike plate on the bow with a pencil, so I know where to put the glue. When applying contact cement, or barge cement, be very careful that none gets on the bow except where the leather will be, or it will harm the lacquer finish that I use, and many others.


I didn't claw my way to the top of the food chain to eat vegetables!

Offline Apex Predator

  • Trad Bowhunter
  • **
  • Posts: 3372
Re: Watch me finish a Howard Hill bow blank!
« Reply #32 on: June 15, 2008, 01:29:00 PM »
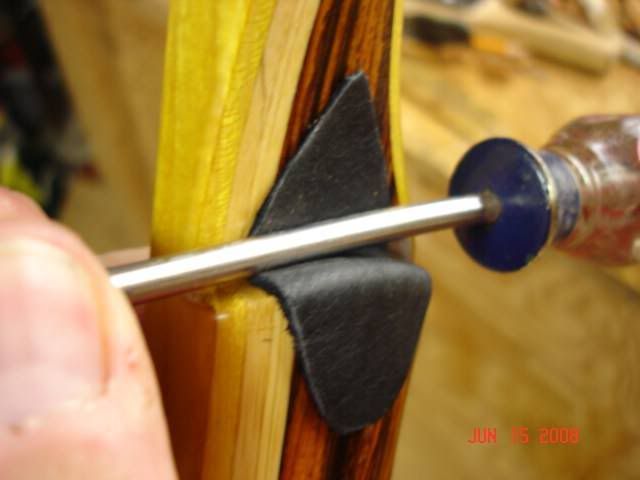
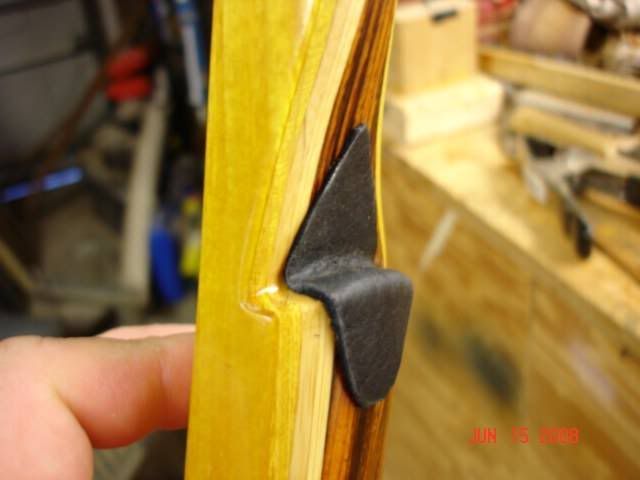
When both bow and leather has dried for a couple of minutes, and is no longer wet, it's time to apply it. I start my sticking the top point and rolling down the strike plate with a small shanked screw driver. The screw driver makes it seat well in the corner of the shelf.


Now it's time to apply glue to the belly side of the bow where the grip will be. I only apply about a 1" wide strip to the bow and then to the leather. I just want some glue to keep the grip from shifting under my hand when shooting. Align the index marks top and bottom, and glue her on. I forgot to photo graph that part.

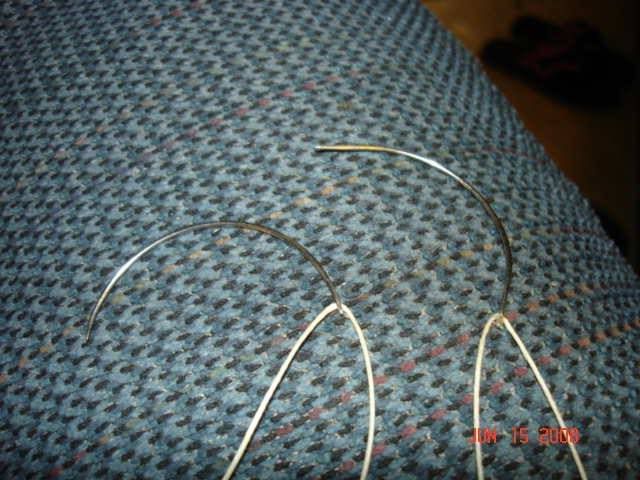
Now for the stitching. I use two curved needles and about 36" of heavy nylon leather sewing thread. I start at the top like this, and then stitch my way down, always making sure I stitch right over left. I am constantly pulling and stretching the leather to make sure I don't have to tug too hard on my stitching holes. It will be a stretch fit, so you have to tug as you stitch. It would really help to have an extra hand here, but not necessary.


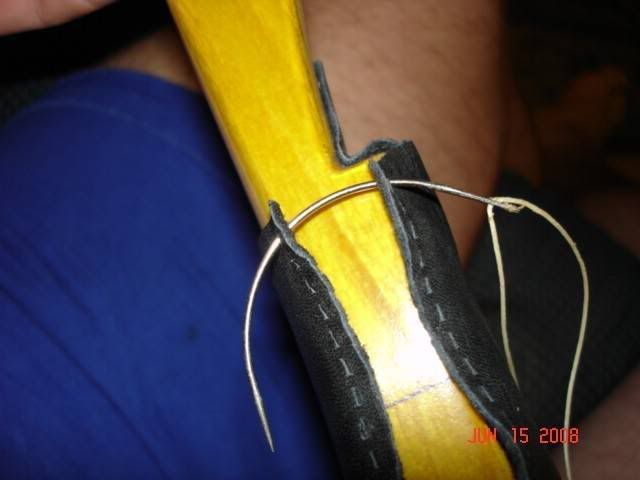
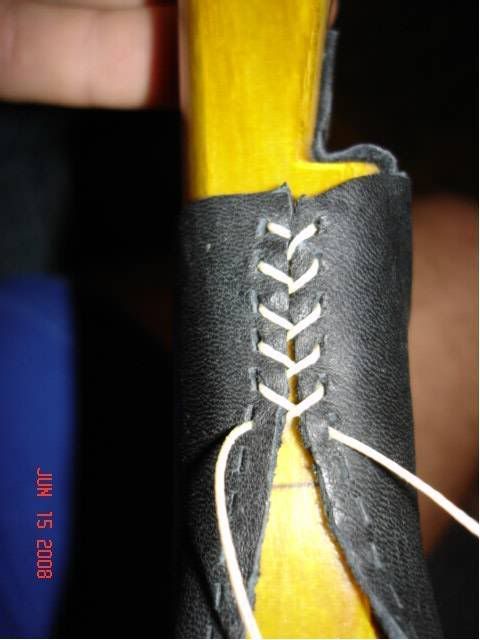
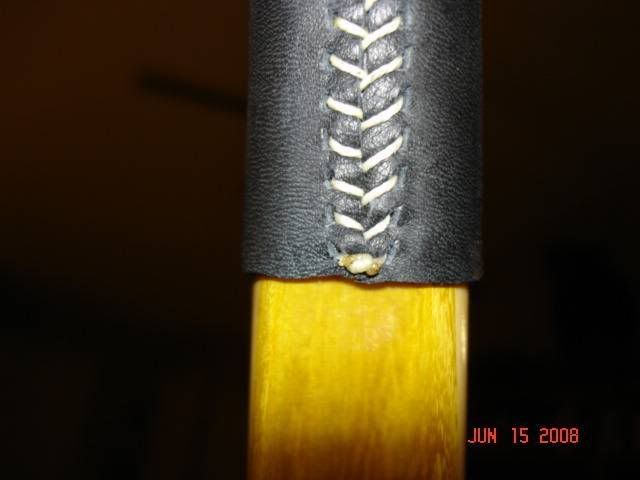
When I get to the bottom I tie one half of a square knot and check my stitches. If they are not tight, or the leather is not seaming well, I will use one of the needles to pick at the threads from top to bottom, pulling out the slack.


I then finish the square knot and trim to about 1/8" from the knot. I then take a lighter and burn the ends. If you leave the tag ends too long they will burn down, but will turn black. If you burn a very short piece they just turn into little molten nylon balls that are not unattractive.

 
I didn't claw my way to the top of the food chain to eat vegetables!

Offline Apex Predator

  • Trad Bowhunter
  • **
  • Posts: 3372
Re: Watch me finish a Howard Hill bow blank!
« Reply #33 on: June 15, 2008, 01:35:00 PM »
Now for the finished product!


I didn't claw my way to the top of the food chain to eat vegetables!

Offline tradtusker

  • TGMM Member
  • Trad Bowhunter
  • ***
  • Posts: 3820
Re: Watch me finish a Howard Hill bow blank!
« Reply #34 on: June 15, 2008, 03:54:00 PM »
great job mate thanks for taking the time to share it with us!
There is more to the Hunt.. then the Horns

**TGMM Family of the Bow**


Andy Ivy

Users currently browsing this topic:

0 Members and 1 Guest are viewing this topic.
 

Contact Us | Trad Gang.com © | User Agreement

Copyright 2003 thru 2024 ~ Trad Gang.com ©