3Rivers Archery


The Trad Gang Digital Market


Contribute to Trad Gang and Access the Classifieds!

Become a Trad Gang Sponsor!

Traditional Archery for Bowhunters


LEFT HAND BOWS CLASSIFIEDS TRAD GANG CLASSIFIEDS ACCESS RIGHT HAND BOWS CLASSIFIEDS


Author Topic: Simmons Sharpening Tutorial  (Read 564 times)

Offline Landshark160

  • Trad Bowhunter
  • **
  • Posts: 672
Simmons Sharpening Tutorial
« on: July 03, 2008, 10:21:00 PM »
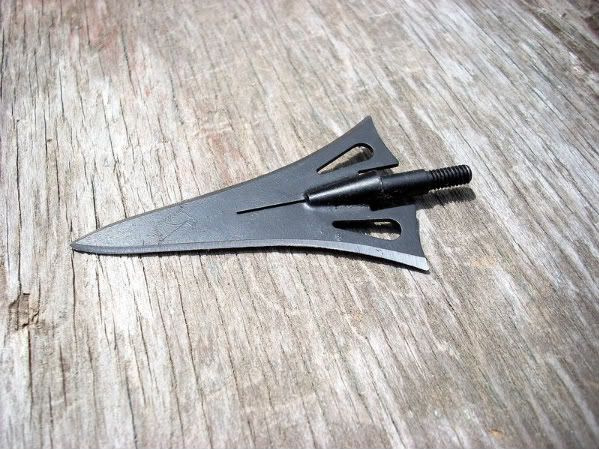
Here’s a little tutorial on how to sharpen two-blade broadheads. I would put the edge attained from this method of sharpening up against any other. Since there seem to be a lot of folks who struggle with the Simmons heads, we’ll use an Interceptor for this demo.

There are two important factors in sharpening. The first is grinding a burr, or wire edge, on each side of the blade. The second is grinding this burr off. If you do not achieve a razor sharp edge, you have failed to do one of these steps completely.

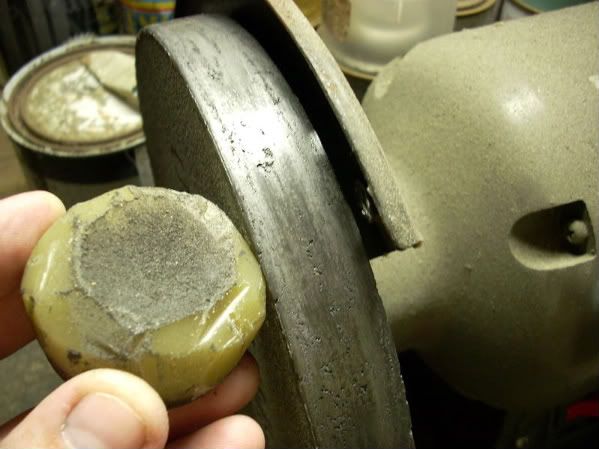
Here are the items we will be using. First is a standard bench grinder with a waxed grinding wheel.


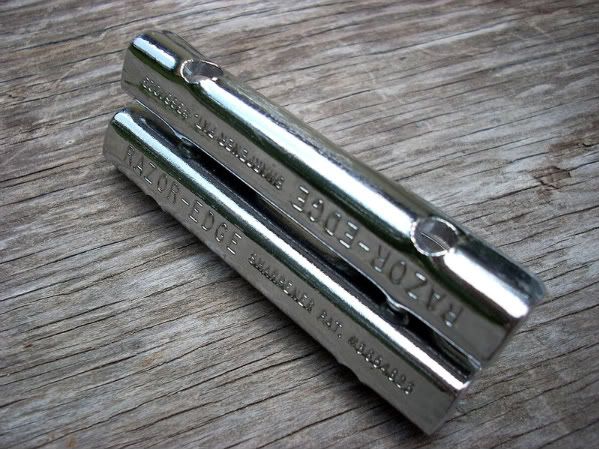
Next, I always use a Razor Edge Arrowhead Guide.


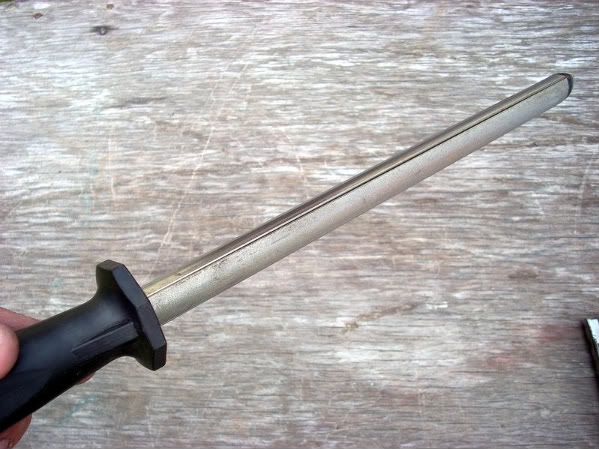
And, of course, our hone. With the Simmons heads, you must use a hone with a round or convex surface to accommodate the concave edge. This is a Hewlett Jewel Stik 3 in 1. It works extremely well with any two-blade broadhead or knife I have tried. It will even work for bleeder blades. It has a coarse grit for grinding your burr, and a medium and fine grit for burr removal. (NOTE: The finer grit you use to remove the burr, the finer your edge will be.)


One of the main reasons people have trouble with Simmons heads, aside from the concave edge, is they lack sufficient relief in the factory grind. (This can also be the case with other brands of heads.) As you can see from this photo, the grind angle is much too steep.


What we want to do is grind relief in the blade at a much shallower angle. This will allow us to immediately begin “working” the edge of the blade. We want to take the grind to somewhere near this point.  (NOTE:  You will only have to grind more relief into the blade the first time you sharpen it.)


NOTE: Even if you want to sharpen your heads with a Simmons Wheelie Sharpener or
Accu-sharp, if you grind more relief into the head, you will get a sharper edge
quicker.

There are several ways to do this, but I have found a bench grinder to be the most efficient way to remove this much metal. This is a standard medium grit wheel. To prevent heat build up, I apply wax to the wheel. (You'll want to do this frequently.)


Mount your broadhead on a shaft, or piece of shaft, to give you better control.


Begin grinding at an extreme angle. This will take you a few tries to get a feel for it. I try to grind as close to the ferrule as possible without hitting it.

     
Chris
>>>>--------------->

The benefits of a big broadhead are most evident when things go wrong. - CTS

Offline Doc Nock

  • TGMM Member
  • Trad Bowhunter
  • ***
  • Posts: 9234
Re: Simmons Sharpening Tutorial
« Reply #1 on: July 03, 2008, 10:26:00 PM »
I'm guessin there is more a comin...that li'l silver gizmo is new to me...

I'm hopin this is at least a "12 step program"

Hi, I'm Dave and I'm sharpening impaired!  :)
The words "Child" and "terminal illness" should never share the same sentence! Those who care-do, others question!

TGMM Family of the Bow

Sasquatch LB

Offline Landshark160

  • Trad Bowhunter
  • **
  • Posts: 672
Re: Simmons Sharpening Tutorial
« Reply #2 on: July 03, 2008, 10:28:00 PM »
As you can see, we now have a good bit of relief ground on this edge. Now just repeat on the other side.


Once we have our relief ground, it’s time to begin grinding a burr. Place the head in the guide with approximately 1/8” gap between the guide and the ferrule. This will allow us to slide the head further into the guide later, effectively increasing our grind angle. It should look like this.


Begin grinding your burr. You will only grind on this side for now. Your burr will come up on the top side of the blade.


Since we reground the head, we will immediately begin working on the very outer edge of the blade. The shiny part of the blade shows where we have been grinding. (You have probably seen this demonstrated using a Sharpie marker.) I am using the coarse grit because I need a heavy burr that will show up for the camera. With a proper relief angle ground, I would normally just use the medium grit. As soon as you get a burr the full length of the blade, STOP grinding. (NOTE: I don’t usually grind a burr until I can see it. This is mainly for demonstration purposes. I usually feel for the burr with my finger.)


Hopefully you can see the burr starting to come up in this photo. If you notice any stubborn spots where there is no burr, concentrate your grinding on those areas of the blade.


Now that we have a full length burr on this side of the blade, we can grind one on the other side.


Here is the burr on the other side of the blade. Hopefully you can see it a little better in this photo.


Now it’s time to start taking that burr off! First thing we want to do is slide our broadhead approximately 1/8” deeper into the guide. This will increase our grind angle and help us get rid of that burr.

It should look something like this.

     
Chris
>>>>--------------->

The benefits of a big broadhead are most evident when things go wrong. - CTS

Offline Landshark160

  • Trad Bowhunter
  • **
  • Posts: 672
Re: Simmons Sharpening Tutorial
« Reply #3 on: July 03, 2008, 10:30:00 PM »
Once again, go back to your hone. The only difference now is we are going to alternate strokes from one side to another. What grit you use will determine how many strokes it will take to remove the burr. A more aggressive grit will remove it faster, but remember, the finer grit will give you a finer edge. It may take 60-80 strokes to remove the burr with a ceramic rod, but I guarantee you will be pleased with the edge. What I did here was begin removing the burr with approximately 10 strokes with the medium grit and then I finished up with 20-30 strokes on the fine grit.


Here is the result. When I say shaving sharp, I mean SHAVING SHARP!(This is with one light push, and not a sawing motion.)


Now let’s go kill something!
Chris
>>>>--------------->

The benefits of a big broadhead are most evident when things go wrong. - CTS

Offline Apex Predator

  • Trad Bowhunter
  • **
  • Posts: 3372
Re: Simmons Sharpening Tutorial
« Reply #4 on: July 03, 2008, 10:32:00 PM »
What parts are included in the Ready Edge sharpening kit?  Where do I get one, and how much?  Thanks for sharing Chris!
I didn't claw my way to the top of the food chain to eat vegetables!

Offline Doc Nock

  • TGMM Member
  • Trad Bowhunter
  • ***
  • Posts: 9234
Re: Simmons Sharpening Tutorial
« Reply #5 on: July 03, 2008, 10:41:00 PM »
Yup. About 12 steps I think!    :D  

that sharpener system is quite the deal...

Can't wait to see what your answer to AP's query is!

Nicely done, btw, and GREAT photos! Thanks!
The words "Child" and "terminal illness" should never share the same sentence! Those who care-do, others question!

TGMM Family of the Bow

Sasquatch LB

Offline Landshark160

  • Trad Bowhunter
  • **
  • Posts: 672
Re: Simmons Sharpening Tutorial
« Reply #6 on: July 03, 2008, 10:50:00 PM »
Marty, this is the Razor Edge Arrowhead guide:  

 http://beast.voltztech.com/~razoredge/product_info.php?cPath=22&products_id=45&osCsid=97e7cb69ae9d9a148d1438c3d49c46c6


If you want to use the diamond hone I use, this is the about the cheapest place I have found it:

 http://www.knifecenter.com/kc_new/store_detail.html?s=HW123K

As long as it is round or convex, you could use any steel or diamond rod for getting a burr and knock it off with a ceramic rod.  This just happens to be my favorite.
Chris
>>>>--------------->

The benefits of a big broadhead are most evident when things go wrong. - CTS

Offline Landshark160

  • Trad Bowhunter
  • **
  • Posts: 672
Re: Simmons Sharpening Tutorial
« Reply #7 on: July 03, 2008, 10:57:00 PM »
Doc, the way I look at it, this is a simple 3 step process.  

1.  Grind relief

2.  Grind a burr

3.  Remove the burr

I just tried to break this down as best I could. I haven't timed myself yet, but once the proper relief is ground, I think I can go from grinding a burr, to shaving sharp, in less than 3 minutes per blade.  Grinding the relief in the blade takes the most time, but it's something you'll only have to do once.
Chris
>>>>--------------->

The benefits of a big broadhead are most evident when things go wrong. - CTS

Offline peak98

  • Trad Bowhunter
  • **
  • Posts: 266
Re: Simmons Sharpening Tutorial
« Reply #8 on: July 03, 2008, 11:08:00 PM »
Excellent tutorial, thanks for sharing. This same technique could be used with just about any two blade broadhead.
Moderators this tutorial needs to be locked in a spot at the top of the "PowWow" forum so we (me at least) will not be searching for it in a month or two !!!!

  :pray:    :pray:    :pray:
peak98

traveling East, in search of more light.

Offline Landshark160

  • Trad Bowhunter
  • **
  • Posts: 672
Re: Simmons Sharpening Tutorial
« Reply #9 on: July 03, 2008, 11:13:00 PM »
Peak, you're right.  This will work on any double bevel two blade head.  It also works like a dream on knives.
Chris
>>>>--------------->

The benefits of a big broadhead are most evident when things go wrong. - CTS

Offline peak98

  • Trad Bowhunter
  • **
  • Posts: 266
Re: Simmons Sharpening Tutorial
« Reply #10 on: July 03, 2008, 11:26:00 PM »
Chris, I bring my landsharks to my brother who has a Tormac (I believe that's the correct spelling) professional knife sharping contraption and he intially told me the same thing concerning the degree of the bevel. After he is through with them though, they'll shave the hair off a gnats behind !! I would like to be able to sharpen them myself, just to be a little more self sufficent. Again Chris, excellent tutorial, thanks.
peak98

traveling East, in search of more light.

Offline SlowBowinMO

  • Trad Bowhunter
  • **
  • Posts: 2540
Re: Simmons Sharpening Tutorial
« Reply #11 on: July 03, 2008, 11:34:00 PM »
Well done sir!   :clapper:
"Down-Log Blind at Misty River"

Offline DW

  • Moderator
  • Trad Bowhunter
  • ***
  • Posts: 1279
Re: Simmons Sharpening Tutorial
« Reply #12 on: July 03, 2008, 11:46:00 PM »
EXCELLENT How-To, Chris  :clapper:   Don and Sky
TGMM Family of the Bow

Offline flatlander37

  • Trad Bowhunter
  • **
  • Posts: 487
Re: Simmons Sharpening Tutorial
« Reply #13 on: July 04, 2008, 02:12:00 AM »
Awesome tutorial.  I am currently experimenting with 160 Snuffers but have a ton of 2 blades I use too.  Will have to buy these tools and try it.  Thanks for putting this together!
"Better to be thought a fool, than to open one's mouth and remove all doubt"-Abe Lincoln

Offline TaterHill Archer

  • Moderator
  • Trad Bowhunter
  • ***
  • Posts: 603
Re: Simmons Sharpening Tutorial
« Reply #14 on: July 04, 2008, 03:24:00 AM »
Excellent Tutorial.  This post inspired me to try this using my Harbor Freight belt sander.  

The belts don't lay completely flat on this sander.  Due to the shape of the wheels the belt has a slightly convex shape.  The belt only flattens out when you press against the platen.  I used the slack part of the belt and was able to get a Simmons shark and a Zwickey Delta hair shaving sharp with just the belt sander.  

I used a 120 micron belt to get the new bevel then switch to a 40 micron belt, then a leather belt with white rouge.  Gotta love it.
Jeff

"Make yourselves sheep and the wolves will eat you."  Benjamin Franklin

Offline Scott Gray

  • Trad Bowhunter
  • **
  • Posts: 97
Re: Simmons Sharpening Tutorial
« Reply #15 on: July 04, 2008, 09:27:00 PM »
Great tutorial Chris  :thumbsup:
BlackCreek Banshee 42 lbs@28

Offline Landshark160

  • Trad Bowhunter
  • **
  • Posts: 672
Re: Simmons Sharpening Tutorial
« Reply #16 on: July 06, 2008, 06:40:00 PM »
TTT for the holiday crowd.
Chris
>>>>--------------->

The benefits of a big broadhead are most evident when things go wrong. - CTS

Offline Hattrick

  • Trad Bowhunter
  • **
  • Posts: 540
Re: Simmons Sharpening Tutorial
« Reply #17 on: July 06, 2008, 07:26:00 PM »
roknjs
where do u get ur belts??? i have never seen a leather belt for a sander, i would like to have one
Bull

Offline TaterHill Archer

  • Moderator
  • Trad Bowhunter
  • ***
  • Posts: 603
Re: Simmons Sharpening Tutorial
« Reply #18 on: July 07, 2008, 12:56:00 AM »
Lee valley tools.
Jeff

"Make yourselves sheep and the wolves will eat you."  Benjamin Franklin

Offline Joe Clark

  • Moderator
  • Trad Bowhunter
  • ***
  • Posts: 139
Re: Simmons Sharpening Tutorial
« Reply #19 on: July 14, 2008, 05:38:00 PM »
I have always had a problem getting these heads as sharp as I would like. I usually lose my patience and switch back to Magnus I heads.I can get them sharp lickity split.  I have a few questions about the tutorial.

1. First I have never used a grinder to sharpen heads. Are you using a medium grit stone wheel or is that a cardboard wheel?

2. What kind of wax are you putting on the wheel? Plain old candle wax, bee's wax or what?

3. I assume when you are using the guide you are stroking away from your body. Maybe it don't matter but I was always taught to do it that way.

4. Lastly do you just rest the guide right on the hone? Doesn't wear the guide and the hone down?

Thanks for the turtorial for us less sharpening talented folks.

Users currently browsing this topic:

0 Members and 1 Guest are viewing this topic.
 

Contact Us | Trad Gang.com © | User Agreement

Copyright 2003 thru 2024 ~ Trad Gang.com ©