3Rivers Archery


The Trad Gang Digital Market


Contribute to Trad Gang and Access the Classifieds!

Become a Trad Gang Sponsor!

Traditional Archery for Bowhunters


LEFT HAND BOWS CLASSIFIEDS TRAD GANG CLASSIFIEDS ACCESS RIGHT HAND BOWS CLASSIFIEDS


Author Topic: Longbow Build-a-long w/pics Project Complete!  (Read 758 times)

Offline Hatrick

  • Trad Bowhunter
  • **
  • Posts: 885
Longbow Build-a-long w/pics Project Complete!
« on: October 29, 2008, 10:23:00 PM »
Gonna try a little longbow build-a-long here with some pictures. I want to carry this one through to the finish which hopefully includes a successful whitetail deer hunt in the next few weeks.

Building a bow is fun project for sure. I just generally don't have much time to get it done. I found some time recently so here goes!


I built this form by copying my favorite "D" profile longbow. The Northern Mist Baraga. I have built 1 other longbow and 2 recurves to this point. So, saying that you know I'm a rank amateur at bow building so the information here is strictly for the novice. I heartly welcome criticism from those who are more skilled so I can do better myself in the future.

I have found nothing more gratifying than killing my game with the equipment I've built. So far, knock on wood, all of the bows I've built are still holding together and shooting fine. I built the form and heat box about a year ago when making the first longbow. The form can be tricky and you need to take your time to make sure it's cut symetrical and square to the front and back. As you can see, I'm going to use the fire hose method with the heat box to cure the epoxy.

I'll try to keep up with this on a nightly basis. To this writing I'm actually putting the finish on. Please enjoy and remember I'm very open to constructive criticism.

 
The scent of Autumn is like food to the hunters soul.

Offline TNstickn

  • Trad Bowhunter
  • **
  • Posts: 816
Re: Longbow Build-a-long w/pics Project Complete!
« Reply #1 on: October 29, 2008, 10:37:00 PM »
man thats a clean shop ! Lookin forward to the build.
Pick a spot.>>>>-------> Shoot straight.

Offline Hatrick

  • Trad Bowhunter
  • **
  • Posts: 885
Re: Longbow Build-a-long w/pics Project Complete!
« Reply #2 on: October 29, 2008, 10:43:00 PM »
Since I had actually cut out the riser a few months ago I don;t have any pictures of the lamination, glue up, layout, or cut out process of the riser. I also cut and ground the laminations a while back. The lams are made out of vertically laminated bamboo flooring. Some extras that a friend of mine had left over from a flooring job. They started as 38" x 3-1/2" x 1/2" flooring boards that I cut the tounge and groove off of and then cut them down to 1-1/2" wide strips. I then resawed them to 3/16 thick on the table saw. I made a platten to go through my Performax drum sander. One for flat grinds and one for tapers.

I ground the laminations in pairs since they were only 36" long and then cut the ends on 45's and glued them end to end to form 1 long lamination. This seemed to work out real well.

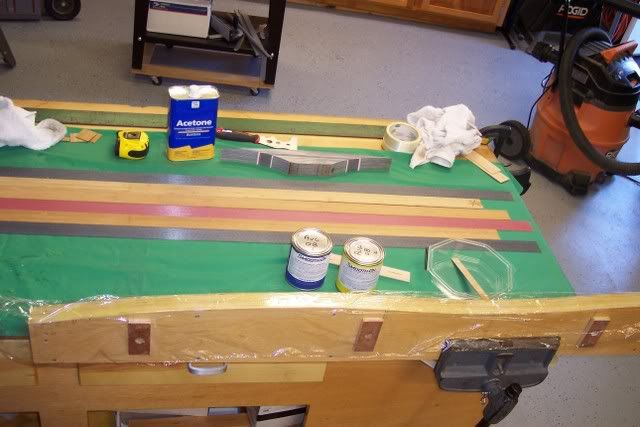
Here I have 2 black fiberglass lams at .040. Two parallel flooring lams at .075. One red glass lam for a decorative touch at .032. and one tapered lam that went from .130 at the butt to .035 at the limb tip.

Acetone to clean the lam surfaces and glueing surface of the riser. Smooth on epoxy and some plastic wrap to cover the form.

Glue up can be a mess with one person. It probably took me 45 minutes by the time I mixed the epoxy till I had everyting lined up in the form.

I might add that getting the poundage you want at the length you want can be a real chore If this is your first couple of bows. My goal here was a 62" bow and 50#@28".

I will say right now, a quality custom bow is, in most cases, is worth what you are paying for! Period.
 
The scent of Autumn is like food to the hunters soul.

Offline SoNevada Archer

  • Trad Bowhunter
  • **
  • Posts: 327
Re: Longbow Build-a-long w/pics Project Complete!
« Reply #3 on: October 29, 2008, 11:31:00 PM »
Looks good!
The doom of man...that he forgets!

Offline Apex Predator

  • Trad Bowhunter
  • **
  • Posts: 3372
Re: Longbow Build-a-long w/pics Project Complete!
« Reply #4 on: October 30, 2008, 05:41:00 AM »
Looking great!  Have you used the extra glass lam in the middle of your stack before?  Seems to me it would add a lot of unnecessary weight, causing hand shock.
I didn't claw my way to the top of the food chain to eat vegetables!

Offline Hatrick

  • Trad Bowhunter
  • **
  • Posts: 885
Re: Longbow Build-a-long w/pics Project Complete!
« Reply #5 on: October 30, 2008, 07:12:00 AM »
Apex, this is the first time using the glass lam in the middle. I just wanted to give it a try and I've seen that Black widow has been doing it for years without any ill effects. With the colors I'm using it does add a nice touch. Honestly, I have the bow to the point now where I'm just adding the finish. I've shot it a bit and I'm very pleased. I will say that there's no discernible added shock from the glass lam. I was actually expecting this question as I would have asked the same. All my bows are experimental at this point. My hats off to you for the excellent work you do!!

I might add here that I purchased all materials other than the bamboo lams from Bingham's. A great source for the amateur.

The riser block is gray coreflex/superaction that I ripped down and added a 1/4" black phenolic stripe and 2 1/16" red and 2 1/16" white stripes for accent. As you will tell, I really like the black/red/white look in a bow.
The scent of Autumn is like food to the hunters soul.

Offline Hatrick

  • Trad Bowhunter
  • **
  • Posts: 885
Re: Longbow Build-a-long w/pics Project Complete!
« Reply #6 on: October 30, 2008, 07:35:00 AM »
Moving right along, here I have the laminations glued up and placed in the form over top of the plastic wrap. The plastic wrap helps to keep excess glue from running down over the form. I use a fiber reinforced packing tape to hold the lams and riser in place before placeing the top part of the form on. The lams can slide around here a bit so you need to be careful and double check everything before putting the top part of the form on.

One thing I forgot to mention is that I placed blue painters tape over the face side of the black glass to prevent excess glue from messing up the finished side. I also mark the Smooth-On cans for the date purchased as I understand the shelf life is about a year.

 
The scent of Autumn is like food to the hunters soul.

Offline Apex Predator

  • Trad Bowhunter
  • **
  • Posts: 3372
Re: Longbow Build-a-long w/pics Project Complete!
« Reply #7 on: October 30, 2008, 07:38:00 AM »
I can hardly wait to see the rest!  This is where I learn the most.  Great job so far!
I didn't claw my way to the top of the food chain to eat vegetables!

Offline BMN

  • TGMM Member
  • Trad Bowhunter
  • ***
  • Posts: 1648
Re: Longbow Build-a-long w/pics Project Complete!
« Reply #8 on: October 30, 2008, 09:24:00 AM »
Man, that's a nice looking shop! Looking forward to following along.

Bill
Compton Traditional Bowhunters
Professional Bowhunters Society
Prairie Traditional Archers
TGMM Family of the Bow

The most frightening thing you are likely to encounter in nature is yourself.

Offline TimZeigler

  • Trad Bowhunter
  • **
  • Posts: 986
Re: Longbow Build-a-long w/pics Project Complete!
« Reply #9 on: October 30, 2008, 11:14:00 AM »
Looking good, can't wait to see the rest.

I've been thinking of adding an additional glass lam in the pack as well.  Read about it in the Traditional Bowyers book by Bertalan.  I would definitely opt for the size you went with and no thicker.
USMC 1992-2000
PBS Associate Member

Offline Hatrick

  • Trad Bowhunter
  • **
  • Posts: 885
Re: Longbow Build-a-long w/pics Project Complete!
« Reply #10 on: October 30, 2008, 07:02:00 PM »
Good evening to all. Tonight we put the top half of the form on and cook the bow. A sheet metal pressure strip goes between the top glass lam and the fire hose. The clamps mearly hold everything together while I apply 60 pounds of pressure into the hose. This really forces the excess glue from in between the laminations to give you a nice glue line. I'll also stick some small wood wedges around the riser area between the fire hose and pressure strip where the angles are sharp and the hose doesn't quite lay flat. This helps to maintain pressure in this area for good glue lines.

 
The scent of Autumn is like food to the hunters soul.

Offline Hatrick

  • Trad Bowhunter
  • **
  • Posts: 885
Re: Longbow Build-a-long w/pics Project Complete!
« Reply #11 on: October 30, 2008, 07:08:00 PM »
Now to cook the bow. My heat box is made of 1/2" plywood. I have insulation with heat resistant coating tacked to all sides, top and bottom of the box. Four 90 watt light bulbs are wired into the lid of the box. I have a thermostat from Bingham wired into the line from a switch box on the outside. Close the lid, plug in the cord, hit the switch, and you have heat.
   

Now I'll cook the bow for about 6 hours. I stick a meat thermometer into a small hole in the front of the box to make sure I'm maintaining heat. The upper end is 180 degrees. Once it reaches 180 the thermostat opens and the box will cool to about 150 when it closes again and heats back up. It will stay between 180 and 150 for the 6 hours.

 
The scent of Autumn is like food to the hunters soul.

Offline Hatrick

  • Trad Bowhunter
  • **
  • Posts: 885
Re: Longbow Build-a-long w/pics Project Complete!
« Reply #12 on: October 30, 2008, 07:47:00 PM »
After 6 hours in the oven I turn it off and let it cool down inside before opening the box. After taking it out of the form this is what I have.

 
The scent of Autumn is like food to the hunters soul.

Offline ohiobowhunt

  • Trad Bowhunter
  • **
  • Posts: 137
Re: Longbow Build-a-long w/pics Project Complete!
« Reply #13 on: October 30, 2008, 08:02:00 PM »
Come on don't stop now !!! I really want to see the process and the end product. This is another maybe someday project for me. Oh and I like the red, white and black color scheme also.

Offline EASTERNARCHER

  • Trad Bowhunter
  • **
  • Posts: 553
Re: Longbow Build-a-long w/pics Project Complete!
« Reply #14 on: October 30, 2008, 08:33:00 PM »
I'm starting to get that itch to build a glass bow again!!!!!
ARCHER

Offline Hatrick

  • Trad Bowhunter
  • **
  • Posts: 885
Re: Longbow Build-a-long w/pics Project Complete!
« Reply #15 on: October 30, 2008, 09:11:00 PM »
OK..., Once out of the form I removed the blue painters tape from the black glass. Because the glue, plastic wrap, and heat tend to stick to the original tape, I disgard the original and then put on a white paint masking tape. I then use thin striing line to find the center line of the bow. Since some of my lams shifted a bit during the gluing and pressure process I find it best to re-establish a good center line over the riser. It may not look centered at the limb ends right now but there's plenty to cut off. I measure off the center line to get 1/2" at the limb tips and 1-1/4" at the butt ends.

 
The scent of Autumn is like food to the hunters soul.

Offline Hatrick

  • Trad Bowhunter
  • **
  • Posts: 885
Re: Longbow Build-a-long w/pics Project Complete!
« Reply #16 on: October 30, 2008, 09:16:00 PM »
With the limb profile layed out on the white tape, I used my band saw to cut within a 1/16" of the line leaving room for the final limb grinding on the belt sander.


And the final grind to proper profile on the belt sander.

 
The scent of Autumn is like food to the hunters soul.

Offline Hatrick

  • Trad Bowhunter
  • **
  • Posts: 885
Re: Longbow Build-a-long w/pics Project Complete!
« Reply #17 on: October 30, 2008, 09:24:00 PM »
Removed the tape and checked center line with the thin string line once again. So Far...So Good!   :)  


Tomorrow - Tiller and Tips!
The scent of Autumn is like food to the hunters soul.

Offline Hatrick

  • Trad Bowhunter
  • **
  • Posts: 885
Re: Longbow Build-a-long w/pics Project Complete!
« Reply #18 on: October 31, 2008, 06:34:00 PM »
Good Friday evening to all. Tonight we check the tiller. I used an old bow stringer with leather cups so I could slip it over the ends. I placed a tiller stick at the center of the riser. The tiller checked close to even with about 1/16" difference at the fade outs. The weaker side becomes the top limb.

I might add that during this process I determined that a 62" bow would not quite give me the draw weight I wanted so I reduced the length to 61" and picked up a couple pounds. Unique, but I make my own strings so no big deal to me.

 
The scent of Autumn is like food to the hunters soul.

Offline Hatrick

  • Trad Bowhunter
  • **
  • Posts: 885
Re: Longbow Build-a-long w/pics Project Complete!
« Reply #19 on: October 31, 2008, 06:49:00 PM »
Now that I've determined the top limb I can make my limb tips accordingly. The top one will be a little longer and come to a sharper point. I love antler tips and had some elk antler available. I started with red phenolic on the bottom, and elk antler on the top. The combo will go well with the black glass. Careful to make sure the surfaces marry up well, I sanded the black glass for rough up and used 5 minute epoxy and a clamp.


Go eat dinner and come back in an hour to shape the tip and cut in the string groove  with a rat tail file.

 
The scent of Autumn is like food to the hunters soul.

Users currently browsing this topic:

0 Members and 3 Guests are viewing this topic.
 

Contact Us | Trad Gang.com © | User Agreement

Copyright 2003 thru 2024 ~ Trad Gang.com ©