3Rivers Archery


The Trad Gang Digital Market


Contribute to Trad Gang and Access the Classifieds!

Become a Trad Gang Sponsor!

Traditional Archery for Bowhunters


LEFT HAND BOWS CLASSIFIEDS TRAD GANG CLASSIFIEDS ACCESS RIGHT HAND BOWS CLASSIFIEDS


Author Topic: Arrow build-a-long  (Read 1470 times)

Offline StanM

  • Tradbowhunter
  • Trad Bowhunter
  • *
  • Posts: 1082
Arrow build-a-long
« on: March 24, 2007, 12:04:00 PM »
Seems like there's been a couple of threads asking for advice on building arrows.  I am no expert on it, but I thought I'd post a build-a-long to show how I do it.  Most of the things I use to build arrows anyone can make in their shop.  I like to keep it simple and it seems to work okay for me.

The first couple of steps are new to me and can be skipped if you buy shafts or dowels.  I happened to find some 36" Port Orford Cedar 2x2's at my local hardware store that were $1.49 and perfectly straight grained.  Couldn't pass that up.

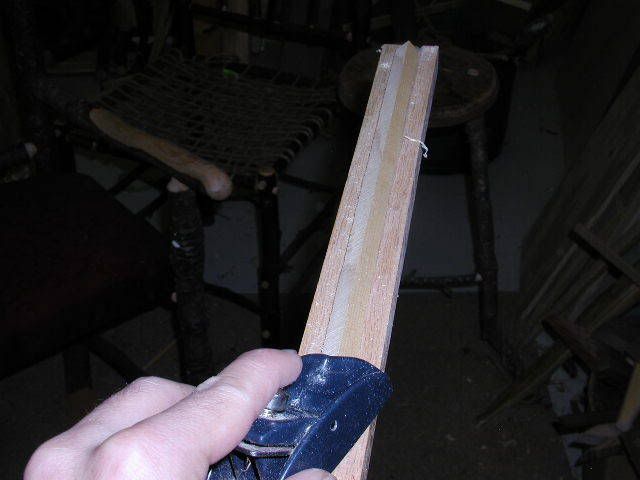
First step is to rip them into 3/8th inch squares.  You can see in the pic that I use a high tech fence for ripping, a scrap 1x2 and a couple of clamps


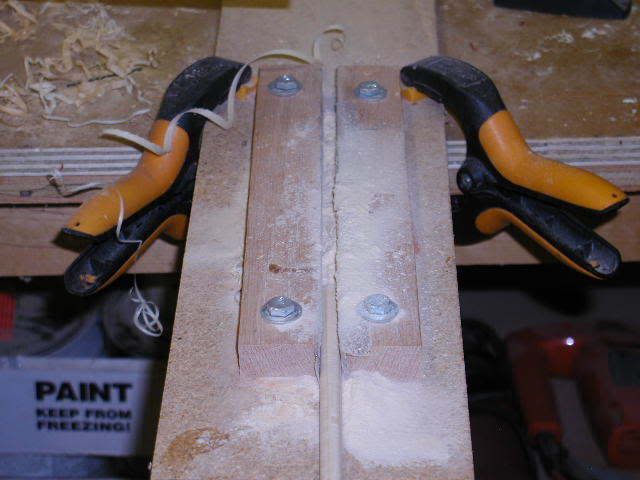
After the stock is cut square another scrap of 1x2 with a v groove cut down the middle and a peg at one end to hold the square allows me to plane the four corners.  Planing the eight corners that are left gets the shaft pretty close to round.


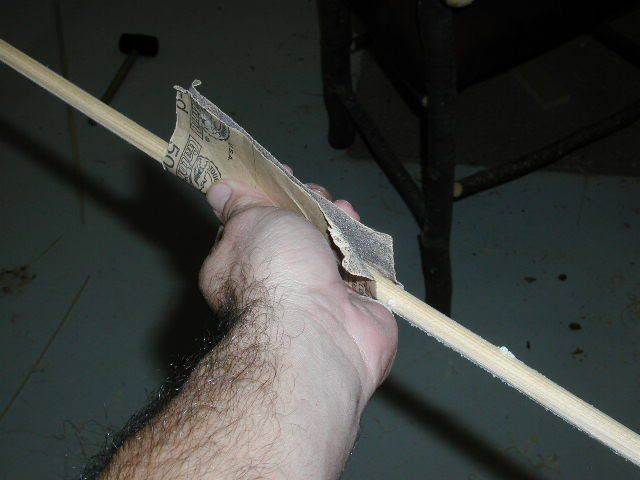
With the shaft this close to round I chuck it in a hand drill and hit it with 50 grit, then 120 grit and then 220 grit to get a smooth round shaft.


Next, it's off to my high tech spining machine.  To me an arrows spine is simply the amount of bend it takes under a given pressure.  I don't weight my shafts down in the middle, I weight the end with a peg in the middle.  According to Einstein, it's all relative anyway   :)  

Marking shafts of a known spine will give you a scale that's easy to read and surprisingly accurate.  Here's my tester.


You probably can't see it in the pic, but I use a small wedge to "zero" out the shaft before I put the wrench on for weight.  Another important note is that I always spine the arrow against the peg the way that it will be against the bow.

If the spine is too high I chuck the shaft again and sand a little more.

When the spine is right, I take the shaft to my high tech tapering jig.  I use this jig to taper my point end to 11/32 inch and the nock to 5/16 inch.  To use it all you have to do is put the full sized shaft in the front end and tighten the nut, then put an 11/32 or a 5/16th drill bit in the back end and tighten the nut.  Chuck the shaft again and run it through.  I've heard that files work a lot better than sandpaper for the jig and someday I'll probably update this one.


More to come

Offline StanM

  • Tradbowhunter
  • Trad Bowhunter
  • *
  • Posts: 1082
Re: Arrow build-a-long
« Reply #1 on: March 24, 2007, 12:24:00 PM »
Now that I've got a semi-barrel tapered shaft I take it to my point and nock tapering jig.  Again, very simple to make.  I glued a scrap of wood that fit into my table saw's fence guide to the bottom of a scrap of plywood.  Then I trimmed the plywood by running it through the saw with the guide in place.  It is important to get the jig right up to the saw for it to work well.  Then I set my fence for a 5 degree angle and cut a groove in the plywood to hold the shaft at an angle.  Did the same for point tapers as well.  To use I put a sanding disk on the saw then spin the shaft while pushing it into the sandpaper.


In the picture I've pulled the shaft to the side to show the groove.  When both tapers are done I stain the shaft.  


After that I usually put a nock on it, unless I'm making a self nock.  I belive Mickey has some pictures on his site of how I reinforce self nocks and make a locator.  With the nock done, I usually crest the shaft.  I used to crown dip, but anymore I kinda like just a simple crest over the wood.


When cresting, I always work from lightest color to darkest color.  Easier to hide mistakes that way.

When the cresting is done I dip the shafts in some sort of sealer.  The best I've ever used was Daly's Profin, available from Bob Burton.  Most of the time I use Deft from the hardware store though.  My dip tube was made from some cheap pvc, but with the reservoir on top it works well.


I hang the finished shafts out on a "clothes line" with clothes pins.  I usually dip three coats.  I find that I get about 10 extra grains per dip, so if you are fanatical about weight matching you can get really close if you want to.


When the shaft is good and dry I fletch it up.  Lately I've gone to using fletch tape.  It works well for me, though I do put a drop of glue on either end of each feather.


And here is a finished arrow, barrel tapered and all.  Not a lot of skill or money to get a dozen arrows that would cost a pretty penny if you were to buy them.  There is time in them though, but I find it all enjoyable.


I'm sure I left something out so if you have any questions, feel free to ask.  I'll check back in on this thread every now and then.  Hope it helps.

Stan

Offline whitebuffalo

  • TGMM Member
  • Trad Bowhunter
  • ***
  • Posts: 2038
Re: Arrow build-a-long
« Reply #2 on: March 24, 2007, 01:08:00 PM »
Very nice, build along. great photos.
TGMM

Offline jimneye

  • Trad Bowhunter
  • **
  • Posts: 211
Re: Arrow build-a-long
« Reply #3 on: March 24, 2007, 02:23:00 PM »
Thankx STAN, very good info.
I've hunted almost every day of my life.....the rest were just wasted

Offline 4runr

  • TG HALL OF FAME
  • Trad Bowhunter
  • *****
  • Posts: 6799
Re: Arrow build-a-long
« Reply #4 on: March 24, 2007, 10:49:00 PM »
Great job Stan.
Kenny

Christ died to save me, this I read
and in my heart I find a need
of Him to be my Savior
          By Aaron Shuste

TGMM Family of the Bow

Offline Cody Cantrell

  • Trad Bowhunter
  • **
  • Posts: 101
Re: Arrow build-a-long
« Reply #5 on: March 25, 2007, 08:54:00 AM »
Stan,

Great looking arrows.  

One question though, I always thought you put your nock and point tapers on before you barrel tapered the shafts, that way you have an exact 5 & 11 degree tapers on the end?  You tapered the points after they are barrell tapered doesnt this throw off the end tapers?

Cody
Your wife will accustom herself to shavings and scraps of feathers on the rugs.-Saxton Pope

Offline Izzy

  • Trad Bowhunter
  • **
  • Posts: 7487
Re: Arrow build-a-long
« Reply #6 on: March 25, 2007, 10:20:00 AM »
Great buildalong,thanks.

Offline EASTERNARCHER

  • Trad Bowhunter
  • **
  • Posts: 553
Re: Arrow build-a-long
« Reply #7 on: March 25, 2007, 10:29:00 AM »
THAT'S what I'm talkin' about!!! Thanks for posting...Sounds simple enough, and I have planned on trying it, so this will work out well.
ARCHER

Offline StanM

  • Tradbowhunter
  • Trad Bowhunter
  • *
  • Posts: 1082
Re: Arrow build-a-long
« Reply #8 on: March 25, 2007, 10:44:00 AM »
Hey Cody,

I don't find that it throws my tapers off at all.  In fact, I think that doing the nock and point tapers after I barrel taper them makes them more accurate.  I always check my point taper by putting the shaft into a Zwickey and giving it a spin.  I wish I knew how to post a video because they spin like tops.

I believe it works because the groove that the shaft lies in is not as wide as the shaft.  That way the axis of the shaft doesn't stray from dead center on the groove.

Here's another tip.  When you chuck the shaft into the drill and tighten it, it will leave chuck marks in the shaft.  Especially if you are working with cedar.

If you start with the full width shaft and chuck the NOCK end first you have the grooves in the NOCK end when you barrel taper the point.  When you reverse the shaft you will grind out the NOCK end grooves and put the grooves in the now skinnier POINT end of the shaft to make your nock taper.  This leaves chuck marks only in the POINT end.  I do my barrel taper in this order, because having the grooves in the point end means that I can grind them out completely when I put on the 5 degree taper.  The other way around you get about a half inch of groove showing on the nock end.

Boy I hope that's not too confusing.

Take care,

Stan

Offline StanM

  • Tradbowhunter
  • Trad Bowhunter
  • *
  • Posts: 1082
Re: Arrow build-a-long
« Reply #9 on: March 25, 2007, 10:47:00 AM »
Hey Easternarcher,

Must've just missed your post.  Trust me, if I can do anyone can.  It really is pretty simple.  Just take the time to make accurate jigs and the rest is cake.

Stan

Offline dj

  • Trad Bowhunter
  • **
  • Posts: 31
Re: Arrow build-a-long
« Reply #10 on: March 25, 2007, 08:13:00 PM »
I tried your exact method of creating arrows out of square stock several weekends ago.  I had no cedar so I tried using a piece of ash left over from building a board bow.  I struggled with the planing.......couldn't quite get to  the 16 sides with anything like a uniform (almost round) shape.  Then the ash just laughed at my attempts to sand it round.  Used up all of the ash I had left.....made nothing but firewood........I'm expecting one dozen poc from 3 Rivers any day now.  Your fine craftsmanship turned out some absolutely beautiful arrows. Congratulations!!!!  dj
"Carve a little wood, pull a few strings, and sometimes magic happens".....Gepetto

Offline StanM

  • Tradbowhunter
  • Trad Bowhunter
  • *
  • Posts: 1082
Re: Arrow build-a-long
« Reply #11 on: March 26, 2007, 07:04:00 PM »
Hey dj,

I've never tried working on ash before.  I did the cedars and today did up some Doug Fir.  Both of them plane pretty well, being soft woods.  Good luck with your POC, it's a great wood to work with.

Stan

Offline the Ferret

  • Trad Bowhunter
  • **
  • Posts: 3232
Re: Arrow build-a-long
« Reply #12 on: March 26, 2007, 08:03:00 PM »
Really nice tute Stan. Enviable results.  :notworthy:
There is always someone that knows more than you, and someone that knows less than you, so you can always learn and you can always teach

Online Roy from Pa

  • Administrator
  • Trad Bowhunter
  • ****
  • Posts: 20644
Re: Arrow build-a-long
« Reply #13 on: March 26, 2007, 10:46:00 PM »
I just love maken wooden arrahs:) Nice job Stan.. Roy

Offline onemississipp

  • Trad Bowhunter
  • **
  • Posts: 668
Re: Arrow build-a-long
« Reply #14 on: August 21, 2007, 11:28:00 AM »
That was great and just what I was looking for!!

Thanks
Dustin
_ _ _________________________________ _  _

Offline MrBadExample

  • Trad Bowhunter
  • **
  • Posts: 79
Re: Arrow build-a-long
« Reply #15 on: August 21, 2007, 03:39:00 PM »
Great post, just what I needed to see! I always need directions. LOL!  :readit:

Offline tradtusker

  • TGMM Member
  • Trad Bowhunter
  • ***
  • Posts: 3820
Re: Arrow build-a-long
« Reply #16 on: August 21, 2007, 03:53:00 PM »
very nice thanks.
There is more to the Hunt.. then the Horns

**TGMM Family of the Bow**


Andy Ivy

Offline Shakes.602

  • Trad Bowhunter
  • **
  • Posts: 3643
Re: Arrow build-a-long
« Reply #17 on: August 21, 2007, 04:15:00 PM »
Very Nice Work!! I kinda Like the Lack of a Crown Dip Myself now!
Great Tute as Well!! Ought to go in the Archives, Right Folks??
"Carpe Cedar" Seize the Arrow!
"Life doesn't get Simpler; it gets Shorter and Turns in Smaller Circles." Dean Torges
"Faith is to Prayer what the Feather is to the Arrow" Thomas Morrow
"Ah Think They Should Outlaw Them Thar Crossbows" A Hunting Pal

Offline onemississipp

  • Trad Bowhunter
  • **
  • Posts: 668
Re: Arrow build-a-long
« Reply #18 on: August 22, 2007, 12:03:00 PM »
I just finished a proto type of your "high tech tapering jig". I built my from aluminum, it still needs some work as the shaft likes to ride up. I'll make some guides for it and when it's done post some pics.

The reason I built it was because I have a 3/8" dowel cutter, but wanted 11/32" arrows. It works very well for reducing it from 3/8" to 11/32" it is also very accurate. It removed 1/32" from the shaft and nothing more.

Thanks again for the post!!!!!
Dustin
_ _ _________________________________ _  _

Offline StanM

  • Tradbowhunter
  • Trad Bowhunter
  • *
  • Posts: 1082
Re: Arrow build-a-long
« Reply #19 on: August 28, 2007, 01:14:00 AM »
Been away from Tradgang for a little while and had forgotten about this post.  Glad to see that it has been of help.  Would really like to see pics of your jig when you get the chance Dustin.

Stan

Users currently browsing this topic:

0 Members and 2 Guests are viewing this topic.
 

Contact Us | Trad Gang.com © | User Agreement

Copyright 2003 thru 2024 ~ Trad Gang.com ©