3Rivers Archery


The Trad Gang Digital Market


Contribute to Trad Gang and Access the Classifieds!

Become a Trad Gang Sponsor!

Traditional Archery for Bowhunters


LEFT HAND BOWS CLASSIFIEDS TRAD GANG CLASSIFIEDS ACCESS RIGHT HAND BOWS CLASSIFIEDS


Author Topic: Snakin' the Tannehill Bow (pics)  (Read 1250 times)

Offline Eric Krewson

  • Trad Bowhunter
  • **
  • Posts: 3126
Snakin' the Tannehill Bow (pics)
« on: April 23, 2007, 08:51:00 AM »
A while back one of the officers of the Alabama Society of Traditional Bowman asked me if they could buy a bow from me at a cut rate price to auction at their Children's Hospital Benefit shoot next weekend at Tannehill park South of Birmingham Al. I thought about a fair price for such an event and told Abe" how does free sound".

I should have taken pictures along the way as I started with a really dogleg, propellered, snaky stave and turned it in to a really nice stave over a two day heating, bending (and a little cussing) session.

I told Tom Kinder (the snake skin guy on the auction site) about my project and he sold me a super matched set of western diamondback skins at a real reasonable price.

I started taking pictures when I started the skin application and although these type of tutorials have been on the Trad Gang before I thought some newbies might like to see the process so here goes.

I finished the bow completely to the final sanding before I start applying the skins.

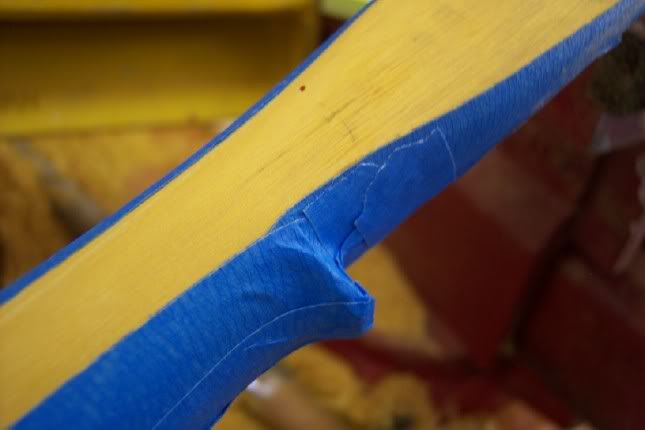
First I like to mask off every part of the bow except the back. There is so much extra glue involved that ends up on various parts of the bow if it isn't masked, I like to cover everything up. I have found some glue spots will escape the closest scrutiny and only show up after the first coat of finish is applied which only makes a mess.


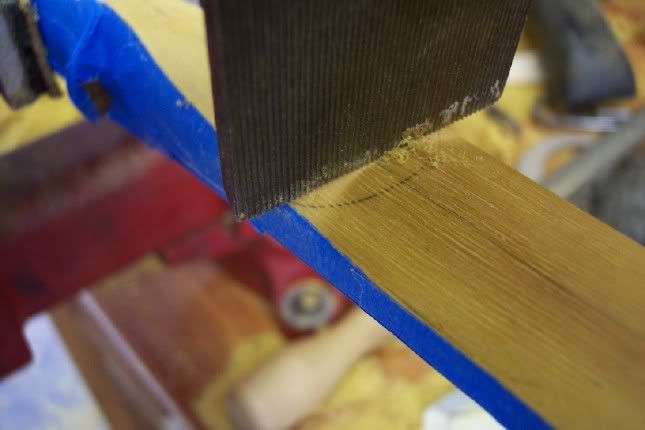
I like to rough up the back of the bow slightly. I ues a toothing plane blade with only the weight of the blade doing the cutting.


Offline Eric Krewson

  • Trad Bowhunter
  • **
  • Posts: 3126
Re: Snakin' the Tannehill Bow (pics)
« Reply #1 on: April 23, 2007, 09:10:00 AM »
I trim away as much excess skin as I can while the skin is dry.


After trimming I put the skins in a bowl of water and assemble the necessary stuff for the project. I have a bowl of water for cleaning my hands, one for the skins, a metal handle glue brush, carpenters wood glue and lots of paper towels. I don't like to use TB11 because you can see the yellow color through the skins when you get them on, the tan glue is neutral.


Offline Eric Krewson

  • Trad Bowhunter
  • **
  • Posts: 3126
Re: Snakin' the Tannehill Bow (pics)
« Reply #2 on: April 23, 2007, 09:16:00 AM »
Lay the skin out, belly side up and blot the excess moisture with a paper towel.


Brush on a light coat of glue to the skin and back of the bow. The glue is pretty thick so I dip the brush in water so it will mix with glue on the skin and bow to thin the glue a bit and make coverage more even.


Offline Eric Krewson

  • Trad Bowhunter
  • **
  • Posts: 3126
Re: Snakin' the Tannehill Bow (pics)
« Reply #3 on: April 23, 2007, 09:28:00 AM »
I lay the skin in place on the limb and spend the next 10 minutes making sure the pattern is centered while forcing air and excess glue to the outside of the limb with my thumbs. I may make several dozen passes with my thumbs making sure the skin is just where I want it and there are no pockets of glue or air under the skin.


After about 10 minutes I trim the edges of the skin, not to the edge of the limb but leaving just a little extra to re-adjust the skin if necessary. A poorly centered skin really messes up the beauty of a snake skin backing.

You can see all the excess glue on the tape, what a mess to get off the bow if you didn't mask it.


One more trip down the limb with my thumbs will squeeze out a few more small drops of excess glue. With the skin trimmed I can see the smallest amount of glue that need to be removed.


I put the matching skin on the other limb the same way and will let the skins dry for a day or so then continue with more pics and the rest of the project.

Offline Dano

  • Trad Bowhunter
  • **
  • Posts: 2660
Re: Snakin' the Tannehill Bow (pics)
« Reply #4 on: April 23, 2007, 10:22:00 AM »
Nicely done Eric.
"If the women don't find you handsome, they should at least find you handy" Red Green

Offline Drew

  • Trad Bowhunter
  • **
  • Posts: 1509
Re: Snakin' the Tannehill Bow (pics)
« Reply #5 on: April 23, 2007, 10:27:00 AM »
Eric...Thanks and I look forward to seeing the process finished up.

Drew, a newbie
Just a Coyote Soul out wandering...

Offline Bjorn

  • Trad Bowhunter
  • **
  • Posts: 8789
Re: Snakin' the Tannehill Bow (pics)
« Reply #6 on: April 23, 2007, 10:38:00 AM »
That is inspiring Eric! One of these days.............and you almost make it look easy.
Can't wait for the rest.

Offline mmgrode

  • Trad Bowhunter
  • **
  • Posts: 1314
Re: Snakin' the Tannehill Bow (pics)
« Reply #7 on: April 23, 2007, 11:05:00 AM »
Great stuff Eric! Can't wait to see the rest!
"We are what we repeatedly do. Excellence, then, is not an act, but a habit."  Aristotle

Offline Frenchymanny

  • Trad Bowhunter
  • **
  • Posts: 2379
Re: Snakin' the Tannehill Bow (pics)
« Reply #8 on: April 23, 2007, 11:19:00 AM »
Superb Eric, thank you Sir!

 :notworthy:  

Is the white carpenter glue really handling the bending well over time?

F-Manny
Coureur des Bois
Big Jim: Buffalo Bows 62" 60@27 & 65@27 ThunderChilds 56" 62@27 & 62@27 Desert BigHorn 59@27
ML, Shrew &TC Knives
With a sturdy bow, a true shaft, and a stout heart, we journey forth in
search of adventure.

Dr. Saxton Pope

Offline Eric Krewson

  • Trad Bowhunter
  • **
  • Posts: 3126
Re: Snakin' the Tannehill Bow (pics)
« Reply #9 on: April 23, 2007, 01:26:00 PM »
The glue is really the stainable, waterproof variety instead of white glue. No problems with it in since I switched from TB2 years ago.

Offline Eric Krewson

  • Trad Bowhunter
  • **
  • Posts: 3126
Re: Snakin' the Tannehill Bow (pics)
« Reply #10 on: April 23, 2007, 04:51:00 PM »
A few more steps. After a day of drying, I use a small, fine cut riffler file to trim the skin to the edge of the limb, pushing the file to the belly only.


This leaves a very crisp edge and a few scrapes with my cabinet scraper removes any small file marks. This is the end result. How about that osage burl tip overlay? "G" brought me one a foot across with plenty of future nock overlays.


Time to remove the scales. I like duct tape because it has the most"stick-um" and makes the job go better. You will always miss a few and will need to go over the limbs several times and look in different light angles to spot the ones that escape the duct tape.  


I guess I should explain the reason for removing the scales to readers who haven't applied skins before. If you try to apply your final finish to the skins with the scales on they will prevent the finish from sealing the skin, acting like shingles on a house. Later they will flake off leaving the skin unprotected with no finish.

Still a little drying to do before the final finishing. The rest later.

Offline the Ferret

  • Trad Bowhunter
  • **
  • Posts: 3232
Re: Snakin' the Tannehill Bow (pics)
« Reply #11 on: April 23, 2007, 07:38:00 PM »
Great job showing the process Eric   :thumbsup:
There is always someone that knows more than you, and someone that knows less than you, so you can always learn and you can always teach

Offline Budog56

  • Trad Bowhunter
  • **
  • Posts: 446
Re: Snakin' the Tannehill Bow (pics)
« Reply #12 on: April 23, 2007, 07:49:00 PM »
Awesome...  :thumbsup:    :notworthy:

Offline BUFF

  • Trad Bowhunter
  • **
  • Posts: 1095
Re: Snakin' the Tannehill Bow (pics)
« Reply #13 on: April 23, 2007, 08:00:00 PM »
good stuff thanks

Offline JEFF B

  • TGMM Member
  • Trad Bowhunter
  • ***
  • Posts: 8246
Re: Snakin' the Tannehill Bow (pics)
« Reply #14 on: April 23, 2007, 08:07:00 PM »
hey this is a good thread would  it work with carp skins ?   we have plenty of over here.  :thumbsup:
'' sometimes i wake up Grumpy;
other times i let her sleep"

TGMM FAMILY OF THE BOW

Offline daniel reynolds

  • Trad Bowhunter
  • **
  • Posts: 165
Re: Snakin' the Tannehill Bow (pics)
« Reply #15 on: April 23, 2007, 09:32:00 PM »
hey eric you're buddy daniel here  it's looking great!
Obama,what a joke!

Offline eagle24

  • Trad Bowhunter
  • **
  • Posts: 499
Re: Snakin' the Tannehill Bow (pics)
« Reply #16 on: April 24, 2007, 09:55:00 AM »
Very nice Eric!  Looks a lot like a bow I've been shooting.  I wonder why?    ;)

Offline Chortdraw

  • Trad Bowhunter
  • **
  • Posts: 688
Re: Snakin' the Tannehill Bow (pics)
« Reply #17 on: April 24, 2007, 12:01:00 PM »
Looks great Eric. :thumbsu
p

Offline Eric Krewson

  • Trad Bowhunter
  • **
  • Posts: 3126
Re: Snakin' the Tannehill Bow (pics)
« Reply #18 on: April 24, 2007, 01:42:00 PM »
Getting close to finishing.

The next step is controversial but works good for me. I brush a VERY thin coat of superglue on the skins, emphasis on very thin. It took two brushes because the superglue sets up in each brush pretty quickly. I brush in a circular motion to spread the glue Be sure to have a fan going or other good ventilation because the fumes are pretty rough.


After a couple hours drying I sand the back of the skin lightly with fine sandpaper to remove the points between where the scales were. I am using 400 grit paper.


Offline ux monster

  • Trad Bowhunter
  • **
  • Posts: 17
Re: Snakin' the Tannehill Bow (pics)
« Reply #19 on: April 24, 2007, 02:16:00 PM »
That is truly awsome brother,thanks for sharing with us.
I hunt because thats the way its supposed to be not hunting upsets the balance of my nature.

Users currently browsing this topic:

0 Members and 1 Guest are viewing this topic.
 

Contact Us | Trad Gang.com © | User Agreement

Copyright 2003 thru 2024 ~ Trad Gang.com ©