3Rivers Archery


The Trad Gang Digital Market


Contribute to Trad Gang and Access the Classifieds!

Become a Trad Gang Sponsor!

Traditional Archery for Bowhunters


LEFT HAND BOWS CLASSIFIEDS TRAD GANG CLASSIFIEDS ACCESS RIGHT HAND BOWS CLASSIFIEDS


Author Topic: Building a St. Jude's Quiver - Update on Page 3  (Read 731 times)

Offline bctgrad

  • Trad Bowhunter
  • **
  • Posts: 137
Building a St. Jude's Quiver - Update on Page 3
« on: March 22, 2010, 09:15:00 PM »
Last year I thought about trying to make a quiver for the St. Jude’s auction, but never found the time to get it started before the auction began.  I told myself that I’d make time for it this year.  And then the opportunity presented itself when Papa Bear posted a thread searching for a quiver to package with the incredible Evo bow he's donating for the auction.  I figured if I made the commitment to build the quiver for his package I would have to get it done.  So I offered and Papa Bear accepted.  I’m honored to be a small part of this great effort to help the kids.

This is my third quiver build and I thought that this time I would try to document the process.  I should have it complete this week so it’s time to start posting some of pictures.

Before I start, I need to state that this is not intended to be a “how-to” thread, it’s merely to show you how I made this quiver and to try and generate some interest in the upcoming auction.  I’m sure that there are better and easier ways to this, but I seldom do anything the easy way and this works for me.

When I made my first quiver (the one I still carry) 20 years ago, I wanted to be able to adjust the length of the strap if needed – whether I gained a bunch of weight or just wanted to wear a thick winter coat.  I considered a few different methods and settled on evenly spaced buttons.  After trying several button options, I decided to use the “star” shape basically because I liked the way it looked.  It’s not the best functioning button design since the points don’t slide through the holes very smoothly, but I rarely adjust the strap and don’t have to worry about them much.

The riser of the Evo is Cocobolo, so I started looking for a piece to make the buttons.  I found a nice piece at a local woodworking shop, ripped some slabs off of it and laid out the buttons.  


Cut them out with my coping saw and cleaned them up with a file:


Then I started carving:


Offline bctgrad

  • Trad Bowhunter
  • **
  • Posts: 137
Re: Building a St. Jude's Quiver - Update on Page 3
« Reply #1 on: March 22, 2010, 09:17:00 PM »
Here are the buttons in their rough carved stage:


Cleaned up with a coat of super glue (LT420) finish:


This was my first time working with Cocobolo and after finishing the buttons I decided that I don’t like this wood very much.  It really stinks when it’s cut and it didn’t carve as good as other wood that I’ve used.  I also found out that wipe-on poly doesn’t stick to it (which is why I used superglue to seal the buttons).  However, with all my complaining, I think they turned out looking pretty good.

Offline bctgrad

  • Trad Bowhunter
  • **
  • Posts: 137
Re: Building a St. Jude's Quiver - Update on Page 3
« Reply #2 on: March 22, 2010, 09:19:00 PM »
The buttons are nearly done and I still have all of my fingers (didn’t even need any stitches!), so I began looking for a good piece of leather.  

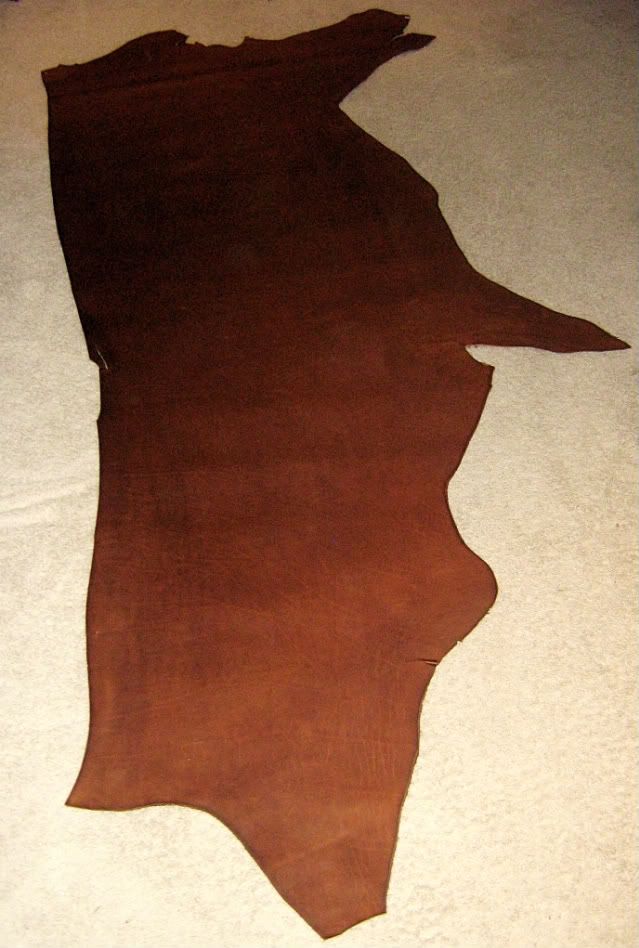
I visited a Tandy Leather store about 20 miles from my house, but they were less than helpful.  They had a poor selection and tried to steer me towards something that I didn’t want.  I left there and started searching on line.  I finally found what I was looking for on the big auction site – it’s a 5 oz semi-soft chocolate brown cow hide.  When it arrived it was much better quality than I expected.


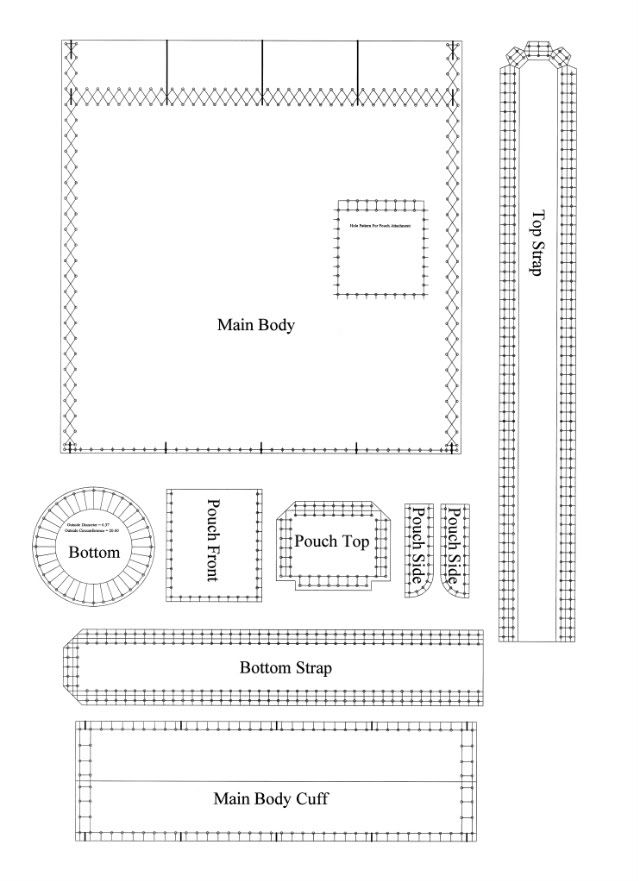
Years ago for my first quiver, I worked out the design as I was making it.  When I decided to make a quiver for a good friend about six months ago, I used my first one as a pattern, tweaked a few things and made part drawings in a CAD program on the computer.  This saved a bunch of time in laying out the holes that need to be punched for the lacing and allowed me to work out a few tricky areas before I started.  

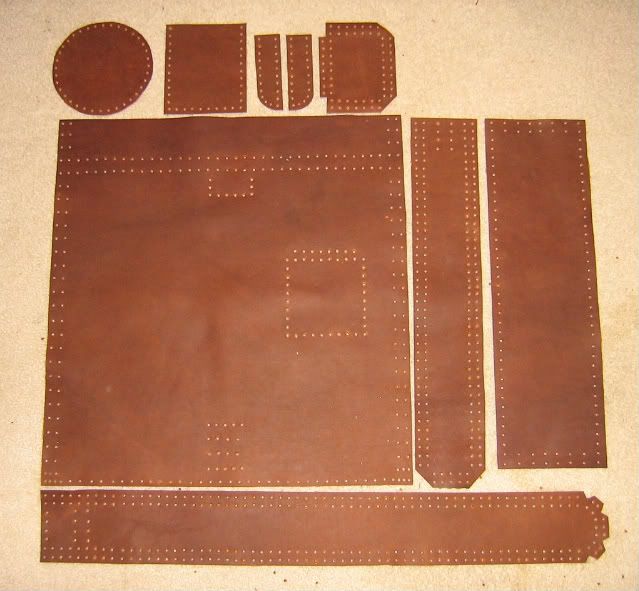
Here are all of the parts from the CAD file:


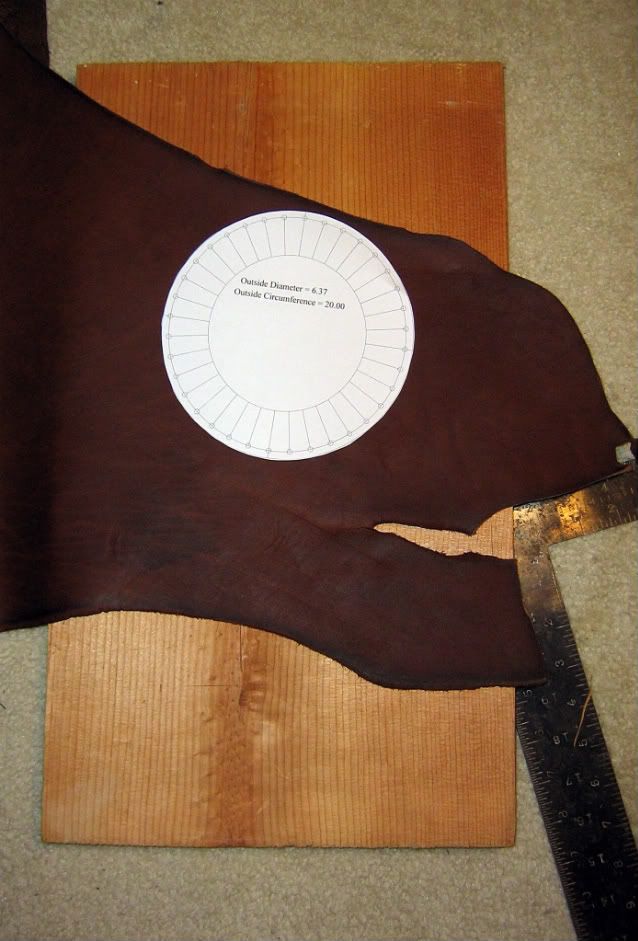
I printed and cut out the paper patterns, laid out the parts and cut all of the pieces:


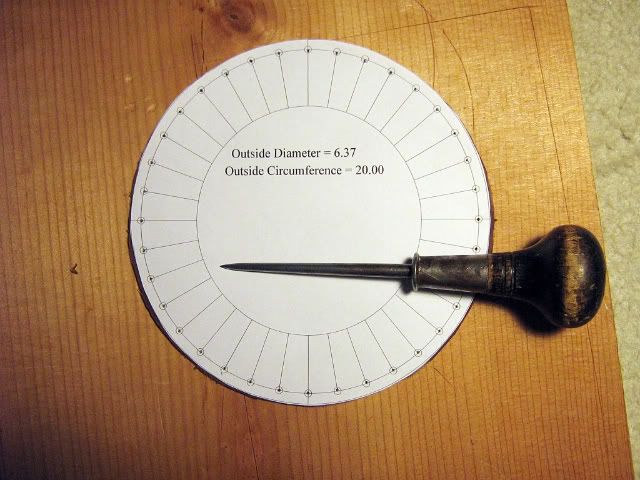
Marked the holes using an awl and the paper patterns:


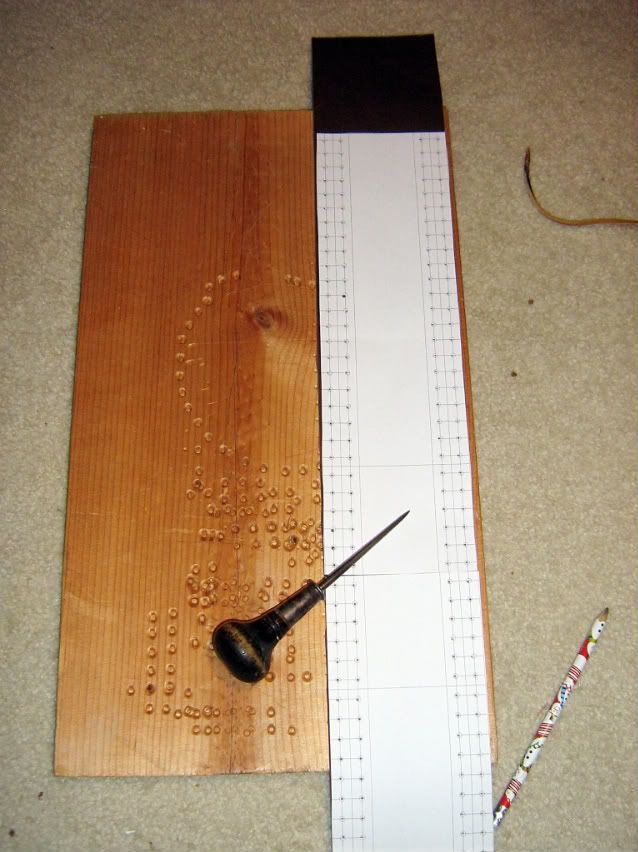
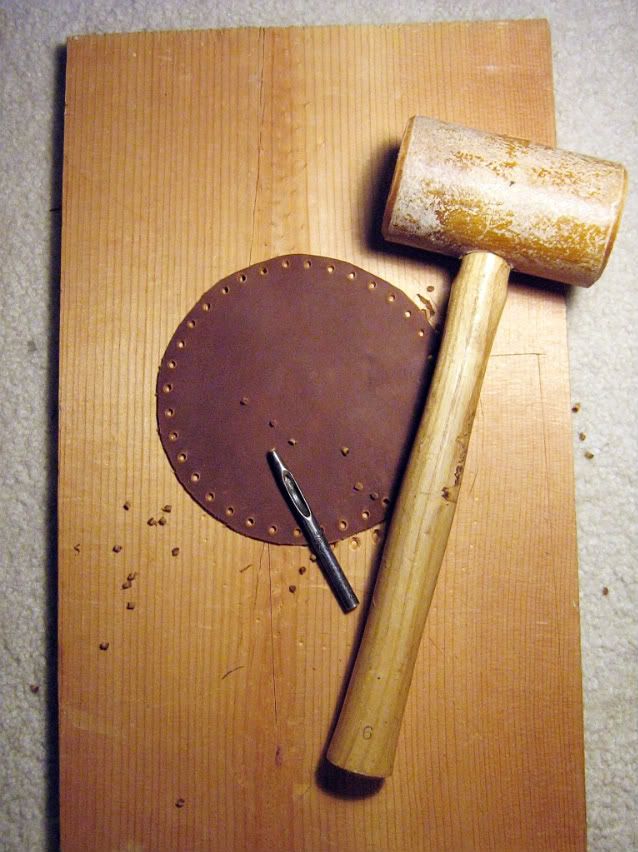
Next is the process that my family really enjoys – punching the holes.  There are 955 holes that need to be punched for this quiver, here’s how I punch them – everyone loves all the pounding:


All of the parts cut and punched ready to be stitched together:


Offline bctgrad

  • Trad Bowhunter
  • **
  • Posts: 137
Re: Building a St. Jude's Quiver - Update on Page 3
« Reply #3 on: March 22, 2010, 09:24:00 PM »
Now, the stitching (or lacing) begins.  The holes that I punch are 1/8” diameter and I run two pieces of 1/8” leather lacing through each hole – one lace from the top and one lace from the bottom.  This means that I have about 1/4” of leather going through an 1/8” hole.  I use an awl to stretch out the hole, feed the top lace though, stretch the hole again and feed the bottom lace through and pull it tight.   Each stitch takes a lot of time, but gives the best finished look since the hole shrinks back tight against the lacing.  

Here’s one of the straps being stitched.  I don’t want raw edges on the straps, so I fold the edges over to make a hem:


Stitching the top cuff to the main body of the quiver:


A few close-ups the stitching, you can see how the holes seal up around the laces on the top side of one of the straps:


Online lpcjon2

  • Trad Bowhunter
  • **
  • Posts: 7673
Re: Building a St. Jude's Quiver - Update on Page 3
« Reply #4 on: March 22, 2010, 09:25:00 PM »
Brian you have a gift and you should be very proud of what you do.Can't wait for the for the auction.Tim
Some people live an entire lifetime and wonder if they have ever made a
difference in the world, but the Marines don’t have that problem.
—President Ronald Reagan

Offline Hot Hap

  • Trad Bowhunter
  • **
  • Posts: 3152
Re: Building a St. Jude's Quiver - Update on Page 3
« Reply #5 on: March 22, 2010, 09:27:00 PM »
Looks like it's going to be a dandy! Hap

Offline bctgrad

  • Trad Bowhunter
  • **
  • Posts: 137
Re: Building a St. Jude's Quiver - Update on Page 3
« Reply #6 on: March 22, 2010, 09:32:00 PM »
I need to drill holes in the buttons so that they can be attached to the strap and pouch:


And tie them on:


As I mentioned above, the buttons aren’t “smooth operators”.  The button holes will loosen up with use, but you wouldn’t want to use the pouch for every day items.  I use mine for carrying a few emergency items such as a back-up string or glove.

Offline Mudd

  • TGMM Member
  • Trad Bowhunter
  • ***
  • Posts: 12391
Re: Building a St. Jude's Quiver - Update on Page 3
« Reply #7 on: March 22, 2010, 09:34:00 PM »
It's really cool to watch the quiver come together. It's gonna be even more cool when it's finished.

Thanks for sharing!
God bless,Mudd
Trying to make a difference
Psalm 37:4
Roy L "Mudd" Williams
TGMM- Family Of The Bow
Archery isn't something I do, it's who I am!
The road to "Sherwood" makes for an awesome journey.

Offline Ragnarok Forge

  • Trad Bowhunter
  • **
  • Posts: 3034
Re: Building a St. Jude's Quiver - Update on Page 3
« Reply #8 on: March 22, 2010, 10:37:00 PM »
Nice tutorial.  I am looking forward to seeing the finished package.
Clay Walker
Skill is not born into anyone.  It is earned thru hard work and perseverance.

Offline DesertDude

  • Trad Bowhunter
  • **
  • Posts: 2058
Re: Building a St. Jude's Quiver - Update on Page 3
« Reply #9 on: March 23, 2010, 12:56:00 AM »
Sweet!!!! punching all them holes is alot of work. I know, I love your Craftsmenship.....
DesertDude >>>----->

US Navy (Retired)
1978-1998

Online Over&Under

  • TG HALL OF FAME
  • Trad Bowhunter
  • *****
  • Posts: 5108
Re: Building a St. Jude's Quiver - Update on Page 3
« Reply #10 on: March 23, 2010, 01:16:00 AM »
Really gives you a inside look and idea of why backquivers are worth what they are priced at, lots of work goes into them.  

This one is flat out awesome!!  Nice work, as already said, something you should be very proud of!
“Elk (add hogs to the list) are not hard to hit....they're just easy to miss"          :)
TGMM

Offline Missouri Bowman

  • Trad Bowhunter
  • **
  • Posts: 391
Re: Building a St. Jude's Quiver - Update on Page 3
« Reply #11 on: March 23, 2010, 01:43:00 AM »
Nice work, it helps me get some ideas for a do it yourself project. Thanks.

Offline wisconsin wood butcher

  • Trad Bowhunter
  • **
  • Posts: 443
Re: Building a St. Jude's Quiver - Update on Page 3
« Reply #12 on: March 23, 2010, 06:40:00 AM »
very nice work and the pics are great to see..when does the bidding start?

Offline bctgrad

  • Trad Bowhunter
  • **
  • Posts: 137
Re: Building a St. Jude's Quiver - Update on Page 3
« Reply #13 on: March 23, 2010, 10:30:00 PM »
Since I’m not talented enough to do any tooling or stenciling and wanted to mark the quiver in some way to show that it was associated with the auction, I ordered a patch from the St. Jude’s gift shop.  The patch fit almost perfect on the bottom of the quiver.  I took it to an embroidery shop and had it modified a bit and added “Trad Gang” and “2010” to it.


I started researching methods of attaching the patch to the bottom.  I wasn’t excited about taking it somewhere to have it sewn on and thought that all the needle holes might weaken the bottom.  I found several sites that recommended using Amazing E-6000 Craft Adhesive.  This stuff is industrial strength fabric and leather glue that is permanent and waterproof.  Everything that I read about it said it will never let go.  So I tracked down a tube.

I laid out the patch on the bottom:


Roughed up the area where the patch would go with sandpaper:


Cleaned off the dust, glued on the patch, clamped it between two boards and let it sit over night:


I cut another piece of 7 oz stiff leather to glue to the inside of the bottom and thicken it up for more support.  I glued and clamped it similar to what I did with the patch.  The finished leather bottom is nearly 1/4” thick:


All that’s left to do is stitch the bottom on.

Offline FerretWYO

  • TG HALL OF FAME
  • Trad Bowhunter
  • *****
  • Posts: 5099
Re: Building a St. Jude's Quiver - Update on Page 3
« Reply #14 on: March 23, 2010, 10:56:00 PM »
That is awesome. Great work.
TGMM Family of The Bow

Offline gregg dudley

  • TG HALL OF FAME
  • Trad Bowhunter
  • *****
  • Posts: 4879
Re: Building a St. Jude's Quiver - Update on Page 3
« Reply #15 on: March 24, 2010, 07:27:00 AM »
The quiver is looking great!  In a million years i would not have thought of having an embroidered patch modified.  That is very cool.
MOLON LABE

Traditional Bowhunters Of Florida
Come shoot with us!

Offline Chris Surtees

  • Trad Bowhunter
  • **
  • Posts: 5697
Re: Building a St. Jude's Quiver - Update on Page 3
« Reply #16 on: March 24, 2010, 08:31:00 AM »
:thumbsup:     :thumbsup:

Offline oneshot-onekill

  • TGMM Member
  • Trad Bowhunter
  • ***
  • Posts: 1032
Re: Building a St. Jude's Quiver - Update on Page 3
« Reply #17 on: March 24, 2010, 09:35:00 AM »
Very nice work.
Proverbs 16:9
TGMM Family of the Bow

Terry Barker

Offline Shakes.602

  • Trad Bowhunter
  • **
  • Posts: 3643
Re: Building a St. Jude's Quiver - Update on Page 3
« Reply #18 on: March 24, 2010, 10:12:00 AM »
AWSOME!!!!  :thumbsup:    :archer:
"Carpe Cedar" Seize the Arrow!
"Life doesn't get Simpler; it gets Shorter and Turns in Smaller Circles." Dean Torges
"Faith is to Prayer what the Feather is to the Arrow" Thomas Morrow
"Ah Think They Should Outlaw Them Thar Crossbows" A Hunting Pal

Offline Larry Surtees

  • Moderator
  • Trad Bowhunter
  • ***
  • Posts: 1708
Re: Building a St. Jude's Quiver - Update on Page 3
« Reply #19 on: March 24, 2010, 11:02:00 AM »
Outstanding!!!    :notworthy:    :notworthy:    :notworthy:
TGMM Family of the Bow

Users currently browsing this topic:

0 Members and 3 Guests are viewing this topic.
 

Contact Us | Trad Gang.com © | User Agreement

Copyright 2003 thru 2024 ~ Trad Gang.com ©