3Rivers Archery


The Trad Gang Digital Market


Contribute to Trad Gang and Access the Classifieds!

Become a Trad Gang Sponsor!

Traditional Archery for Bowhunters


LEFT HAND BOWS CLASSIFIEDS TRAD GANG CLASSIFIEDS ACCESS RIGHT HAND BOWS CLASSIFIEDS


Author Topic: Side Quiver Build Along As Requested  (Read 412 times)

Offline Dimondback

  • Trad Bowhunter
  • **
  • Posts: 329
Side Quiver Build Along As Requested
« on: March 31, 2012, 02:48:00 AM »
Hello All,
         I recently posted a couple of pictures of a leather side quiver that I made last weekend a few of you asked for some instructions on how it is made....here they are. Here are the different components:
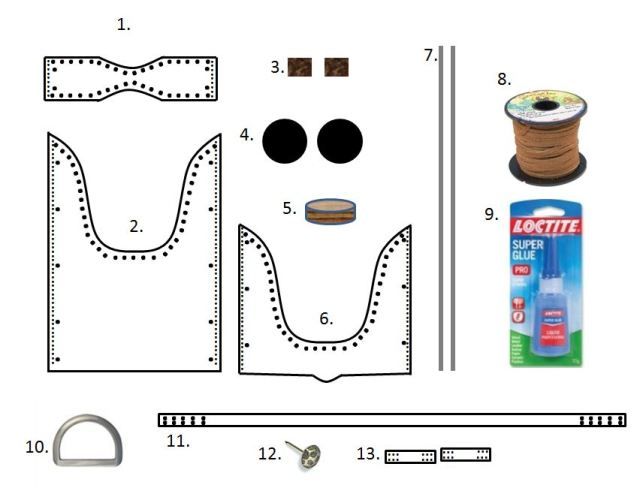
1)Upper quiver piece 8-10oz tooling leather (mine measures 8.25" x 5" Flat)
2)Lower quiver piece 8-10oz tooling leather (mine measures 8.25" x 10" Flat)
3)2 Small scraps of thin brown leather
4)2 1/4" thick closed cell foam circle cut to final inner diameter (2 5/8" in this case) (available at craft stores)
5)1/2" x 2 5/8" wooden circle (cut with a hole saw)
6)Decorative Piece 5oz tooling leather cut to match part of the lower quiver piece (optional)
7)2 aluminum arrow tubes/wood dowel/hardwood strip
8)1/8" leather lace in what ever color you choose
9)Superglue
10)2 x 1" D-ring
11)Around 6 feet of 1" leather strap (depending on your "girth"....  :)  
12)6-8 upholstery tacks
13)2 x 1"x 4" strips of 5oz leather (for D-ring mounts)

Tools and other stuff:
1)Adjustable Leather Hole Punch
2)Heavy Duty Needles
3)Heavy Duty Thread (I use bow string material)
4)Razor Knife (for cutting leather)
5)Leather Glue (if adding decorative piece)
6)Leather Carving Tools (if decorating)
7)Leather Stain
 
"Do or Do Not, There is no "Try"
Martin Savannah 45#
3PC Home Built Longbow 53# @ 28"
MAJ - SCARNG 1998 - Present

Offline Dimondback

  • Trad Bowhunter
  • **
  • Posts: 329
Re: Side Quiver Build Along As Requested
« Reply #1 on: March 31, 2012, 02:51:00 AM »
First cut out your leather pieces as shown. Using a width of 8.25" will yield a quiver with a diameter of 2 5/8" and will hold around a dozen arrows with field points but 9 arrows fit a little better.
 
"Do or Do Not, There is no "Try"
Martin Savannah 45#
3PC Home Built Longbow 53# @ 28"
MAJ - SCARNG 1998 - Present

Offline Dimondback

  • Trad Bowhunter
  • **
  • Posts: 329
Re: Side Quiver Build Along As Requested
« Reply #2 on: March 31, 2012, 02:57:00 AM »
Add tooling/decoration of your choice to the decorative piece and allow to dry. Using leather adhesive, glue the decorative piece to the main quiver piece as shown. This part is optional if you do not wish to have a tooled leather component or wish to simply tool the main lower quiver piece or decide on no tooling at all(you will save a significant amount of time not adding this decorative piece but at a sacrifice of the look of the final product)
 
"Do or Do Not, There is no "Try"
Martin Savannah 45#
3PC Home Built Longbow 53# @ 28"
MAJ - SCARNG 1998 - Present

Offline Dimondback

  • Trad Bowhunter
  • **
  • Posts: 329
Re: Side Quiver Build Along As Requested
« Reply #3 on: March 31, 2012, 03:04:00 AM »
Once your components have dried, use the adjustable leather hole punch to punch the following as shown. Use holes to match the size thread/lace you are using. The larger holes shown are for the decorative 1/8" lace around the edges and are spaced 1/2" apart. The smaller holes are used to form the tube that will be your quiver using the bow string or other strong thread and are spaced 1/4" from each other. Finally the attatchment holes are punched down the sides spaced 1" apart.These will be used to attach the components to the shaft. The number of holes may vary depending on the final length of the bottom and top components and the picture is just used as a reference. Also take the time to get your strap cut to the correct length and punch two rows of 8-10 holes on each end to allow adjustablility. (see materials pic on the first post for location)
 
"Do or Do Not, There is no "Try"
Martin Savannah 45#
3PC Home Built Longbow 53# @ 28"
MAJ - SCARNG 1998 - Present

Offline Dimondback

  • Trad Bowhunter
  • **
  • Posts: 329
Re: Side Quiver Build Along As Requested
« Reply #4 on: March 31, 2012, 03:13:00 AM »
Now use an awl or other sharp instrument to punch matching holes in the D-ring attachment straps and the lower and upper quiver components. This is also a good time to stain the leather if you have not done so already. (bottom component shows the proper location but upper portion does not and I wasn't willing to redraw the upper piece in powerpoint...see the final pictures for location of the upper attachment point if needed   :)   ) Now sew the D-rings and attachment straps to the quiver as shown using your strong thread or bow string material. Don't forget to insert the D-ring inside the strap before sewing....ask me how I know this  :knothead:  ...scotch was involved...  ;)  
 
"Do or Do Not, There is no "Try"
Martin Savannah 45#
3PC Home Built Longbow 53# @ 28"
MAJ - SCARNG 1998 - Present

Offline Dimondback

  • Trad Bowhunter
  • **
  • Posts: 329
Re: Side Quiver Build Along As Requested
« Reply #5 on: March 31, 2012, 03:19:00 AM »
Now roll the lower piece into a tube and sew using your strong thread and needles to form a baseball stitch down the seam using the smaller holes punched earlier. Directions for the baseball stitch can be found on many web sites featuring videos and is quite easy. Repeat on the upper portion....
 
"Do or Do Not, There is no "Try"
Martin Savannah 45#
3PC Home Built Longbow 53# @ 28"
MAJ - SCARNG 1998 - Present

Offline Dimondback

  • Trad Bowhunter
  • **
  • Posts: 329
Re: Side Quiver Build Along As Requested
« Reply #6 on: March 31, 2012, 03:28:00 AM »
Now for the shaft....I like the look and quietness of a leather lace-wrapped shaft. To do this, grab your arrow shafts that you have cut to desired length and glue them side-by-side using the super glue. Use the small thin leather scraps (thick cloth or felt would work too) to "cap" the ends of the arrow shafts as shown, attaching with more glue. Some trimming after attachment will clean this up a bit. Be careful not to let your fingers become part of the quiver during the gluing (again...ask me how I know this...) Once dry you can glue the end of your leather lace over top of the scrap leather piece and begin wrapping. I like to add a drop of super glue to the shaft every few wraps to ensure it stays tight. Once the wrapping is complete, secure the other end with a few drops of glue. Now you can lace the shaft to the upper and lower quiver pieces as shown in the picture. use a few drops of the superglue to secure your knots.
 
"Do or Do Not, There is no "Try"
Martin Savannah 45#
3PC Home Built Longbow 53# @ 28"
MAJ - SCARNG 1998 - Present

Offline Dimondback

  • Trad Bowhunter
  • **
  • Posts: 329
Re: Side Quiver Build Along As Requested
« Reply #7 on: March 31, 2012, 03:36:00 AM »
Now you need to add something so the arrows do not fall out of the bottom of the quiver...for this I used a 1/2" x 2 5/8" circle of wood cut with an adjustable hole saw, capped on each side by 1/4" closed cell craft foam that I bought at a local craft supply store (lots of other TRAD friendly uses for this stuff as well, broadhead quiver inserts etc). If you don't have a way to get an appropriate cicle of wood, simply glue 4-6 layers of this stuff together and cut to shape. Once dry, insert into the bottom of the quiver and tack with the upholstry tacks.
 
"Do or Do Not, There is no "Try"
Martin Savannah 45#
3PC Home Built Longbow 53# @ 28"
MAJ - SCARNG 1998 - Present

Offline Dimondback

  • Trad Bowhunter
  • **
  • Posts: 329
Re: Side Quiver Build Along As Requested
« Reply #8 on: March 31, 2012, 03:39:00 AM »
Now add the decorative 1/8" lacing around the edges of the upper and lower portions of the quiver and use super glue to secure each of the ends to a hidden spot where the shaft meets the quiver for a clean finish.
 
"Do or Do Not, There is no "Try"
Martin Savannah 45#
3PC Home Built Longbow 53# @ 28"
MAJ - SCARNG 1998 - Present

Offline Dimondback

  • Trad Bowhunter
  • **
  • Posts: 329
Re: Side Quiver Build Along As Requested
« Reply #9 on: March 31, 2012, 03:41:00 AM »
Thread your strap through the D-rings, adjust to proper length and secure with with the 1/8" lace as shown.
 
"Do or Do Not, There is no "Try"
Martin Savannah 45#
3PC Home Built Longbow 53# @ 28"
MAJ - SCARNG 1998 - Present

Offline Dimondback

  • Trad Bowhunter
  • **
  • Posts: 329
Re: Side Quiver Build Along As Requested
« Reply #10 on: March 31, 2012, 03:45:00 AM »
Now you are ready to tote your arrows around in style...I hope this helps anyone that wants to give this a try and like everything else, there are probably many other (possibly easier) ways to get this done but this is how I made mine. Please let me know if you have any questions or suggestions. Thanks for reading!

CPT D
 
"Do or Do Not, There is no "Try"
Martin Savannah 45#
3PC Home Built Longbow 53# @ 28"
MAJ - SCARNG 1998 - Present

Offline Green

  • Trad Bowhunter
  • **
  • Posts: 3003
Re: Side Quiver Build Along As Requested
« Reply #11 on: March 31, 2012, 05:33:00 AM »
Thanks Brian, for the build along.  Well done.    :thumbsup:
ASL's, Selfbows, and Wood Arra's
Just because you are passionate about something, doesn't mean you don't suck at it.

Offline AkDan

  • Trad Bowhunter
  • **
  • Posts: 2119
Re: Side Quiver Build Along As Requested
« Reply #12 on: March 31, 2012, 05:58:00 AM »
very nicely done!   Like the tooling you've done also!

Offline saumensch

  • Trad Bowhunter
  • **
  • Posts: 915
Re: Side Quiver Build Along As Requested
« Reply #13 on: March 31, 2012, 06:32:00 AM »
Thanks alot, short but very informative build along!
Perhaps this should be moved to the Howto section...
And sometimes our dreams they float like anchors in hopeless waters oh way down here
Sometimes it seems that all that matters most are all the things that you can't keep
(William Elliot Whitmore)

Offline PeteA

  • Trad Bowhunter
  • **
  • Posts: 968
Re: Side Quiver Build Along As Requested
« Reply #14 on: March 31, 2012, 07:25:00 AM »
Hey Brain. I had one of these types of quivers in process but abandoned the effort. You answered a bunch of my dilemmas. Great stuff!

Thx!
Predator Hunter 46#@28
'70 Bear Kodiak Hunter 45#@28
'72 Bear Grizzly 45#@28

Online Keefer

  • TG HALL OF FAME
  • Trad Bowhunter
  • *****
  • Posts: 4153
Re: Side Quiver Build Along As Requested
« Reply #15 on: March 31, 2012, 09:54:00 AM »
This is cool and a must for the How to section as someone else already mentioned...Thanks for the pics that is very nice of you to share ...

Offline FerretWYO

  • TG HALL OF FAME
  • Trad Bowhunter
  • *****
  • Posts: 5099
Re: Side Quiver Build Along As Requested
« Reply #16 on: March 31, 2012, 10:02:00 AM »
Wow Very well done build along. Exellent. Copy going to how too now.
TGMM Family of The Bow

Offline Hawkeye

  • Trad Bowhunter
  • **
  • Posts: 1665
Re: Side Quiver Build Along As Requested
« Reply #17 on: March 31, 2012, 10:15:00 AM »
Great explanation and documentation, Brian.  Thank you!

I have one question. In your photo, the wrapping on the shafts looks like a single piece of suede.  The caption describes wrapping them with leather lace.  Are my eyes fooling me, or are the pics a bit different than the description?  Just trying to get a mental handle on it!
Daryl Harding
"He is no fool who gives what he cannot keep to gain that which he cannot lose."  Jim Elliot

Traditional bowhunting is often a game of seconds... and inches!

Offline ron w

  • Contributing Member
  • Trad Bowhunter
  • ****
  • Posts: 13849
Re: Side Quiver Build Along As Requested
« Reply #18 on: March 31, 2012, 05:35:00 PM »
Thanks for sharing your ideas and design......   :thumbsup:    :notworthy:
In the beginner's mind there are many possibilities. In the expert's there are few...So the most difficult thing is always to keep your beginner's mind...This is also the real secret of the arts: always be a beginner.  Shunryu Suzuki

Offline Dimondback

  • Trad Bowhunter
  • **
  • Posts: 329
Re: Side Quiver Build Along As Requested
« Reply #19 on: March 31, 2012, 07:02:00 PM »
Quote
Originally posted by Hawkeye:
Great explanation and documentation, Brian.  Thank you!

I have one question. In your photo, the wrapping on the shafts looks like a single piece of suede.  The caption describes wrapping them with leather lace.  Are my eyes fooling me, or are the pics a bit different than the description?  Just trying to get a mental handle on it!
Hello Hawkeye,
             Hopefully this zoomed in picture will answer your question. It does, in fact, look like a solid piece of suede but is actually 1/8" leather lace wrapped around the shaft in close intervals (A lot of wraps). Glad you enjoyed the build along!

Dimondback


"Do or Do Not, There is no "Try"
Martin Savannah 45#
3PC Home Built Longbow 53# @ 28"
MAJ - SCARNG 1998 - Present

Users currently browsing this topic:

0 Members and 2 Guests are viewing this topic.
 

Contact Us | Trad Gang.com © | User Agreement

Copyright 2003 thru 2024 ~ Trad Gang.com ©