3Rivers Archery


The Trad Gang Digital Market


Contribute to Trad Gang and Access the Classifieds!

Become a Trad Gang Sponsor!

Traditional Archery for Bowhunters


LEFT HAND BOWS CLASSIFIEDS TRAD GANG CLASSIFIEDS ACCESS RIGHT HAND BOWS CLASSIFIEDS


Author Topic: Just got my yew staves, now what?? Pictures included.  (Read 1469 times)

Offline the Ferret

  • Trad Bowhunter
  • **
  • Posts: 3232
Re: Just got my yew staves, now what?? Pictures included.
« Reply #20 on: August 13, 2007, 07:21:00 AM »
Just went and looked at my copy of Billets to Bows (the Book) and Glenn was using sister billets with a long W splice. I can only assume he used the long fades to keep bending away from the ends of the splice which covered about 8" looking at the pics. I also see he was building the deep cored American Long Bow or ALB which favored the English Long Bow or ELB only the ALB has distinctive fades and dips.So now it make sense.There aren't a lot of bowyers around who still build that type of bow.

If you  were going to build a shorter flatbow with a shallow d crss section ala Chet Stevenson, say 66" tip to tip or less, most bowyers go with a 4" handle and either 1 1/2" or 2" fades. A 1 1/2" fade will be steeper and a 2" fade will be more gradual in the dips (where the handle dips to the belly of the limb).The shorter fades would be required on the shorter bow where you have less wood to woork with for your bending limbs.
There is always someone that knows more than you, and someone that knows less than you, so you can always learn and you can always teach

Offline Jason Lester

  • Trad Bowhunter
  • **
  • Posts: 651
Re: Just got my yew staves, now what?? Pictures included.
« Reply #21 on: August 13, 2007, 08:36:00 AM »
Mickeys point is that with shorter fades it is easier on the limbs because there is more limb to be working. When you get to the tillering stage sometimes the extra length on the limbs makes a difference. At 72" it will be fine for the 4 inch fades but if you miss your weight and start shortening it to make up weight things could get a bit trickier when it comes to tillering.

When it comes down to it you can basicaly try whatever you want to try to get your desired bow at the end. Some things work others don't. Everyone finds their own ways as they build a few. But thats the fun of it realy.

I haven't worked yew so I'm not sure what it likes. I've built a few Osage selfbows and others here have built just about everything (Mickey and other LOL) I rely on them alot if I have a question.  

Have fun and keep us updated with these pics. We love seeing then.
Jason Lester

Offline Shaun

  • TG HALL OF FAME
  • Trad Bowhunter
  • *****
  • Posts: 3619
Re: Just got my yew staves, now what?? Pictures included.
« Reply #22 on: August 13, 2007, 09:16:00 AM »
Cool project Rascal, keep us posted. I second the yew dust precautions. Osage dust makes my throat sore but yew dust makes me feel real sick. Be careful when sanding or making fine dust. Use cutting tools like drawknife, scrapers, etc. as much as possible and use rasps and sandpaper with caution for dust. Especially post pictures when you start to tiller. Lots of good advice will come your way.

Offline rascal

  • Trad Bowhunter
  • **
  • Posts: 402
Re: Just got my yew staves, now what?? Pictures included.
« Reply #23 on: August 13, 2007, 12:24:00 PM »
Hey Ferret, if you get a chance to put some dimensions down for that flat bow design  I would be interested in looking them over.  Im not sold on any one design at this point and I think the staves would lend themselves to virtually any bow design.  Is there a benefit to a flatbow versus the ALB when using Yew?  It was my impression that Osage made the better flat bows and I want to tackle Osage in the future.  I basically picked this design because of the resource I had to go from, mainly Glenn St. Charles book.  Who am I to argue with the likes of Glenn.  Ill probably follow Al Herrin's advice on Osage since Ive read his work but again thats about the extent of my resources right now.  I tried not to get too many ideas going at one time, just wanted to focus on one thing and see how things turned out.
 
Im not brave enough to just go my own direction at this point and these two staves wont be the last that feel the bite of my tools.  I dont plan on doing cookie cutter versions on every piece of wood I tackle so any ideas you pass along wont be wasted I have a note book with all kinds of stuff written down already.
Hunt fair, hunt hard, no regrets.

Offline Jason Lester

  • Trad Bowhunter
  • **
  • Posts: 651
Re: Just got my yew staves, now what?? Pictures included.
« Reply #24 on: August 13, 2007, 12:32:00 PM »
Thats the way to do it rascal. This stuff is adictive. I have a few staves just waiting for me to have the time to work on them. Each ends up much different than the ones before it.
Jason Lester

Offline NorthShoreLB

  • Trad Bowhunter
  • **
  • Posts: 634
Re: Just got my yew staves, now what?? Pictures included.
« Reply #25 on: August 13, 2007, 01:56:00 PM »
I second what that guy said earlyer, ...I would go buy a couple of 5 $$ boards and get used to the tillering process and the use of the tools before taking on a precious YEW stave.
"Almost none knows the keen sense of satisfaction which comes from taking game with their own homemade weapons"

-JAY MASSEY-

Offline rascal

  • Trad Bowhunter
  • **
  • Posts: 402
Re: Just got my yew staves, now what?? Pictures included.
« Reply #26 on: August 13, 2007, 04:32:00 PM »
Well I think its time I made a decent bench for working these staves, got some oak 1 1/4" thick and lots of heavy treated timbers.  Probably just mount the 2 home made wood vises I fabricated (helps when you are a millwright by trade) onto this so I can clamp it at both ends if needed. Jaws are wood padded so I wont be marring the stave when I clamp it.  Should make working on this a little easier than just single vise on an old greasy bench.  Ill have to improvise some lighting no doubt.
Hunt fair, hunt hard, no regrets.

Offline rascal

  • Trad Bowhunter
  • **
  • Posts: 402
Re: Just got my yew staves, now what?? Pictures included.
« Reply #27 on: August 13, 2007, 11:53:00 PM »
OK managed to get a lot done today after putting a decent work bench together.  I stuck with my original layout, perhaps a bit wider after the fade from handle but the rest is the same. Of course its still just rough shaped so all of this is subject to change as called for by the process. Anyhow here are some pictures.

Heres the bench with dual vises. Actually it has a clamp on vise on the end as well.
 

One more shot of the layout, still doesnt show perfectly.
 

I used a hand power plane to take off the bulk of the wood, much easier than anything else I had access to (note to self bandsaw = good).  You can see the plane in the bottom of the picture if you look.
 

Im still quite worried about the follow thats built into this bow and plan to attempt to clamp it up and take that out if I can.  By my estimate its 13/16" high at center when resting on the belly wood.
 
Hunt fair, hunt hard, no regrets.

Offline rascal

  • Trad Bowhunter
  • **
  • Posts: 402
Re: Just got my yew staves, now what?? Pictures included.
« Reply #28 on: August 14, 2007, 12:03:00 AM »
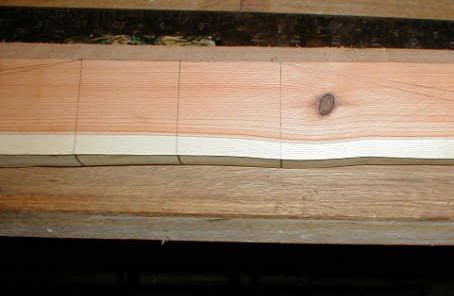
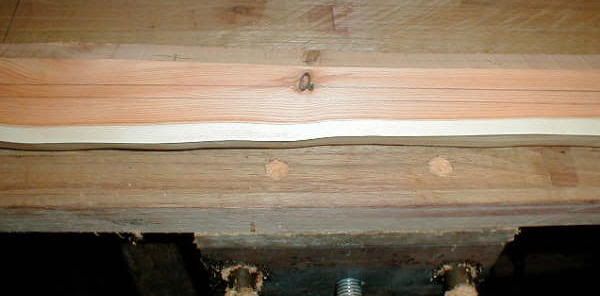
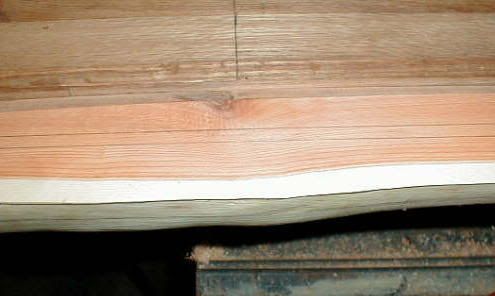
Here is a series of pics after using a 14" farriers file on the stave to reduce it to the lines and close to final shape (minus any work on the belly).

I have a couple of knots that are bothering me on the sides of this stave, this one is on the fade from the handle. I think its just gonna be a beauty mark, just a tad thicker in this area for safety.
 

This one is close on the limb but I think Ill end up cutting it out by the time is done. (notice I have 2 sets of layout lines right now?  Thats cause Im a chicken and dont wanna get too close to final dimension too quick.)
 

Here is a knot on the other side that may or may not be an issue it doesnt really touch the layout line but those are just rough lines for my benefit right now so who knows.
 

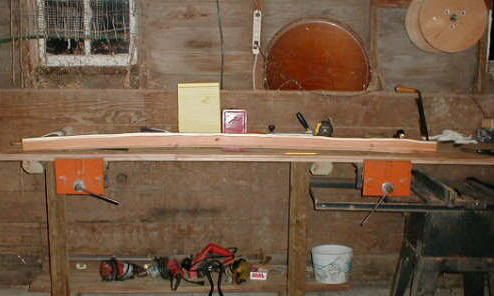
The follow didnt improve much with working the stave.  I can pretty well flatten the stave out with the 2 vises without even working the belly of the bow not sure if I should just lock it up like that and leave it for a week and see if that has an affect or try to make a form to put some reflex into it (likely only managing to get it straight).
 

Anyhow thats whats happening right now with my project it will slow down after I take a bit off the belly Im sure.  I havent done anything about getting the backing for it yet so thats quickly becoming a priority.
Hunt fair, hunt hard, no regrets.

Offline rascal

  • Trad Bowhunter
  • **
  • Posts: 402
Re: Just got my yew staves, now what?? Pictures included.
« Reply #29 on: August 14, 2007, 12:51:00 AM »
Hey quick question, earlier in the post goat skin rawhide was suggested for backing the bow and I saw that it was reasonable enough at tandy Also if Im gonna back this bow then Im inclined to get some snake skins to cover the limbs with, now were do I get them?  Ive read Ferrets page on applying the the snakeskins, is the process the same for backing with rawhide?
Hunt fair, hunt hard, no regrets.

Offline the Ferret

  • Trad Bowhunter
  • **
  • Posts: 3232
Re: Just got my yew staves, now what?? Pictures included.
« Reply #30 on: August 14, 2007, 07:16:00 AM »
rascasl..one thing I notice is your belly lines do not follow the back. They must follow the back on each side. If the wood on the back humps the wood on the belly must follow the same contour

Check out my pictorial below, page 7 about 1/2 way down the page to see how this is done. Don't do this and you get thick and thin spots int he limb  and possibly a bow ruining hinge

 http://tradgang.com/cgi-bin/ultimatebb.cgi?ubb=get_topic;f=2;t=000046;p=7

Your knots don't look like they will cause any significant problems to me.
There is always someone that knows more than you, and someone that knows less than you, so you can always learn and you can always teach

Offline Eric Garza

  • Trad Bowhunter
  • **
  • Posts: 20
Re: Just got my yew staves, now what?? Pictures included.
« Reply #31 on: August 14, 2007, 08:40:00 AM »
If you're worried about the backset, the easiest thing to do is to rough the bow out and then bend it with heat to reflex it.  When you try to bend the wood, I'd recommend drawing the limbs down enough so you can bend them about 5 inches.  You can make a fancy steam deal, but the last couple bows I had to bend I just heated the stave over a burner on my electric stove.  Worked fine, as long as you GO SLOW.  

Also, I must admit that reading of your decision to use saws has me quite worried.  Nothing ruins a first bow faster than a saw blade.  I understand that you want to see results fast, but if you want this first bow to be usable you MUST SLOW DOWN!  And I'd also recommend not worrying so much about having all lines be straight.  Wood grain usually isn't straight, so if it is your intent to follow the grain then you need to get used to incorporating subtle curves into the design of your bows.  It doesn't have to end up looking like it was made by a machine !-)

And I stick with my original recommendation to set the yews aside and find a couple cheaper pieces of wood to start with.  This way if you end up ruining them with a bandsaw it won't break your heart!

Again, just my two cents...

-Eric
-Eric Garza
_ _ _ _ _ _ _ _
Only when the last tree has been cut, the last river poisoned, and the last meadow paved will Man realize that he cannot eat money...

Offline NorthShoreLB

  • Trad Bowhunter
  • **
  • Posts: 634
Re: Just got my yew staves, now what?? Pictures included.
« Reply #32 on: August 14, 2007, 01:00:00 PM »
Spot on Eric !   :bigsmyl:    :bigsmyl:
"Almost none knows the keen sense of satisfaction which comes from taking game with their own homemade weapons"

-JAY MASSEY-

Offline rascal

  • Trad Bowhunter
  • **
  • Posts: 402
Re: Just got my yew staves, now what?? Pictures included.
« Reply #33 on: August 14, 2007, 02:11:00 PM »
Ferret, just read that link excellent information there.  You have a knack for making things very clear that will help me a lot.

Eric thanks for the advice on reflexing, you think this will take 5 inches of reflex to take that set out of the limbs?    I actually used a power plane to take the bulk of the wood off not a saw.  It takes 1/64" per stroke and never tears the wood like a block plane.  I worked it down to within about 3/16" from my lines and then switched to the file Im still over 1/8" to 1/16" from finish dimensions depending on where you measure.

As far as the lines call it a bad habit its just something for me to guage by not a final destination.  All the work so far has been to get this down to a rough shape of a bow it still takes 2 wood vises just to bend it a little.   So far Ive only used this one power tool, granted it saved me a lot of time but the point was the control it gave me.  I started with a block plane and it was tearing the wood, I tried the draw knife but again I was taking more than I cared for.  Basically after using this I had a piece of Yew that was about 1 3/4" wide end to end.  

I still have a bit of wood to work with for width its cautiously close at this point.  My plan was to do about the same to the belly.  If I get the basic handle shape and then trim the belly of the limbs down to something reasonable close to the lines maybe 1 1/4 inch thick I shouldnt be in any danger of going too far should I?  Right now I probably have 2 1/2" of wood from back to belly and that runs tip to tip.  I wouldnt think I am in any danger of messing this up at this point.  Ill slow this down and take another hard look at what Ive got so far but it seems I need to at least get some of the wood off the belly before its even roughed out.
Hunt fair, hunt hard, no regrets.

Offline Shaun

  • TG HALL OF FAME
  • Trad Bowhunter
  • *****
  • Posts: 3619
Re: Just got my yew staves, now what?? Pictures included.
« Reply #34 on: August 14, 2007, 03:32:00 PM »
Thanks for keeping us posted. You can straighten or backset the bow with a heat gun and a caul (form to clamp to) as on Ferrets page or other threads. This is easiest to do when you are  close to rough demensions but not yet bending past floor tiller. I like your confidance working with the yew stave first. What's the worst that can happen? A spectacular explosion of wood pieces and a couple "that'll leave a mark" dings - no big deal.

Offline rascal

  • Trad Bowhunter
  • **
  • Posts: 402
Re: Just got my yew staves, now what?? Pictures included.
« Reply #35 on: August 14, 2007, 04:10:00 PM »
LOL well thats one way to look at it Shaun, faint heart never won fair maiden eh?

Anyhow I applied what I gathered from Ferret about following the contour of the back in a somewhat unique way.  I first used blue painters tape to cover my original (and what I deemed as cautious) rough layout lines and then plotted a 3/4" line following the back.  Then with an exacto knife I cut the tape on the line and removed the excess.  As it turns out the closest I would have gotten to my original line was 3/16" and that was near the tips.  

Basically I figure that I should be at least 1/8" - 1/16" over width at any give point on the bow and thats roughing it out to the largest dimensions Ive found on an ALB.  Im not cocky  but I am pretty confident that Ive left plenty of meat on the stave to work with.  I guess time will tell, but hey you gotta make some chips if you plan to end up with a bow right?
Hunt fair, hunt hard, no regrets.

Offline Shaun

  • TG HALL OF FAME
  • Trad Bowhunter
  • *****
  • Posts: 3619
Re: Just got my yew staves, now what?? Pictures included.
« Reply #36 on: August 14, 2007, 05:02:00 PM »
I use a pencil and my fingers to scribe the line like using a compass to mark a thickness from the back that follows the back. This ends up close to following the grain of the wood. As a millwright, you should have the skills to do some fine woodworking. I spent many years as a union carpenter and did some millwright work. Mostly working with metal machines instead of the wooden shafts and gears that turned in old mills - where the term originated. Have fun and post lots of pictures.

Offline rascal

  • Trad Bowhunter
  • **
  • Posts: 402
Re: Just got my yew staves, now what?? Pictures included.
« Reply #37 on: August 14, 2007, 09:38:00 PM »
Shaun Ill make sure to post lots of pictures for sure.  In fact Im due for some more now that Ive taken the back down to approximate dimensions this evening.  I took the handle down to about 2 inches in depth and the limbs down to about 1 inch in depth.  The stave now is starting to resemble a bow at his point.  I can just start to bend the limbs now when I brace it against the floor.  After getting it close with the draw knife I used a glass scraper to feather the grain down the limbs and work around a couple of knots.  Made sure to leave plenty of wood in the one knot that was in a flexible part of the limb.  Long slow work, all that scraping, but Im pretty happy with the results so far.


Ive clamped it to the bench for the evening in hopes of taking a bit of that follow out before I try to reflex it on a caul.  Still trying to figure out what I have handy to heat the stave while clamping it down to the caul.  Oh well thats a problem for tomorrow.

Ill take a few more pictures tomorrow after I pull the clamps off it and before I try to make a caul and do the reflex with heat.  Hmmm I guess I should have asked Eric some details on what he meant about reflexing this 5 inches.  Does that mean making the caul 5 inches lower on the ends than in the center?  Sure seems like a lot to me if my goal is just to end up with a bow that is straight or just a slight bit of follow.
Hunt fair, hunt hard, no regrets.

Offline rascal

  • Trad Bowhunter
  • **
  • Posts: 402
Re: Just got my yew staves, now what?? Pictures included.
« Reply #38 on: August 16, 2007, 12:33:00 AM »
Well I still havent managed the time to get anymore pictures today.  I made a caul to reflex the roughed out stave, copied what I saw on Ferret's site for that.  Also made a tillering tree since Im pretty sure Ill need to take a bit more off of the stave before I attempt to reflex it.

How far along in the tillering process should I be before I reflex the bow anyhow.  Right now Im just able to start bending the limbs while bracing them against the floor and even then I feel Im using quite a bit of force.
Hunt fair, hunt hard, no regrets.

Offline the Ferret

  • Trad Bowhunter
  • **
  • Posts: 3232
Re: Just got my yew staves, now what?? Pictures included.
« Reply #39 on: August 16, 2007, 07:46:00 AM »
Your caul will need to be flat for the middle 8"(non bending part of the bow or maybe in your case 12") and bend gradually to the tips from there. I make mine lower on the tips by about 2 3/4" over a 68" spread. You will lose some of that when you pull it off the caul and some more when tillering, but my goal is to come out with it even to less than one inch of reflex in the end. You will want your limbs less than 3/4" thick before you put it on the caul. It should bend pretty well at floor tiller. If you have another bow feel what that feels like at floor tiller to give you an idea of how much pressure it takes to bend that kind of weight. You won't want it that easy of course cause you still have to remeove wood to get the limbs to bend evenly, but it will give you and idea.

5" of reflex is just nuts. Hard to tiller , hard to string, and touchy to shoot.(IMO)
There is always someone that knows more than you, and someone that knows less than you, so you can always learn and you can always teach

Users currently browsing this topic:

0 Members and 1 Guest are viewing this topic.
 

Contact Us | Trad Gang.com © | User Agreement

Copyright 2003 thru 2024 ~ Trad Gang.com ©