3Rivers Archery


The Trad Gang Digital Market


Contribute to Trad Gang and Access the Classifieds!

Become a Trad Gang Sponsor!

Traditional Archery for Bowhunters


LEFT HAND BOWS CLASSIFIEDS TRAD GANG CLASSIFIEDS ACCESS RIGHT HAND BOWS CLASSIFIEDS


Author Topic: Side quiver build along  (Read 371 times)

Offline madness522

  • TGMM Member
  • Trad Bowhunter
  • ***
  • Posts: 1743
Side quiver build along
« on: August 14, 2007, 09:17:00 PM »
Here is my first attempt at a build along so please forgive anything I might have missed or don't explain in enough detail.  I have been on a quest for the perfect hunting quiver for most of the summer.  I have tried a lot of different quivers including bow quivers which didn't suit me either.  I have been making back quivers and other leather items and thought I could make a side quiver.  My apologies to Mr. Catts for the idea.  I modeled mine after his with a minor change here and there so I can't take credit for the design.

I started by using graph paper to draw to scale the quiver that I envisoned would finally make me happy. Sorry I didn't take a picture of this but you get the idea.  Next I pulled out a roll of meat packing paper and sketched out the design full size and cut it out.  No pic of this yet. I hadn't planned on doing a build along at this point.  The next thing is to trace the paper cut out onto the leather and cut it out.  This is about the time I thought I could take pics and do a build along.


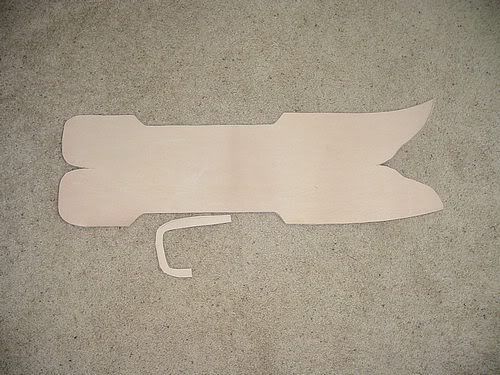
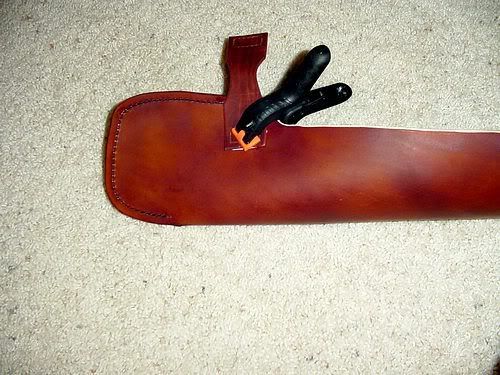
I also cut out a piece to be sewed into the business end I think this is called a welt. (This is the little U shaped piece at the bottom of the pic)  I ended up using two pieces of this material in the final design.  I thought after folding the leather together and clamping it I would have more room to insert a piece of foam to hold broad heads.

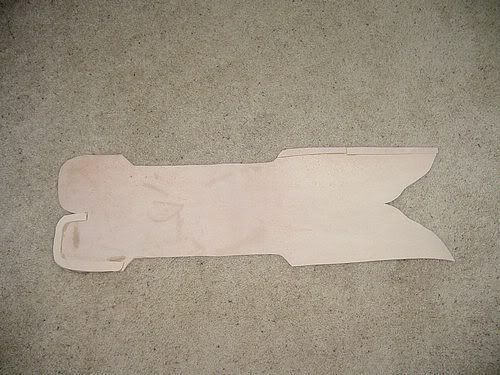
Here are the welts glued into place.


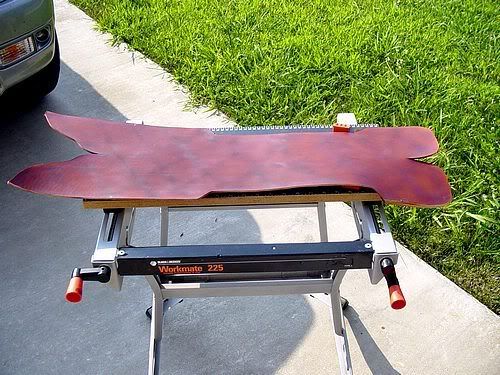
At this point I thought it would be a good idea to stain the leather.  For this I used a kit I bought at Wally world that is used to paint model cars and planes. I don't have a pic of the kit but it has a glass jar to hold the stain and a hand operated nozzle that blows air from a can of propellent.  This actually worked really well (after I figured out how to use it).  

A pic so far.


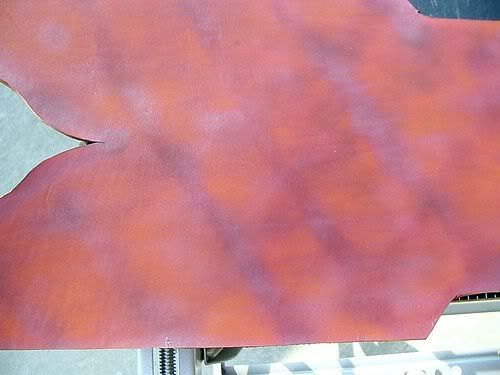
While I was learning to use the sprayer kit I kinda got a little heavy on the stain in places and got the bright idea to add some stragetically placed camo with the stain.

If you look closely you can see the striping.  I thought this would maybe help break up the outline a little.


Since my wife was out of town over the weekend I was making this and it was scorching hot in the garage even at 9:00 in the evening I had another bright idea. Guys here is the disclaimer....don't do this if there is even a remote chance your wife will find out...
I brought my portable work bench into the living room and set my portable drill press on it.  I then was nice and cool and ready to drill the holes for the stitching while watching the Braves game.


There will little pieces of leather all over the floor so guys if you do decide this is a good idea make sure you know how to actually use a vaccum cleaner....

After the holes are marked I used a little tiny drill bit just larger than my needles and drilled out the holes.  I used wax coated heavy duty thread (more like small cord) for the stitching.  Sorry didn't think to take a pic of this.

The next step is to attach a D ring for the shoulder strap.  I used glue to afix this piece to the quiver before I started punching holes and stitching.  I have seen my other projects and it is really easy to make a complete mess if your holes in what you are attaching and the holes in what you are attaching too are off line.


The strap that holds the D ring is sewed onto both sides.  This is kinda my first design flaw.  There isn't a lot of room in there to find and fit the needle into the hole for the return stroke.  

Now on to the rear flap glue up and stitching. I used a fair amount of glue and clamps to get this part lined up right.  I didn't want the quiver to take on a bend in the wrong spot. Matter of fact I didn't want it to bend at all.  Take your time and get this right you'll thank yourself in the end.


The holes for stitching the rear flap are marked and drilled just like the front so no pic of this either.

The second strap for another D ring is cut, stained, glued and stitched into place just behind the opening to get your arrows out.  Don't do this!!  This is my second design flaw and first major one.  The quiver will not hang right with the rear attachment point so close to the center line of the quiver.  The quiver will want to hang horizontal and at times point end up and dump your arrows on the floor.  This was a hard lesson learned and a lot of time wasted making and attaching this piece.  Sorry I was just a little unhappy with myself here so taking a pic was the last thing on my mind.  I almost lost my religion....

Instead of attaching the second D ring to the quiver just past the opening attach it to the rear.  It will hang nicely and stay more or less where you put it.

Continued on next post...
Barry Clodfelter
TGMM Family of the Bow.

Offline madness522

  • TGMM Member
  • Trad Bowhunter
  • ***
  • Posts: 1743
Re: Side quiver build along
« Reply #1 on: August 14, 2007, 09:19:00 PM »
Now that I have 3 D rings I wondered how to make a strap that I would be able to use either the front or middle D ring to wear this quiver.  So I decided to stitch the strap to the rear D ring and use a Sam Browne button and cut a hole in the strap to hold it at the desired height.  This way I can easily take the strap off the front D ring and hook it up to the middle D ring and wear the quiver like a back quiver.  I don't have pics of this either I ran out of day light taking the quiver for a test run this evening.

Here are a couple pics of the finished quiver.


This one was a learning curve and there are several things I will change on the next one.  The first thing I will do is not stitch the D ring attachments to the sides but rather make them part of the welt.  This will be easier on your fingers to do the stitching and you won't run the risk of loosing your religion when it gets so tight in there trying to find the hole to push the needle back out of. The next thing I will change is to make the quiver just a little deeper.  I could carry 5 arrows with field tips really nicely but there will only be room for 3 broadheads and a judo maybe.  And I will make the arrow retrieval opening a little longer.

I hope you enjoyed reading this build along and I would ge glad to try to answer any questions your might have.
Barry Clodfelter
TGMM Family of the Bow.

Offline Ian johnson

  • Trad Bowhunter
  • **
  • Posts: 1608
Re: Side quiver build along
« Reply #2 on: August 14, 2007, 09:33:00 PM »
cool buildalong!, awsome quiver, if you dont like it, you can always send it to me!
ARTAC member
53@29 sheepeater shaman recurve
52@29 66 bear grizzly
51@29 dryad orion td longbow

Offline pintail_drake2004

  • Trad Bowhunter
  • **
  • Posts: 535
Re: Side quiver build along
« Reply #3 on: August 14, 2007, 09:37:00 PM »
nice

Offline dannyvp

  • Trad Bowhunter
  • **
  • Posts: 132
Re: Side quiver build along
« Reply #4 on: August 15, 2007, 10:15:00 AM »
very cool.
"I make dirt look good"

Offline Coon007

  • Trad Bowhunter
  • **
  • Posts: 91
Re: Side quiver build along
« Reply #5 on: August 15, 2007, 10:23:00 AM »
great quiver very nice
It's only funny until someone get's HURT, Then it's hilarious

Offline Izzy

  • Trad Bowhunter
  • **
  • Posts: 7487
Re: Side quiver build along
« Reply #6 on: August 15, 2007, 10:59:00 AM »
A really fine looking quiver.I like that camo.

Offline OzarkRamblr

  • TGMM Member
  • Trad Bowhunter
  • ***
  • Posts: 446
Re: Side quiver build along
« Reply #7 on: August 15, 2007, 11:06:00 AM »
Good job, I like it. I've been thinking of doing one myself.
"A friend of mine said that I'm lucky, I told him luck has nothing to do with the life I chose, we choose the life we have and don't have, so choose wisely"...Kingwouldbe

Words to live by.

TGMM Family of the Bow

Offline formerbutcher

  • Trad Bowhunter
  • **
  • Posts: 398
Re: Side quiver build along
« Reply #8 on: August 15, 2007, 01:36:00 PM »
Looks real nice !!
It's a great day to be alive !!

Offline Blackhawk

  • Trad Bowhunter
  • **
  • Posts: 3863
Re: Side quiver build along
« Reply #9 on: August 15, 2007, 01:40:00 PM »
Very nice...  :thumbsup:  ...and Mr. Catts is getting some competition.  I like it.  :clapper:
Lon Scott

Offline Frank V

  • Trad Bowhunter
  • **
  • Posts: 1183
Re: Side quiver build along
« Reply #10 on: August 15, 2007, 04:26:00 PM »
Barry thanks for the nice pictures. Your quiver looks great. Thanks too for the reminder about the clean up. Frank
U.S.A. "Ride For The Brand Or Leave."

Offline Over&Under

  • TG HALL OF FAME
  • Trad Bowhunter
  • *****
  • Posts: 5108
Re: Side quiver build along
« Reply #11 on: August 15, 2007, 06:10:00 PM »
Nice work, good idea gluing the piecies together before stitching.
“Elk (add hogs to the list) are not hard to hit....they're just easy to miss"          :)
TGMM

Offline madness522

  • TGMM Member
  • Trad Bowhunter
  • ***
  • Posts: 1743
Re: Side quiver build along
« Reply #12 on: August 15, 2007, 06:38:00 PM »
Thanks guys! but Mr. Catts is still the "man" and makes a lot nicer quiver than I did. But I did make it myself and if I am blessed with a deer this year while carrying it then it will have some mojo and I will have to find a way to add part of the deer to it.
Barry Clodfelter
TGMM Family of the Bow.

Offline pintail_drake2004

  • Trad Bowhunter
  • **
  • Posts: 535
Re: Side quiver build along
« Reply #13 on: August 15, 2007, 11:08:00 PM »
looks good.!

Offline redant 60/65

  • Trad Bowhunter
  • **
  • Posts: 866
Re: Side quiver build along
« Reply #14 on: August 15, 2007, 11:15:00 PM »
Great looking quiver.  :thumbsup:
Larry

Offline RRock

  • Trad Bowhunter
  • **
  • Posts: 347
Re: Side quiver build along
« Reply #15 on: August 15, 2007, 11:23:00 PM »
Nice job, I can see an after deer law project coming up. Always wanted to try a quiver like that.  Thanks.

Offline vermonster13

  • TGMM Member
  • Trad Bowhunter
  • ***
  • Posts: 14572
Re: Side quiver build along
« Reply #16 on: August 15, 2007, 11:24:00 PM »
Very nicely done.
TGMM Family of the Bow
For hunting to have a future, we must invest ourselves in future hunters.

Offline **DONOTDELETE**

  • Trad Bowhunter
  • **
  • Posts: 10441
Re: Side quiver build along
« Reply #17 on: August 16, 2007, 01:01:00 AM »
Very nice looking side quiver....would you be up for some horse trading? or possibly i could commision you to build one for me like that?

That is some nice work!
 
Please pm me if you are interested....


 Kirk

Users currently browsing this topic:

0 Members and 2 Guests are viewing this topic.
 

Contact Us | Trad Gang.com © | User Agreement

Copyright 2003 thru 2024 ~ Trad Gang.com ©