SHOOTING THE BOW
 Figure 1
In 1545 Roger Ascham, the grand-daddy of archery, wrote a book called "Toxopbilus", "The Schole of Shootinge Conteyned in tvvo Bookes". In it he states that "fayre shootynge came of these thynges: Of standynge, nockynge, drawynge, howldynge and lowsynge". Every writer since has reiterated these essential five points:-Standing, Nocking, Drawing, Holding and Loosing.
STANDING. Stand naturally and squarely on your two feet; don't try to toe in or out, and at right angles to your mark - your left shoulder toward the target, your bow in your left hand. The arrow is held in your right hand at the nock end, just above the feathers, and between your thumb and first finger. Figure 1.
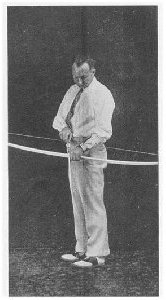 Figure 2
NOCKING. Which means placing the arrow on the string. Pick up a shaft by the notch, carry it over the string while your bow is in a horizontal position so that it lays on the knuclde of the first finger of the left band. If you look down an arrow, you will see that the three feathers are placed so there is a free space between two of them. This permits the arrow to leave the bow without any feather hitting. The feather that is colored differently than the other two is the cock feather, and it is at right angles to the nock. When the arrow is properly nocked, it is also at right angles to the string. Arrows are shot from the left side of the bow (right banded archers), and they must be at right angles to the bow and string. They must not be tilted either up or down. Figure 2.
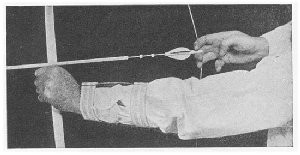 Figure 3
The bowstring is drawn or pulled with the first three fingers of the right hand. These three fingers are hooked around the string. The arrow goes between the first and second fingers. The bowstring cuts across the middles of the first phalanges or palm side of the tips of these fingers. With the string in place, as shown on Figure 3, you are ready to draw your bow.
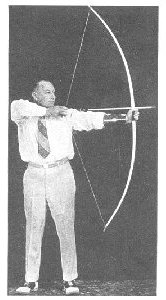 Figure 4
DRAWING. You are standing at right angles to the target, and you are looking at it down your left shoulder and left arm. The draw is accomplished by a simultaneous movement of both arms-the left pushing out and the right pulling toward you and across the upper chest or should ers. You extend your left or bow arm and pull with the three shooting fingers hooked around the string. It is absolutely essential that you always draw the arrow to the head no matter what distance you are shooting, and that you draw the arrow so your right hand always comes to rest under your jaw or on the jaw or cheek, whichever suits your nature best. Figure 4.
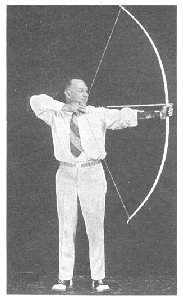 Figure 5
HOLDING. After you have completed the draw, hold this position for a few seconds, during which time you get your aim and release the arrow, called "loosing". A common failing with beginners is to have the arrow fall away from the left side of the bow. Only practice in drawing will overcome this fault. Figure 5.
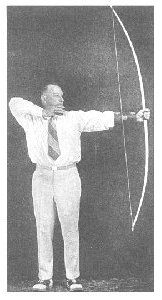 Figure 6
LOOSING. Means what it says-you loose or release the arrow and the bowstring propels it. Quickly straighten the three fingers hooked or curled around the bow string. You must learn to snap these three fingers straight at the same time, so that the release is true and smooth. Figure 6.
HOW TO AIM
The first time you shoot a bow and arrow, the whole business feels awkward. Your shooting glove or the "tabs" feel thick and clumsy, the arrow may keep falling away from the left side of the bow, and your first shots will seem futile. Persist in your efforts and you will soon be able to shoot an arrow in the general direction of your mark. To shoot with a fair degree of accuracy means practice and lots of it. Sometimes a novice will pick up a bow and at once shoot with some precision-it is instinct with some others must follow the slower road of practice.
INSTINCTIVE SHOOTING. We don't know just exactly how we aim a stone or a baseball when we throw it. Some coordination of muscle and mind directs the missile and with practice we become accurate throwers. Just so with the natural or instinctive method of shooting a bow. This "snap-shooting" is used in roving, hunting and by some target shots. The arrow is usually drawn to the cheek or jaw, and the pull and release is quick and snappy. The writer has a quiver full of assorted arrows, no two of which are alike, but, because the peculiarities of each arrow are known, excellent snap shooting can be done with them. The writer has always admired a good snap shooter or an archer who is an instinctive shot. It is real archery, and if a fellow can go out and hit rabbits, stumps or any other mark at from thirty to fifty yards and do it regularly, then he is an archer of the true breed.
POINT OF AIM SHOOTING. This is the only method to use if you expect to become a proficient target shot. All the top notchers either use "Point of Aim" or a sight of some sort. Study the Plate "Aiming by Point of Aim." What you do is to find a spot on the ground (for short ranges-say 60 yards and under) or a spot in a tree (for long ranges-say 80 to 100 yards) on which you rest the pile or tip of your arrow. If you always rest the tip of your arrow on this spot, your arrows, if they are all the same in length and flying qualities, will fly and land in the same place. Suppose you want to find your "Point of Aim" at 40 yards. With a 6'0" bow 45 pounds drawing weight, it may be halfway between you and the target. Go back to where you first stood. Draw the arrow under your chin, sight down diagonally across the head. Follow this imaginary line to the ground. It may rest on a tuft of grass or bunch of clover. Place a point of aim, marker, a wad of paper or a stone at this spot. Draw your arrow under your chin, rest the tip of your arrow on the "point of aim" which you just marked with some object, and release your shot. If your arrow flies over the target, move the marker in closer. If it falls under the target, advance your marker. You also can control left and right direction by moving the marker either way. An important point to remember: Keep your eye on the "Point of Aim". You see the target only vaguely or not at all. Experiment until you get the idea. The Plate shows the method quite clearly. Once you have mastered "Point of Aim Shooting", your target scores will go up by leaps and bounds, you will begin to find fault with your arrows, and demand better and better matching until you have driven honest fletchers crazy.
SHOOTING WITH SIGHTS. During the past ten years, a great variety of sights and sighting devices have been developed. There are so many different kinds that it would be useless to attempt to describe them all. Some evidently are excellent, for very high target scores have been made with them.
Sights generally fall into two classes; one includes those where the point of aim would be below the target, as in short ranges, and the other where it would be higher, as in longer distances. From the diagram entitled "Aiming by point of aim for short Ranges", imagine the bow held in exactly the same position, where the same arrow flight would hit the bullseye, and imagine a point on the upper limb of the bow, above the arrow plate which would be in the line of sight, if the archer were looking at the bullseye. This point would be about two inches up the handle from the arrow plate. Anything might be used as a sighting point, such as a match or a wire, or a brad-headed nail. Some archers actually paint lines on the belly of the bow, their position being determined by experimenting and practice, to help them in odd range shooting where they judge the distance from the mark and look at it across the line corresponding to the distance they think they are from it.
There are many mechanisms for sighting purposes, of which the main requirements are ease of moving and stability of position, once set. Any cross bar with a small knob on the end will serve the purpose while an elastic band makes a good position fixing member.
We make a very simple sight which will do anything that more complicated ones will do.

PREFACE
| Archery |
| Target Shooting |
| Roving |
| Hunting |
| Archery Games |
THE FUNDAMENTALS OF ARCHERY
| Archery Tackle |
| Stringing or Bracing the Bow |
| Shooting the Bow |
MAKING ARCHERY TACKLE AS A HOBBY
| Archery Camp Program |
| Making Bowstrings |
| Bow Woods and Bow Staves |
| Arrow Woods and Arrows |
| How to Take Care of Your Bows and Arrows |
| Common Archery Terms |
| Title Page |